Sunday, 23 May 2010

The Spring Clean and the Wine

Every now and again I'm tempted to have a tidy up: I know that I shouldn't, but I just can't seem to help it.

To help you keep your system at peak running efficiency, Karmic has a Computer Janitor utility (System → Administration → Computer Janitor) which searches your computer and finds all those orphan programs and shared libraries that it thinks that you no longer need. If, like me, you are a trusting soul, the temptation is to simply click the Do Selected Tasks option and think no more about it: however, I urge caution!

This is the second time that I've used the utility only to find subsequently that I couldn't use Wine. I only use Wine to run a single program, Memory-Map and to be honest, it doesn't run particularly well: nonetheless, I have a great wide-screen monitor on my Ubuntu box and it makes for superb viewing of 1:25,000 scale maps. Anyway, long story short: it seemed easier to remove Wine completely and start from scratch than it did to try and repair the damage. I went to the command line and typed:

sudo apt-get remove wine

Typed in my password and waited for the system to do its thing. After removing Wine, I noticed that there was still an entry for the program in the Applications menu although nothing would work when I clicked on the shortcut. It turns out that the standard remove command doesn't remove the Windows applications, you have to remove the ~/wine directory manually.

Open a terminal and type:

rm -rf $HOME/.wine

Once the directory is gone, you can then remove the menu entries and desktop items:

rm -f $HOME/.config/menus/applications-merged/wine*
rm -rf $HOME/.local/share/applications/wine
rm -f $HOME/.local/share/desktop-directories/wine*
rm -f $HOME/.local/share/icons/????_*.xpm


Source: Wine HQ FAQ 5.1

Reinstalling Wine from the Ubuntu software Centre is easy enough and replacing the map viewer from Memory-Map didn't trouble me either but I will think more carefully about spring cleaning in the future!

Friday, 21 May 2010

More Codec Issues

It's funny what you forget when you rebuild your PC. This week I decided to start watching the second series of 24 on DVD. I slipped the first disk into the drive and Movie Player just refused to play!

When I rebuilt the PC, I forgot to install the libdvdcss2 package that allows Ubuntu to play restricted content. Easy enough to fix, open a terminal and type:

sudo apt-get install libdvdread4

You may also need the dvdspu gstreamer plugin:

sudo apt-get install totem-gstreamer


With the plugins loaded, Movie Player played the first episode but wouldn't give me access to the menu nor allow me to jog to the next chapter. I switched to xine and was good to go.

Thursday, 20 May 2010

Karmic Cash

It occurred to me that my output to date might suggest that I am anti-Windows, but nothing could be further from the truth. In fact, I'm quite a fan of Microsoft (or, at least I was) and believe that without Bill Gates computing would remain the purview of corporations and academia.

That said, Microsoft (and the other commercial software vendors) also has its flaws not least the constant and unnecessary product upgrades. My foray into open source has taught me that I can be just as productive as I was in my Windows days but save a small fortune into the bargain. Take a fairly average (non-corporate) project manager's software collection:


WindowsUbuntu
Windows 7 (Home Prem/Full)£149.99Ubuntu 9.10 LTS £0.00
Outlook£99.99Thunderbird£0.00
Microsoft Office (Std '07)£349.99OpenOffice £0.00
Microsoft Project (Std '07)£519.99OpenProj £0.00
Microsoft Visio (Std '07)£229.99OpenOffice Drawing£0.00
Internet Explorer£0.00Thunderbird £0.00
Windows Media Player£0.00RhythmBox £0.00
Microsoft Autoroute£49.99OpenStreetMap £0.00
Anti-virus softwarec.£50.00ClamTK Virus Scanner£0.00


That's a lot of cash!

There are a few caveats:

I know that the OS normally comes bundled with a new PC, but if you want to upgrade it will still cost you money and you're tied to the latest technology. Ubuntu on the other hand runs quite contentedly on a pretty old PC: there are exceptions, as my recent experience with Lucid Lynx demonstrates, but you can run an excellent (and safe) system on a recycled base (saving money & the planet).

I've used Microsoft's Retail List Price and no-one pays full price! However, you will pay quite a lot for most of the more arcane Office products (Project & Visio, especially) and they are not always substantially better than the free alternatives.

Some of the commercial software is just better than the free stuff. Again, I would rate MS Project and Visio as far better products than anything that I've found for free: but the question remains as to whether they are so much better as to justify several hundreds of pounds for each version/upgrade.

There are two other considerations when choosing an operating system: virus infections and footprint. Ubuntu is not as prone to attack as Windows and nor does it need the 16GB of disk space to run!

Wednesday, 19 May 2010

Do You Scrobble?

One of the fringe benefits of teaching myself Linux by attending the University of Google is that I get to learn all sorts of strange stuff that I didn't know that I didn't know (if you'll excuse the Rumsfeldism). For instance, whilst trying to fix my Zen recently, my research exposed me to the hitherto unknown expression, scobbling.

I know, it sounds like something that you'd catch if you hadn't taken precautions! However, as a verb, it appears to mean collecting data (particularly data regarding someone's taste in music) in order to refine service delivery and/or for social networking purposes. The (rather convoluted) wiki definition goes thus:
To publish one's music-listening habits via software, as counted events when songs or albums are played, to selected internet services in order to track them over time, out of curiosity and/or to make them visible to others.
It seems that it all stems from Last.fm, an Internet radio site that records the details of its listeners' musical tastes to better provide content to its audience.

So, there you have it: when we give up this information willingly it's called freedom (or, scrobbling ;)), if it's taken by stealth, it's called invasion of privacy.

Just trying to learn you all something!

Monday, 17 May 2010

Karma and Zen

Lets' face it, Ubuntu doesn't get everything right and it can even be as bad as Windows at times! OK, I've had one of those weeks: first the printer saga and then Windows nuked my Creative Zen V!

The Zen comes with some Windows sync software which (frankly) is rubbish, but I'm a creature of habit (aka, stupid) and still insist on trying to transfer music to my Zen using Vista. Somehow, connecting my Zen to my Vista machine (something I've done countless times before) triggered some sort of kill command and Windows happily obliged.

Alright, I'm overstating it, but you take the point: when I attached my Zen it was one of my favourite gadgets, when I detached it, it was a brick. It only happened because the postman delivered the new Jackson Browne album yesterday and I wanted to get it straight onto my PMP for those long walks in the Welsh hills.

Fortunately, Google had the solution and, to my palpable relief and benefit to my temper, I was able to revive my Zen. That's the good news!

The bad news is that for some completely insane reason, I decided that Ubuntu must be able to sync my PMP with my music on my network and I spent the next twenty-four hours trying to get it to work. Entertainment is one area of personal computing that I think Windows wins hands-down: leaving aside the (excellent) Windows Media Player, there are all sorts of alternative entertainment packages that beat the Linux offerings into the dust. I'm sorry, but that's just how I see it. That said, I really don't want to be tied to Microsoft just so that I might occasionally update my music, so Ubuntu was going to have to play ball (even if it killed me).

The real irony is, when I plugged my Zen into the USB of my Ubuntu box, Linux saw it immediately and mounted it in Nautilus. Now that's impressive! However, the problem comes with the proprietary formats used by Creative: Ubuntu just can't read them without a little help and you need to install the MTP support packages from Synaptic. Even then, you can't just drag and drop as you would in Windows Media Player because the Zen doesn't add the new files to the library (see the wiki link above for an explanation). I wasn't too phased by this: I still had Rhythmbox to try and, sure enough when I opened Rhythmbox, there was my Zen listed in the side panel waiting patiently for me to do something. Unfortunately, everything I tried to do was fruitless. Dragging tracks to the Zen resulted in the music being added to root and not the Music folder: consequently, the PMP couldn't play them. I tried the command line but with the same result (even using the folder ID numbers rather than, names), I wasted hours trying to get it to work - all to no avail.

So, onto gnomad2. This just didn't see the device at all and I had absolutely no joy in finding a solution. My best guess is that, had I owned a Zen V Plus (rather than the Zen V), I might have made it passed the finishing post, but as it was nothing helped. I even compiled and installed the latest version in the vain hope that it would solve the dreaded "No jukeboxes found on USB bus" error message. The lsusb command listed my Zen, so I know that the USB bus was working ok: but nothing I tried (even a firmware update) would coax gnomad2 to talk to my PMP.

In desperation I finally turned to Amarok. The version from the repository was rubbish: it wouldn't even play music in my Music folder on the PC! It didn't see the Zen (until I realized that I had to unmount (I much prefer "demount", but let's go with the lingo) it first) far less read it. Anyway, as a last resort, I compiled the latest version from source and....

It worked!

I can now send music to my Zen and it loads all the artwork and track listings as it should. It is noteworthy that Amarok still won't play music on my PC, but hey, you can't have everything!

By the way, if you have a bricked Zen, try connecting it to a PC via a USB cable, slide and hold the on switch while you use a pin to reset the device. Worked like a charm for me.

Saturday, 15 May 2010

Before you blame the Equipment...

I've had one of those days: my network printer ran out of ink this afternoon (yes, I know!) and I remembered that I had an old hp Photosmart 7660 in a box upstairs.

I was confident that I could just plug the USB cable into the back of my Ubuntu box and get on with life because that's what always happens when I plug anything into Linux! However, after connecting it to the pc and wiping the dust away, I began to suffer an intermittent but persistent fault: after printing a document or test page, the printer would just hang and I would get a strange error message from my hplip toolbox if I tried to send anything else to the spooler. I could restart the printer by unplugging it from the mains and then print a new document, but after that, I couldn't get it to do a thing. I confess that my first reaction was to think that it was a hardware problem and that my trusty printer was destined for the local dump (I mean, recycling centre, of course!).

I've had the printer for years and only replaced it when it refused to play nice with Windows Vista (more accurately, Windows Vista refused to play nice with any of my hardware): it's always produced excellent quality print both for office use and photographs, so I was sorry to see it go. More to the point, it didn't consume huge amounts of resource on my old PC nor require the obscene bloatware that accompanied its replacement. The Photosmart 7660 also has an embedded card reader, so getting it to work would have been a seamless replacement for my inkless All-in-One machine and I really didn't want to run around on a Saturday afternoon buying overpriced cartridges from the local office supplies store. I tried everything that I could think of to get it to work: clearing the print queue, rebooting the PC, restarting hplip, having another coffee...

The only thing that didn't occur to me was to exercise the first lesson of PC maintenance: check the cables!

Yep, the USB connection on the printer was not pushed fully home: a small adjustment later and Ubuntu has once again demonstrated its superiority to anything Microsoft has to offer: much faster, up to date information and beautiful prints!

The only thing wrong with my Ubuntu box is the idiot on the other end of the human interface devices! The lesson (had I bothered to learn it way back when Windows 3.1 was my weapon of choice) is to check the cables and connections whenever you have problems with hardware: perhaps I've learned it this time.

Friday, 14 May 2010

More on the Lynx

I've just downloaded Ubuntu 10.04 LTS and run the Live CD on my Inspiron 530s (running Windows Vista) and it works a charm!

I suspect that much time will be spent playing!

Thursday, 13 May 2010

The Toy Shop Window

William E. Shotts, Jr.'s take on the difference between Windows and Linux:

"When I am asked to explain the difference between Windows and Linux, I often use a toy analogy.

Windows is like a Game Boy. You go to the store and buy one all shiny new in the box. You take it home, turn it on and play with it. Pretty graphics, cute sounds. After a while though, you get tired of the game that came with it so you go back to the store and buy another one. This cycle repeats over and over.

Finally, you go back to the store and say to the person behind the counter, “I want a game that does this!” only to be told that no such game exists because there is no “market demand” for it. Then you say, “But I only need to change this one thing!” The person behind the counter says you can't change it. The games are all sealed up in their cartridges. You discover that your toy is limited to the games that others have decided that you need and no more.

Linux, on the other hand, is like the world's largest Erector Set. You open it up and it's just a huge collection of parts. A lot of steel struts, screws, nuts, gears, pulleys, motors, and a few suggestions on what to build. So you start to play with it. You build one of the suggestions and then another. After a while you discover that you have your own ideas of what to make. You don't ever have to go back to the store, as you already have everything you need. The Erector Set takes on the shape of your imagination. It does what you want.

Your choice of toys is, of course, a personal thing, so which toy would you find more satisfying?"

pp.70-71 The Linux Command Line
I've referenced (and recommended!) this work before and do so once more.

I've been working my way through this guide and, as my confidence and competence grow, I understand how worthwhile that investment of time and effort has been!

Wednesday, 12 May 2010

Panel Problems

I've had a erratic but persistent problem with the Notification applet on my panel: when I restart my machine (not (usually) when I boot my machine), the network icon fails to render (also known as paint) leaving a black hole that neither responds to attention from my mouse or my keyboard.

There are several suggestions on the Internet about what might cause this and how it might be resolved, but none of them have been successful in my case. That said, it's an irritation rather than a major inconvenience and it's easily fixed by opening a terminal and typing:

killall gnome-panel

The killall command stops the panel and, as soon as this happens, the kernel re-starts it rendering all the icons as they should appear. However, I must be getting lazy in my old age and even this simple operation is too much bother! So, I created a simple shell script and allocated it to an application launcher on the panel.

Open a text editor and type: killall gnome-panel. If you want to add some notes about the purpose of the shell (which is a very good idea), simply use the hash (#) symbol at the start of a text line and the command line interface will ignore it when it runs. Save the file as Notification_Panel_Fix.sh (or any name of your choice) in your home directory.

Open a terminal and type:

chmod +x ./Notification_Panel_Fix.sh

This makes our file an executable shell script.

Right click on your panel where you want to add your launcher and click Add to Panel.... From the Add to Panel... dialog box, select Custom Application Launcher.
  • Type is Application
  • Name can be anything that you want, but I think simple is best, so I advise that you make it as descriptive as possible.
  • Command is the full file path to the Notification_Panel_Fix.sh file - it's case sensitive, so use the browse button if your typing is rubbish!
  • The Comment can be anything but will appear when your mouse hovers over the application icon so, once again, make it descriptive and meaningful.


You can add (or change) an icon to the launcher simply by clicking on the icon in the top left hand corner of the launcher panel. You'll find more icons in the /usr/share/icons directory.

Now all you have to do is click the icon if you need to restart the gnome-panel: simple!

Tuesday, 11 May 2010

Karmic Candy

One of the benefits of rebuilding your PC is that you get the opportunity to address all those little niggles that you never quite got round to fixing first time round.

Take the boot splash screen in Ubuntu 9.10: could the Ubuntu developers have made it any more dreary? In previous incarnations of Ubuntu, changing the splash screen was simple using the gdmsetup client (graphical display manager) from the System → Administration menu but in Karmic, this function has disappeared but it's still possible to change the splash screen if you know where to look.

The artwork for the splash is located in the /usr/share/images/xsplash directory (go and have a browse) and you can change the background image for one of your own choosing. If you have more than one image (each called bg_####x####.jpg, where ####x#### is the screen resolution), you can either replace them all (to be safe) or determine which one boots by establishing your display resolution and simply replacing the file that most closely matches that parameter. Assuming that you only have one (as I did), choose your replacement file and, using the GIMP Image editor, scale your new image to the relevant size.

Firstly, make a backup of the existing background just in case there's a problem. In this instance, I'll save a copy to the Pictures directory. Open a terminal and create a new directory for storing the backups of the original files. You can call it anything you like, I've called mine xsplash_backup:

mkdir ./Pictures/xsplash_backup

Now, change directory to copy the original files:

cd /usr/share/images/xsplash

Copy the files to your backup directory:

cp *.jpg /home/[user name]/Pictures/xsplash_backup

Now copy your replacement background to the xsplash directory making sure that you use the correct name to replace the existing file.

cd /home/[user name]/[file location]
cp -u bg_####x####.jpg /usr/share/images/xsplash


Obviously, change the user name, file location and file name as appropriate! If you get an error message telling you that you don't have access rights to the target directory (the xsplash folder), log on as root and repeat the instruction. To log in as root:

sudo -i

You can use Nautilus to check that your new background has made it safely to its new home if you feel the need. Now all you need to do is to reboot and watch in satisfaction as your new creation makes the start up sequence more pleasurable.


Here's my new splash screen by and artist called thewer, it's a download from the Ubuntu-Tribal Pack available from gnome-look.org. Just compare it with that old un-Karmic background.


I know which one I like more!

Monday, 10 May 2010

Making Space

If, like me, you've got directories, files or drives with embedded spaces (whitespace) in their name (for instance, External Hdd) you may experience problems trying to reach them using the command line, try putting the name in quotes, thus:

cd /media/"External Hdd"

or (to display a text file with whitespaces in the terminal)

less /home/usr/"Word Space File.txt"

Or, if that doesn't work, a backspace might do the trick:

cd /media/External\Hdd

The double quote method works for me, both with directories and files: however, the lesson learned is that, if you intend to use the command line, try to avoid embedded spaces in Directory and file names. For instance, a better name for the drive in this case might be: External_Hdd (note the underscore!)

Sunday, 9 May 2010

Fixing Firefox

If you want to load the latest version of Firefox onto your Ubuntu system, you can't use the official repositories as these only hold the latest version of Firefox available at the time of your version's release (source: SourceForge). Happily, there is a way to install the latest version and get security updates and bug fixes as part of your normal update routine: I won't replicate the step-by-step instructions here, you can follow them on the Ubuntuzilla project page.

However, once you download Firefox, you may not be particularly impressed with how Ubuntu renders web pages. You can fix this by adding Microsoft's TrueType fonts to the ~/.fonts directory in Ubuntu. Open a terminal and type (or copy & paste) the following:

sudo apt-get install msttcorefonts

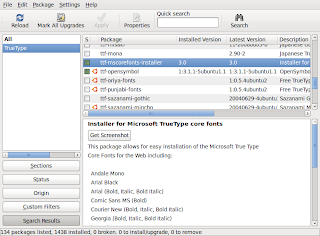
Input your password at the prompt and the system will download and install your fonts. If you'd rather not use the terminal, you can use the Synaptic Package Manager to achieve the same result: from System → Administration → Synaptic Package Manager and search for the libfreetype6, ttf-freefont, ttf-liberation, ttf-opensymbol and ttf-mscorefonts-installer packages.


Next, you need to force your font information cache files to refresh in order to make the fonts available. You can either log out and log back in or run the following command in the terminal:

sudo fc-cache -f

Now you can change fonts in Firefox: From the Edit menu select Preferences and then the Content icon. You can change the selected font from there and see the changes in real-time. The good news is that installing these fonts has implications system-wide including other applications such as OpenOffice.

If you spend a lot of time in front of your screen, this is a life-saver.

Saturday, 8 May 2010

The Koala and the Lynx

It's always best to do your research before you start any project and this is especially true in IT.

When I started my journey with Ubuntu (Hardy Heron), it was no more than an experiment on a spare PC that I had lying around: over the next couple of years, Ubuntu became my primary operating system for an outlay of less than £100 for a new hard-drive (if you ignore the cost of the PC as a sunk cost) and that's not bad for a for a system that can do everything the competition can, requires a fraction of the disk space of Windows and is significantly more secure into the bargain!

Moreover, one of the great things about Ubuntu is that it will always be free and that includes security updates and OS upgrades. Compare that to Windows: if I wanted to upgrade Windows Vista to Windows 7 (probably not a good idea anyway), I could expect to pay between £70 and £100 for the privilege (based on today's Amazon prices for Home Premium upgrade) and hope that all my existing software would work.

Sadly however, I rarely take my own advice! At the weekend I decided to take a peek at Ubuntu's new release, Lucid Lynx (10.04 LTS) and, in a fit of uncontrollable enthusiasm decided to upgrade!

The short version is that the escapade was a disaster: my graphics card is not supported and I couldn't get the visual effects to work (even in normal mode) so I ended up rebuilding Karmic from the floor up. The good news is that I've rather enjoyed the rebuild and it was great to see how far I've come in open-source computing in a relatively short space of time. More to the point, I would never have been brave enough to even countenance upgrading a Windows machine: so even a failure turned out to be a success!

Karma in 3-D

If, like me, you enjoy the occasional game of chess, Ubuntu comes with a chess (glchess) program as standard and available via the Applications → Games menu. The application isn't built on a particularly good chess engine, but for those five minute coffee breaks, it can provide an enjoyable diversion.

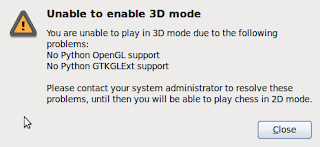
However, I was puzzled that I couldn't get the game to render in 3-D and the error messages that plagued my screen whenever I tried.


To be honest, it wasn't the most pressing of problems so I ignored it, making the ease at which this irritation is resolved doubly embarrassing!

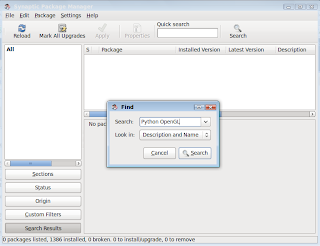
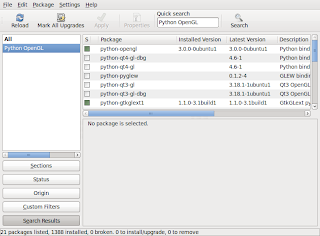
If you want to play glchess in 3-D, open your Synaptic Package Manager (found in System → Administration) and, after entering your Administrative password, search for Python OpenGL using the search function. Scroll down the returned search results until you find the two packages required (python-opengl & python-gtkglext1). Simply mark the check-boxes (select mark for installation from the drop-down menu) and click the Apply button.


Follow the prompts and the accept the package review screen and close Synaptic when it's downloaded and installed the packages: that's it!

If glchess is open, close it and then re-open and select 3-D Chess View from the View menu.

Friday, 7 May 2010

Synchronizing WinMob PIM Data with Ubuntu - Post 4

Originally posted at Mobility Site in the X50 / X51 Forums/Tips and Tricks forum as multiple posts under the pseudonym, Jogga. It's the last in my series of setting up FinchSync to synchronize WinMob devices with Ubuntu.

Syncing Multiple PCs

If you want to sync multiple machines and aren't bothered about keeping your data separate (for instance, work and private information), you can simply create an Alias client server on the PDA.
  • Set up the server information on your PC (following the instructions in Post #2)
  • Create the Sync Sources on your PC
  • Create your Client and allocate the Sync Sources (just follow the instructions in Post #2)
  • Set up the server information on your second machine (again, following the instructions in Post #2)
  • Add the same Sync Sources on your second PC with exactly the same name(s)
  • Create a Client and allocate the Sync Sources
  • On your PDA, set up the first server as per the instructions in Post #3
  • Add a second server, giving it a separate name but add the name of the first server as an Alias in the Alias dialogue box


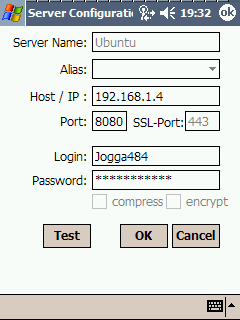
As you can see, the first screen shows the Ubuntu server settings and the second shows my laptop with the Ubuntu server name (ironically enough, Ubuntu) in the Alias drop-down menu. When you Test the server connection settings, you'll see the server name (in this case, Laptop) with the Alias in brackets.


Now, data will happily travel between PCs and your PDA: you can (apparently) set up as many machines as you wish. I am currently sharing (and syncing) data between a desktop (Ubuntu – Karmic), a laptop (Windows XP) and my Axim X50 – all wirelessly!

Uninstall FinchSync from Your PC

I can't imagine why anyone would want to uninstall this remarkable program from their PC, but if you do, simply delete the FinchSync directory (the folder and all its contents that you created in Post #2): that's it!

Uninstall FinchSync from Your PDA

Removing the application from your PDA is a little more complicated. First, you delete your servers from the Server list (this is a manual process).
  • Open FinchSync on your PDA
  • Tap Config
  • Tap Server
  • Select each entry in turn and tap Remove
  • Tap Yes on the dialog box each time it appears
According to the FinchSync documentation, this removes all synchronized items from your Pocket PC! Now you can simply remove the programme using the Remove Programs option in the usual manner.

Additional information:
”Two small configuration files may be left by the uninstaller. To remove these files, use the 'File Explorer' to navigate to the folder 'My Device/Program Files' and delete the folder 'FinchSync'.”
From the FinchSync Documentation

Avoid Corrupting Your Data

Before synchronizing your PDA close Thunderbird on your desktop and all Outlook programs on your PDA. I can't stress this enough: if you synchronize with Thunderbird open, you will corrupt or delete your data – Don't say that you haven't been warned.

Good practise dictates that you backup your data regularly and your contacts and calendar data is no exception. The good news is that it is relatively easy to write a simple shell script that can automate the process of closing Thunderbird and opening the FinchSync GUI.Open a text editor (not a word processor) such as gedit or (my favourite) Scite and type the following into a new document:

#!/bin/bash
#Run FinchSync from a single command line
killall /opt/thunderbird/thunderbird-bin
# Closes Thunderbird before opening Finchsync as recommended by Markus Rahiff
cd /home/[usrname]/finchsync
# Changes directory
java -jar finchsync.jar
# Executes Java GUI


Save your file in your /home/[usrname] directory as, finchsync.sh. Obviously, the spelling and file extension are important: so get it right!

Now you need to make the file executable. Open a terminal and, if you have stored your file your home directory, type:

chmod +x finchsync.sh

If you want to test the code, simply type:

./finchsync.sh

And the FinchSync GUI should appear. From now on, you can open the GUI from a terminal simply by typing the command above, saving one whole line of command and several characters from the second line. However, you will still need to open a terminal and type the command in order to access the GUI: wouldn't it be so much better to have a clickable icon on your desktop panel? Fortunately, Ubuntu makes this easy to set up.

Right-click on the panel where you would like your icon and select Add to Panel from the drop-down menu. The Add to Panel dialog box should open:


Select the Custom Application Launcher and click Add. The Application Properties dialog box will appear.


  • The application type is: Application
  • The application name is FinchSync
  • The command is the directory path and file name. For instance, my path looks like /home/jogga/finchsync.sh – the applet recognizes this as an application because you've made the file executable with the chmod command.
  • The comment can be anything that you want. When you hover your mouse over the icon, the system displays the application name and your comment, so make the comment relevant to the operation of the icon

Click the icon and watch the GUI open as if by magic! Ironically, it takes longer to type (and read) these instructions than to actually execute them. I hope that you'll find this a useful mod to your system.

Working with Microsoft Windows

The process for creating and opening the FinchSync GUI is (very) slightly different on Windows. I've only installed it on XP, but having created the directory and copied the Java file to the folder, there is no need to run code at a command prompt: just double click the Java file (called “finchsync Executable Jar File 738KB”) and the GUI will open.

Pretty much everything else is the same as per the Ubuntu instructions although in Windows, the IP address in the status bar of the GUI seems to be the correct one.

Killing the Server using a Web Browser

Simply type http://[ip]:[port]/status into the web browser address bar, type in the user name and password created in Post #2 and click Stop Server.

I find that just exiting the application is sufficient, but there you go!

Thursday, 6 May 2010

Synchronizing WinMob PIM Data with Ubuntu - Post 3

Client Side – Installing & Configuring FinchSync on Axim X50

Originally posted at Mobility Site in the X50 / X51 Forums/Tips and Tricks forum under the pseudonym, Jogga. If you can't wait for the final post, head on over to Mobility Site.

No mystery here, the appropriate download is found on the same page as the PC Server application: make sure that you download the one necessary for your device. For the X50, you need the Pocket PC Client application (Windows Mobile <= 5.0, .NET 1.1) .cab file (or the .zip file).

Download the file to your computer and use Activesync (perhaps for the last time!) to copy it to your pda. Double tapping the file installs FinchSync on your device.

You'll find the program in the Program listing and you open it as you would any other application. Now that it's installed, you have to configure the client to talk to the server.


  • Tap Config.
  • Tap Server.
  • Tap Add.
  • Complete the log-in details (established when you set up the client on the Server), making sure that you use the correct IP address and leaving the Alias field blank.


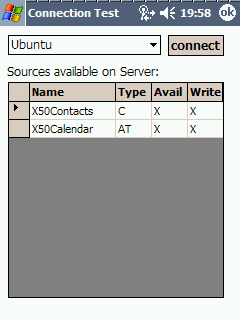
Click the Test button to test the connection to your Server by tapping Connect on the next screen. If all's well, you should see the Sources table appear: if you get an error message, check your settings and/or your firewall.


You're almost ready to sync your data! However, first you should set up your category maps on the client. Category maps help keep data synchronized between discrete machines and discrete categories: for instance, if you sync your PDA between a home and work PC, you may not want your “home” data appearing on your “work” server and visa versa. I used the default settings because I don't really use categories a great deal. If you want to know a little more about how they work, have a look at the Sync Guide Documentation.

To set up your Category Maps, tap Config and then Category Mapping.


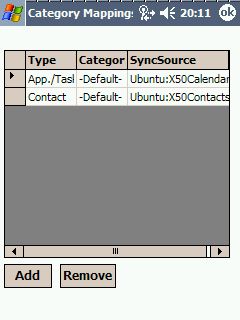
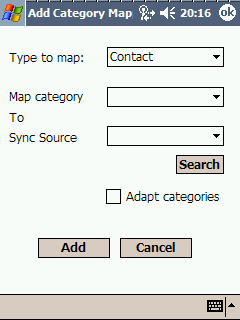
Here's my categories, your initial table will be blank. To add a category, tap Add.


In the above example, I am mapping Contact details on my PDA with my address book on the Sync Sources (X50Contacts): for the Map Category drop down box, I selected the -default- option, but you can map all of your categories back to Thunderbird. Check the Adapt categories option to rename the category field of all existing items according to your mapping.

Make sure that you map all of your Sync Sources to categories and you're ready to synchronise your devices.
  • Close Thunderbird on Ubuntu (how I wish someone had told me that!)
  • Turn on WiFi on your Axim
  • Start The FinchSync Server on Ubuntu using a terminal and the java command outlined earlier
  • Start the FinchSync client software on the PDA from the Programs screen
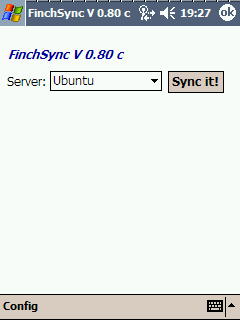
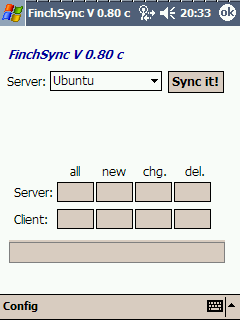
  • Select your Server from the drop-down box
  • Tap Sync it!


That should be that! I'll post some hints and tips tomorrow but you must make sure that you close Thunderbird before syncing or you may corrupt or loose data!

Good luck and, if you do try this, let me know how it goes. The good news is that FinchSync works on Windows also, so Outlook could be a thing of the past for syncing mobile data!

Wednesday, 5 May 2010

Synchronizing WinMob PIM Data with Ubuntu - Post 2

Server Side – Installing & Configuring FinchSync on Ubuntu

Originally posted at Mobility Site in the X50 / X51 Forums/Tips and Tricks forum under the pseudonym, Jogga. It is the second of four posts: if you can't wait for the next two in the series, head on over to Mobility Site.

Installing FinchSync on Ubuntu is easy:
  • Create a file on your hard drive called finchsync (my path looks like this: /home/jogga/finchsync).
  • Download the PC Server application from the FinchSync Downloads Page (you'll have to accept the Terms and Conditions – the file is called FinchSync.jar (738 KB)) and save (or copy) the download to the finchsync folder you created in step 1. You don't need to open the file or do anything clever: simply copy the download to the finchsync directory!
Now we get to configure the FinchSync server (the PC application that you've just downloaded). Open a terminal and change directory to the finchsync folder.

cd /home/[usr]/finchsync

When the terminal has changed directory, we'll open the FinchSync Gui using:

java -jar finchsync.jar

All being well, you should see the FinchSync GUI.


When the GUI appears, you may receive the error message, 'Address already in use: JVM_Bind': this can be safely ignored for the time being. Next, from the toolbar, select File and Server Configuration and you should see the Server Configuration dialog box.


The http port should be set to a value between 8080 & 8087 (although theoretically it can have any value between 0 and 65535): if the value selected has already been allocated, you'll be prompted to change the setting. Be warned, if you change the setting you must close and restart the server before the changes take effect. Keep cycling through the numbers until you find a vacant port number. If you are using a firewall, you'll have to open this port in order to allow the pda to connect: I use Firestarter and opening the 8080 port is straightforward, so I can help with instructions if needed (anything else and you're on your own!).

If you select the Enable Status Page option, you can kill the server via a web browser using http://[ip]:[port]status. Please note that the IP address is not the one shown on the GUI status bar (at the bottom of the GUI): it is most likely the eth0 IP address followed by the port number you selected. For example, I would type http://192.168.1.4:8080/status into my Firefox browser and the status page appears: to find the appropriate IP address for your set up, open a terminal and type:

ifconfig

When you've completed the user and password fields, click OK (and remember what you've typed!).

Now we can tell FinchSync what we want to synchronize: these are called Sync Sources. Click the Sync Sources tab in the FinchSync GUI.


Obviously, your table will be empty! Click the Add button to start the setup wizard.
  • Enter a unique name and click Next (as an example, for my contacts source, I used the name X50Contacts which (I hope) is pretty self-explanatory).
  • From the Source drop-down menu, select either the Address Book or Calendar option.
  • Browse to where your file is stored on your hard drive. You can use the Scan Disk option, but this can take time in Ubuntu and I didn't find it helpful (and it never found the relevant files!). If you are setting up you contacts, you are looking for a file called abook.mab which is in the /home/[usr]/.thunderbird directory in the Default user file. Your calendar is in the directory that you created when you started so it should be easy to find!
  • Click Next.
  • The next screen gives some additional configuration options. Read Only prevents the client (i.e. your mobile device) from changing source data (not useful if you make changes to your calendar or contacts on the move!).Config opens another dialog box allowing you to block application preventing Thunderbird from opening if a sync is in progress (very useful as you will later see!).
  • Click Finish to set up your Sync Source and repeat for additional Calendars or Address Books.
Now we can set up the client. Click the Clients tab.


Now click the Add button to set up your client.


Enter a name for your device and a password. These are your log-in details when we set up the client side software, so make a note of the details! You can add a description of the device and then select which sources you want to sync by clicking the Add button. A dialog box gives you the options set up in your Sync Sources, just select the ones that you want to sync.

Phew, that's the PC set up: now for the pda!

Tuesday, 4 May 2010

Synchronizing WinMob PIM Data with Ubuntu - Post 1

Originally posted at Mobility Site in the X50 / X51 Forums/Tips and Tricks forum under the pseudonym, Jogga.

One of the shortcomings of Linux distributions is the difficulty of synchronizing PIM data with Microsoft Windows in general and Windows Mobile in particular, or so I thought! Actually, this perception is more a reflection of Windows than Linux, but as open-source mobile devices are still comparatively rare, syncing Windows devices with Linux distros is still the mobile equivalent of cross-platform nirvana. Notwithstanding the incompatibility issues, I still wanted to find a way of synchronizing all of my PCs and mobile devices and I recently came across a freeware application called, FinchSync by Markus Rahlff that promised to do just that.

Whilst the FinchSync setup is not particularly intuitive for the technically challenged (like me) and the documentation seems a little vague, after some hours of frustration, blind alleys and trawling the FinchSync forum, I have finally managed to synchronize my Axim X50 contacts, calendar and task data with Mozilla Thunderbird over my WLAN.

It's worth mentioning that I haven't managed to get a USB connection to work using Ubuntu (but I think that's mainly because I'm inept) and have only managed to sync over the wireless network. But hey, that's not bad, right?

Anyway, I thought that I'd share the process with you and hopefully help anyone interested in trying this to avoid mistakes. However, this is going to be a marathon post, so I'm going to break it into four sections:
  1. This brief introduction
  2. Server Side installation and configuration
  3. Client Side Installation and Configuration
  4. Troubleshooting Hints and Tips
My setup:
  • Axim X50 2003 Second Ed v 4.21.1008
  • Ubuntu 9.10 (Karmic)
  • Mozilla Thunderbird 3.0.4 with Lightning Calendar 1.0b 1extension
  • DELL Inspiron 6400 (XP Pro) running the same Thunderbird setup as above
Setup Process

Housekeeping

I recommend that you review (and cleanse) your contact data before attempting this setup and then backing up your address book. That way, if things go wrong (and they might!) you'll be able to restore your data quickly and easily. Use the Export function from the Address Book toolbar (Tools → Export...) and save your address book as a LDIF file on your hard drive (you'll thank me one day).

For some reason, the latest builds of Thunderbird use .sqlite file formats for calendar data and FinchSync can't read this format because there is no native java support! In order to synchronize your calendar, you'll need a .ics calendar file somewhere on your hard drive or network. I set up a folder in /home/[usr]/ (change [usr] to your user name) called mycalendars (so my file path is /home/jogga/mycalendars) and just built a new calendar in Thunderbird for the purpose (of syncing data), but, if you are an old hand with Thunderbird, you'll probably want to import your existing calendar into a new calendar file with the .ics file extension. To create a new calendar:
  • On the main toolbar, click File → New → Calendar...
  • Select the, On the network option and click Next
  • Select the iCalendar (ICS) option and, in the location dialog box, type: file:///[calendar location]/[Calendar Name].ics (my location path looks like this: file:///home/jogga/mycalendars/Private.ics) and click Next
  • Choose the calendar name, colour and email address and click Next
  • All being well, you should get a confirmation screen telling you that your calendar has been created (it should also appear on the sidebar): click Finish

That's the housekeeping taken care of: it gets a little tricky from here on, but nothing we can't handle!

If you can't wait for the next three posts, feel free to head on over to Mobility Site. While you're there, feel free to sign up and add input where you can.

Monday, 3 May 2010

Giving the Koala Teeth

I have a confession: I still have a laptop that runs Windows XP and I'm unlikely to change the operating system on it any time soon. I'm a freelance project manager and most (in fact, all) of my clients run Windows and use Microsoft Office. Now, I do know that I can save projects, documents, spreadsheets and presentations created in OpenOffice in MS Office formats, but I've always found that there are some niggles with format conversions, so I tend to produce work for assignments using Office. That's the only reason that I keep a laptop that runs Windows.

One of the features absent from my laptop (a DELL Inspiron 6400) is bluetooth functionality and, at the back-end of 2008, I thought I'd treat myself to a bluetooth dongle so I could swap files with the various bluetooth enabled devices that I carry around. I ended up with an adaptor from LM Technologies and, to be blunt, it turned out to be a less than successful experiment: Windows complained when the adaptor was plugged in and complained even more when it wasn't. I got so fed up with the constant nagging that I uninstalled the drivers and forgot about the whole palaver.

Anyway, to cut a long story short (even I'm getting bored), I came across the adaptor the other day and started wondering what would happen if I plugged it into the back of my Ubuntu box. The answer is: not very much! That is, until I realized that I had to start the bluetooth applet.

The Gnome Bluetooth module is included in Karmic Koala (9.10) by default but you have to enable the applet in order to connect to other BT devices. To start the module, open a terminal and type:

bluetooth-applet

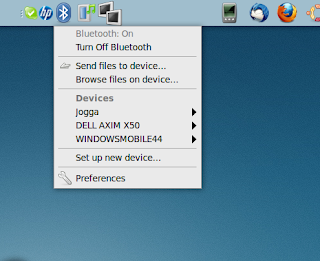
The Bluetooth icon should appear in your Notification Panel: clicking on the icon gives you access to the Bluetooth menu.


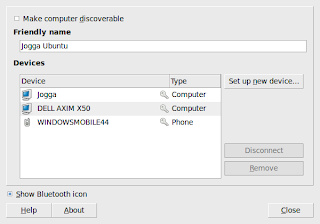
Clicking Preferences allows you to pair devices and make your computer discoverable (which you'll need to do if you want to find your PC with another bluetooth device).


Setting up a partnership (also known as pairing allows you to send files to and browse files on the paired device from your Ubuntu machine. However, in order to receive files from paired devices, you must install the gnome-user-share application. Open a terminal and type (or copy and paste) the following code:

sudo apt-get install gnome-user-share

Enter your sudo password when prompted and the application should install. Henceforth, you should be able to send and receive files using bluetooth.

That's it: another application that works as it should without messing around with additional drivers and software to manage a simple file exchange protocol. There are just two other things worth considering:
  1. When you're not pairing devices, it's a good idea to turn off the bluetooth discoverable mode. This is simply a security precaution:
    Bluetooth as other network types implies security risks, so setting your adapter undiscoverable to other devices is a good thing to do to limit the possibility of cracking.
  2. If like me you would like to start bluetooth at bootup, you can add the application to your startup Applications.

Sunday, 2 May 2010

Karmic No More

Less than twenty-four hours after starting my Ubuntu blog, I'm sad to inform you that I have taken the decision to abandon the Karmic Koala.

As I type this post (on a Windows machine), I am currently updating my Ubuntu box to 10.04 LTS Lucid Lynx! The download seemed to go ok, the upgrades are installing now. Hopefully, I'll have even more to blog about when the upgrade is finished...

Read, Mark and Learn

I was brought up to believe that everything I will ever want to know is written down in a book somewhere (thanks Mum) and, whilst this maxim might preclude the cutting edge of knowledge, it has stood me in good stead and fueled my curiosity over many years (it's also resulted in a small fortune spent on books over the years), so it's no surprise that when my journey into open source began, I looked for publications that might give me a head start.

The purpose of this blog is to chart my experiences with Ubuntu rather than peddle goods or services on behalf of others, but there are two publications that I would recommend to anyone that is interested in exploring Linux:
  1. Ubuntu Unleashed by Andrew Hudson and Paul Hudson - this is a commercial offering and it's not (particularly) cheap but it is an excellent resource nonetheless. I haven't linked to a particular retailer: use Google or search your preferred supplier (ISBN-13 for 2008 edition: 978-0672329937).
  2. The Linux® Command Line by William E. Shotts, Jr. - a free resource that guides the novice (like me) through the vagaries of the Linux terminal.
However, despite both these publications proving invaluable, the best advice that I've received has been on the various Internet forums and websites a couple of which are particularly worthy of mention:
  • Psychocats Ubuntu - a collection of superb tutorials aimed at new Ubuntu users and the place that I went to frequently during my first few weeks with Ubuntu. The author also has a blog here.
  • Ubuntu Forums - friendly advice from the Ubuntu community.
There's a surprising amount of help out there, most of it freely given.

Karmic and the Card Reader

One of the benefits of moving to Ubuntu is leaving behind the bloatware that accompanies much of today's hardware built with Windows in mind: Hewlett-Packard seems to be one of the worst offenders!

Some months ago, I changed my old (much loved) hp printer to a Photosmart C6280 All-in-One device because I had upgraded to Vista and my Photosmart 7660 USB printer would no longer co-operate with Windows. I networked the new printer and, after installing the drivers and associated software on the various machines at home, all was well (apart from the persistent problems of computers hanging during the shut-down sequence caused by the hp software). One of the features of the new combo device that I really like is the embedded card reader, which makes uploading photos to the network drive much less painful than attaching a camera and, whilst it was a bit slow using Windows, if worked flawlessly with CF, SD and micro-SD cards.

When I started my experiment with Ubuntu, life wasn't quite so easy: Ubuntu found the network printer without any difficulty, but it took me a little while to find the Linux drivers and figure out how to get them installed. That said once I'd got Ubuntu connected, the printer printed, the scanner scanned and the copier copied and that's really all I wanted from my device: with the notable exception of access to the card reader to which Ubuntu resolutely refused to connect.

Until now!

In desperation I made one last attempt to find a way to utilize my card reader and found three facts hitherto unknown:
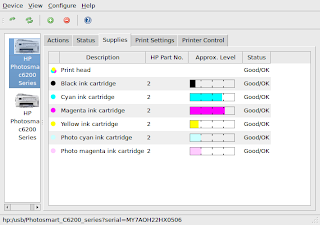
  1. There is an hp toolbox utility for Ubuntu that gives you status information (such as ink levels and print queues) on network and local printers.
  2. The C6280 can be attached to a router (using a network cable) and a computer (using a USB cable) at the same time, acting as both a network printer and a local printer.
  3. Ubuntu reads the embedded card reader of a local printer without any need for additional software or drivers.
First, the code for the printer utility. Open a terminal and type (or copy & paste) the following code into the command prompt.

sudo apt-get install hplip

When prompted, enter your password and Ubuntu will download the utility. If you are prompted to continue, type "y" and press enter. Reboot Ubuntu and the utility will appear in your Notification Panel applet (if you use it).


If you don't use the Notification Panel, you can access the utility via Applications → Accessories.


If your device is not connected to your PC as a local printer, simply connect them using a USB cable. Right click the utility icon (or start it from the Accessories menu) and select HP Device Manager... from the drop down menu, followed by the Setup Device icon (the green circle with the white plus) to start the discovery wizzard. In all honesty, I'm no IT expert and I don't know if this workaround is a sensible procedure or not, but I have found no conflicts or problems in using the device this way: the network device prints much quicker than the local, but that seems to be the only difference.

As for the card reader, simply plug in a card! You can access the card's folders and files using Nautilus or what ever file browser you use (or the Places option on the Gnome Menu). Alternatively, you can configure Nautilus to open your file browser when a card is detected: From the System Menu (Karmic 9.10), select Preferences → File Management → Media (tab) → Photos (option) and choose how you want Ubuntu to react to card detection.

So, the £7 I spent on a card reader at Amazon was wasted: but I don't really mind too much.