Showing posts with label network. Show all posts

Sunday, 28 September 2014

SSH - Sharing Privately

Apart from loving the look and feel of the Cinnamon desktop, Mint 17 has another attraction over some other Ubuntu derivatives such as Lubuntu: Secure Shell (SSH) has native support from the file manager GUI.

Many of my posts over the last four years have been about networking & file sharing using Ubuntu and I have used (and promoted) Samba as the solution to my particular circumstances. However, recently I have become increasingly aware that Samba is not without its problems, particularly read/write permissions and lock files on the remote server. These problems aren't terribly serious and there are ways to work around the issues; but I want my file server to be just that and I don't want to find workarounds for simple file sharing on a private network.

As an example, you may know that I spend much of my free time in the mountains of North Wales and take some of my pictures on my mobile (cell) phone. Rather than slip the ssd out of the phone and into a card reader (meaning that I have to stop the card and disassemble the phone) I normally use Bluetooth and set up a personal area network (PAN) to transfer the files to a laptop or desktop. Using Samba, I find that I can't simply copy the new files to my pictures directory on the server because I don't have the necessary permissions. Try as I might, I can't seem get the read/write access right. I've also had problems with GnuCash, meaning that I have to use the program on the server to update my finances - not ideal!

Using Secure Shell to connect to my server resolves all of these permission issues at a stroke and, for all intents and purposes, it behaves exactly the same as accessing local files. It has the additional advantage in that directories on the server do not need to be shared in the conventional sense and that makes them accessible only to me (or anyone that steal my login credentials).

To access your files you need only to invoke the Connect to Server... dialog from Nemo (File > Connect to Server...) and provide the necessary details.

If you've set up Samba to recognize netbios names, then it's pretty straightforward: the port default for SSH is 22 (and will only change if you've changed it!). Once connected, you can access your files and directories from Nemo's GUI and use them locally. This may be overkill on a private network, but using SSH also resolves another irritating problem: file lock. Using Samba, if an application wasn't closed before shutting down the client pc, the file lock would remain on the server (effectively making the file, read only): SHH seems to resolve this problem because Nemo is closed down as part of the normal shutdown sequence.

One final tip, if you're having trouble connecting to your server, check that ufw is allowing incoming traffic on port 22:

sudo ufw allow proto tcp from 192.168.0.0/24 to any port 22

Sources & References:

Sunday, 7 September 2014

NAS Woes

Some years ago I made the mistake of buying a Western Digital network drive - there's a reason that they're cheap! Anyway, this week the hard drive failed (or so I thought) and this morning I took the enclosure apart only to find that it was the capacitors that had given up the ghost.

blown capacitors in WD network drive
What's All that Goo?

Because the drive uses hardware encryption, the data is unreachable: I can't even mount the drive to attempt a recovery. Assuming that the drive is still healthy (smartctl -H results in an access denied error message), I'm faced with several options:

  • Try to recover the data by finding a replacement enclosure with the same model number (yeah, good luck with that!)
  • Try to recover the data by repairing the pcb (replace the burned capacitors)
  • Sacrifice the data and reuse the drive building my own NAS

Most (but not all) of the data is already safely on my file server. I've lost some video but everything else is either duplicated or replaceable so, option 3 is looking favourite! I'm toying with the idea of a low-powered box running FreeNAS or perhaps even a Intel's NUC. I even looked into using a Raspberry Pi!

I've accepted that the data is gone and that I should probably format the drive, but I really can't decide on (or afford) a replacement. I'll mull it over but, in the meanwhile, my advice is to avoid Western Digital drives if you value your data.

Sources & References:

  • None

Sunday, 27 April 2014

Ubuntu 14.04 LTS on DELL Inspiron 6400 - restoring your network

Now that Microsoft has (finally) pulled the plug, I've helped a couple of people to migrate from XP to Ubuntu. In my most recent project, I thought I'd give the new release of 14.04 a try, just to see if The Register's Scott Gilbertson is right about needing a new PC to run Canonical's latest incarnation of the Ubuntu OS. He's not!

I loaded 14.04 onto a DELL Dimension 5150 that was shipped with XP. This model was released in 2006, so let's be generous and say that this machine is at least five years old. The installation was flawless with all of the hardware properly supported and functioning as expected - boot time is around 70 seconds and the old desktop is responsive and agile with a state-of-the-art operating system! So impressed was I with the look and feel of the new LTS, I thought I'd load it onto the Inspiron 6400.

Unfortunately, this was not so easy!

Running the live DVD was painless enough although I didn't have WiFi (no surprise there!) but, when I installed the system to the hard drive, I had no networking of any kind - that's kind of a deal breaker! After a couple of hours tinkering with the setup, it seemed that the bundled WiFi driver was killing my wired connection on boot, so I removed the driver with:

sudo apt-get remove --purge bcmwl-kernel-source

Rebooting gave me a brief error message that I had no WiFi drivers installed (as expected - I'd just purged them!) but eth0 popped up as if it had never been away! So, now the usual installation of the b43 driver:

sudo apt-get install firmware-b43-installer

A reboot saw my WiFi indicator light up and a wireless connection to my router! I expect the problem to return whenever the kernel is updated, but it should be fairly easy to fix from now on.

Sources &References:

Saturday, 29 June 2013

D-Link's Impressive Powerline

I know that these devices aren't new, but I've never used them before today: D-Link's Powerline network adapters are superb and a great way to extend your network to those hard-to-reach WiFi spots.

Setup time is minimal (around ten minutes with all the plug & sorting and cable untangling!) and connecting your PC to the network gives new meaning to the phrase plug 'n' play. All-in-all I'm very impressed.

Just one word of warning: the RJ45 cables supplied in the starter kit are around 450mm long (around 18") and nowhere near long enough for any practical purposes. Make sure that you've got a couple of spares handy or buy some when you order your starter kit.

Sources & References:

Friday, 13 July 2012

Turn Off, Switch On!


It matters not how good No-IP's service might be (and it is good) if you don't think before you act. This week I had to attentd to an urgent matter that required access to files on my server: no problem I thought, I can access them from work (during my lunch break, of course!) using NoMachine.

Except I couldn't!

It took several hours of racking my brain to figure out why my IP address hadn't been updated by the No-IP client before I realized that it wasn't updating the DDNS server because it wasn't running! I'd rebooted my server after a software update and had never restarted the client. Clearly, if you are as absent minded (read, stupid) as I, it's better to start the client automatically every time the pc boots and, fortunately, this is easy to achieve.

Open a terminal and login as root:

sudo -i

Then add the client to the startup file (/etc/rc.local):

echo '/usr/local/bin/noip2' >> /etc/rc.local

Remember to exit from root & the terminal by typing exit twice:

exit

exit

In my defence, I had implemented a fail-safe using email and file copies, so all was not lost. More to the point, I was actually pretty chuffed that I'd figured out the problem without resorting to Google, so all-in-all the episode was far from a disaster.

Sources & References:

Sunday, 8 July 2012

NoMachine - Installation & Configuration

I use NoMachine's NX Client to connect to my FreeNX server: it's fast and accurate and gives the user an almost local desktop experience. As I'm just loading it onto my 1501 (running Kubuntu), I thought it would be useful to record the installation & setup process.

First, head over to NoMachine's Download page and select the NX Client for Linux. You can download this either as a .tar or a .deb package - I'm going with the DEB!

Click on the download icon and you'll be taken to the download page (yes, it is a bit clumsy) and there select the Download Package option. Once the package is downloaded, navigate to the download location and click on the file: the packager installer should open automatically.

Click the Install Package option.

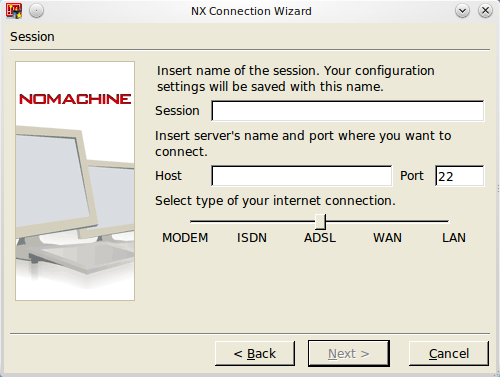
Use your file browser to navigate to /usr/NX/bin and click on the nxclient application: this should start the NX Connection Wizard.

  1. Your Session name can be anything you like. For instance, if you want to set up two sessions, one behind your router (LAN) and one for when you're outside your router (WAN), you could call them Local and Remote respectively.
  2. Your Host name will depend on how you intend to connect to your server:
    • From inside your LAN, you'll probably connect using your LAN IP address - something like 192.168.x.x (where x is a number).
    • If you are outside your LAN and have a static IP address, you can connect using the ISP issued address - you'll find this from your router/modem interface.
    • If you don't have a static IP address and use a DDNS service like No-IP, you'll use the human friendly name that you allocated to your server when you signed up for the service. It'll be something like; host.no-ip.org or whatever subdomain you chose.
  3. NoMachine uses SSH as its connection agent so the default port is 22. You can change this port number by amending the /etc/ssh/sshd_config and (perhaps) the /etc/nxserver/node.conf files: you'll find instructions on how to make these amendments here
  4. Unless you have a specific reason, leave the Internet Connection Type as ADSL.
  5. Click Next
  6. In the Desktop dialog, leave the OS type as Unix but change the desktop type to Custom and then click the Settings... button
  7. Select the Run the following command radio button and enter the following command in the dialog box below:

    gnome-session --session=ubuntu-2d

    Now select the New virtual desktop radio button in the Options dialog and click OK. Don't change the Disable encryption option!
  8. Choose the display sizes as appropriate and click Next.
  9. Now click Finish

Finding the client depends on what version of Ubuntu you're running: in 12.04 just use the dashboard and type nxclient; in 11.04, you'll find it lurking in the Internet menu (as you will with Kubuntu).

When the client starts you'll be prompted to authenticate yourself by providing your username and password. Use the Session drop-down to select the session type and enter your details. Then simply click the Login button.

Sources & References:

Thursday, 5 July 2012

Static IP with No-IP


One minor problem that I've experienced with my new server set-up is random changes in my IP address. Ordinarily, I would expect my IP address to stay fixed for as long as my router remained up and connected to the WAN, but short interruptions at the exchange have renewed my IP address on several occasions meaning that I couldn't connect to my network using NoMachine. My new ISP doesn't offer static IP addresses to domestic customers (no surprise there), but I have found a way to achieve the same result using a dynamic IP address.

No-IP is a service that uses a client to update and redirect service to map a static (DNS) or dynamic (DDNS) IP address to an easy to remember subdomain. The good news is that, when my exchange renews my IP address, I don't need to worry any more, I just point No-Machine to my server's new subdomain. Even better, the entry level service is free! The bad news is that the installation instructions for Ubuntu 12.04 out there on the Internet are not as accurate as they could be and I found installation a little tricky. So, here's how I did it!

Firstly you have to sign up for your No-IP account and set-up your host in the Account section - you'll need to know your current IP address for this. The process for setting up your host is pretty straightforward, so I won't replicate it here.

Next is to install the client on your server: don't bother with the sudo apt-get install option to download the No-IP client (suggested on the No-IP site), it doesn't work! Go to the downloads page, click on the penguin and save the file to the location of choice (mine was home/jogga/Downloads/). When the client has downloaded, use Nautilus to navigate to the download directory, right-click the noip-duc-linux.tar.gz file, and select the Open With Archive Manager option. Click Extract.

Now open a terminal and change directory to your extracted file:

cd /home/jogga/Downloads/noip-2.1.9-1

Tip: keep an eye on your folder/version number - mine is 2.1.9-1; yours could be different.

Now issue the make command.

sudo make

Now issue the make install command.

sudo make install

You'll be prompted for your login details and password. Leave the update interval to 30 (unless you have a good reason to change it) and check that the correct nic is selected (probably eth0).

To check that the client is running:

/usr/local/bin/noip2 -S

If not:

/usr/local/bin/noip2

That's it!

Sources & References:

Tuesday, 26 June 2012

No More Network Nightmare!

It seems that my recent server problem was caused by my router: installing my old D-Link DSL-2740r was all that was needed to get my NoMachine client to connect to freeNX over the WAN.

What's more, I've even managed to change the ssh port for a bit of added security - although key management is still problematic. Once I've got it all fixed, I'll post the setup (promise).

Sources & References:

Monday, 25 June 2012

Advancing in Full Retreat

One of the problems that I've been having with my server setup is accessing my network from the WAN-side of my new router. My original (default) setup worked superbly, but once I started to tweak the settings to improve security, the wheels came off quickly! My early investigation pointed toward a port forwarding issue, so I made the appropriate adjustments - no joy! Even restoring the default settings have had no effect. It seems that the router supplied by my new ISP is not immune from problems and port forwarding doesn't work.

Having spent several more hours on the problem again today, I finally decided to install my old router to see what, if any, effect it would have on my problem. Of course, I can't test the connection until I can get on a different network (and that will be tomorrow); but one unexpected and very welcome consequence is that I managed to connect my iPAQ to the network for the first time since moving house!

I know; the iPAQ is a relic, a legacy device that surely can't have much useful life left in it - but I'm still very fond of it, nonetheless!

Sources & References:

Wednesday, 20 June 2012

Nearly Headless Nick

Headless system: a computer system or device that has been configured to operate without a monitor, keyboard and mouse. Source: Wikipedia - Headless System

After some initial problems, my new Aleutia D2 Pro is up and running!

It's sporting a stock install of Ubuntu 12.04 LTS (Precise) and I'm using smb for sharing files across the network. So far, so good - but I could have used any old box as a file server; so why spend £500 on a new PC?

Well, the D2 is frugal in its power consumption which means that it can be left running without destroying the planet (or my bank balance). In fact, in sleep mode it consumes just 2.6 watts and under load, a paltry 18.0 watts! Moreover, this thing isn't just quiet - it's absolutely silent. Of course, these performance figures don't include a monitor which leaves one with the problem of managing the system blind.

Ubuntu does come with a default VNC client (Vinagre) which is fine for helping a friend over the Internet, but if you don't have a monitor or don't have physical access to the machine, typing in passwords and accepting the connection can be problematic. However, I did try Vinagre for a while and connected a keyboard and mouse (hence the cryptic title for this post) to access the machine, but the lag was excruciatingly slow; slow enough to make the solution unworkable. Fortunately (and, as you would expect) there is an opensource solution: FreeNX. I'm still trying to figure out some WAN issues since changing my port number, but over the next few days, I'll post details of how to connect from both sides of your network.

Sources & References:

Monday, 9 April 2012

Home Networking - Again

I'll be moving home shortly and my attention has turned to planning my (new) home network. Over recent years I've been relying on a Weston Digital network attached storage device - it runs on Windows-based software and that makes file sharing on a (predominantly) Linux network problematic at times: file permissions are constantly screwed up and, even a minor glitch can make access to directories impossible. It's time to create a Linux based server, that will allow me to access files from all of my machines without loosing ownership or permissions.

For my new network, I want a file server that is always available: i.e. always on. This means that I'd prefer a low-power option and I've been looking at Aleutia's D2 Pro Fanless Mini Atom PC. At a rating of just 18 watts, it should cost less than £50/year to run and be virtually silent in operation. I won't bother hooking up a monitor (that will also help to keep running costs to a minimum), but access the desktop (for maintenance purposes) using Gnome's Remote Desktop Viewer, Vinagre. That only leaves the selection of the server software and, as I happen to have an old (and not particularly energy-friendly) desktop hanging around, I've been playing around with a couple of options over the Easter weekend.

My first choice was FreeNAS: it's file sharing software that you access via a web browser. It took me a while to figure out that the operating software is designed to run from a USB stick or memory card as the files can't reside on the same disk as the OS. Partitioning the hdd didn't seem to help, so I installed the OS on a 4GB USB and got the system running without any real difficulty. However, creating and accessing storage proved impossible for my meagre skills and, after a few hours of toying with the system, I gave up!

Next stop, Ubuntu Server. Once again, I had no difficulty in installing the software and I opted for the Samba Server option during the initial configuration. However, despite having a reasonable grasp of smb, I still had difficulty creating, accessing, and using shares on the server. A couple of hours later I realised that I had another requirement - ease of use! I abandoned the server software and went to plan C.

A quick install of Ubuntu 11.10, updated with Samba, smbfs, and winbind and I had a perfectly usable solution. Creating shared directories can be achieved easily using the file manager (no need for the terminal) and you only have to remember to create a user to access Samba. When I'm ready to set up the new network on a more permanent basis, I'll mount the share at boot on each of the machines allowing me to dump all my files on one disk drive (with an appropriate backup protocol, of course!).

Monday, 29 August 2011

Kubuntu - Fixing WiFi

When I loaded Kubuntu on my Inspiron 1501 this week, I experienced the perennial WiFi problems that seem to plague every Ubuntu installation. Loading the correct driver was a piece of cake - I've done it so many times - but even though I could see all the available networks, I just couldn't connect!

Eventually, I abandoned the default application (the plasma-widget-networkmanagement) and installed the Gnome front-end for Network Manager - problem solved.

Well, sort of...

Despite being able to connect to my network, I kept receiving error messages about the system being unable to unlock the Gnome keyring. I'd also have to supply the wireless manager my network password every time I rebooted. This can get kind of tedious very quickly! Strangely, most of the solutions posted online recommend setting an empty value for the default keyring password - right, like that's going to happen!

Actually, there's a much simpler (and far more secure) way to allow the wireless applet access to the keyring.

  • Open the Autostart System Settings dialog (Menu > Computer > System Settings > Autostart > Advanced Tab).
  • Click the Add Program... button.
  • In the Choose Application search dialog, type Gnome Keyring.
  • Click the Application tab and in the Command: dialog, type - gnome-keyring-daemon
  • Click Ok.
  • Close the Autostart Settings dialog.

Next time you reboot, you'll be asked for your network password but, thereafter, your wireless should connect automatically. Moreover, with this solution there is no need to have blank passwords either, so it's a much more secure method of automating connection.

Sources & References:

Sunday, 20 February 2011

I've Figured out the How, Now for the What!

I really don't know why it's taken so long. My friends in the various discussion forums that I've contributed to over the years are accustomed to me berating them for not doing it and I know from bitter experience that it's better not to get caught with one's pants down: so I'm embarrassed to admit that recently I haven't been making regular system and file backups!

The reason for my slovenly behaviour? I couldn't figure out how to get Simple Backup to write the backup to a remote network drive!

My early attempts to implement a backup strategy were thwarted by my difficulties with Samba and recently my attention has been monopolized by upgrades and laptops. However, today I set myself the goal of getting my backup strategy back on track. As always, it took an awfully long time to realize that it shouldn't have taken such an awfully long time.

Having fixed Samba (not that it was really broken!), I thought that pointing Simple Backup to my chosen destination directory and telling it how often to backup my files was all that was required. However, every time that I pointed to an existing directory on the network drive, Simple Backup demanded my login and password: that's not ideal if you want to automate a backup process. I tried mounting the drive without success and even looked at alternative solutions; including using rsync via the terminal.

Ultimately, it proved easier to start from scratch and, using Windows Explorer (on a Vista machine), I created a new CIFS share on my network drive called (in my case) UBUNTUBACKUP. In this share, I added two additional directories, one each for my laptop and desktop.

I had to set some pretty liberal read/write permissions, but the vanilla directory did the trick.


It's worth noting that, despite the inference to the contrary on the Simple Backup Help Page you don't have to use a secure shell (ssh) or file transfer protocol (ftp): Samba (smb) works just fine!

Moreover, you don't have to use the ip address of the remote machine: NetBIOS names also work.


After assigning the destination addresses in both Ubuntu machines, I rebooted to test whether the login/password issue would return: it didn't and subsequent test backups showed that I had finally managed to achieve the simplest of tasks! It seems that the point that I'd missed is that writing files to another machine on your network requires the destination directory to be a shared directory with permissions that are liberal enough to allow access for a remote source.

Now that it's working, all I need to do is to figure out what is worth saving and how often!

Monday, 31 January 2011

SWAT

The swat web interface is a useful way of viewing information about samba: you can access it by typing http://localhost:901 into the address bar of your chosen browser.


However, in order to ensure that you can amend the samba configuration files, access shares, and add resources, you must make sure that you are a member of the administration group and that the group has the necessary permissions. If, when you log in to the swat web page, you only see four boxes (Home, Status, View, and Password), you must change the permissions on the smb.conf file.

Open a terminal and type:

sudo chmod g+w /etc/samba/smb.conf

This command changes the files "mode bits" to execute permission for the group.

sudo chgrp adm /etc/samba/smb.conf

And this command changes the group to Admin.

Now, when you type your user name and password into the login box, you should have full access to samba from the web page. You might even try simply refreshing your browser to see if the changes have taken effect. If you find that your user name still doesn't work, try logging in using root as your user name.

Useful Resources:

Thursday, 20 January 2011

Thanks Mum


The Definitive Guide to Samba 3 [Paperback]
Roderick W. Smith
ISBN: 978-1590592779

Sometimes a bargain comes along that's just too good to pass up. This book popped up in my Amazon recommendations the other day (probably after I searched for "Using Samba") and I couldn't believe the price!

Amazon has this available from one of its resellers for £5.47 + p&p so I snapped it up! I have no idea whether it's any good, I suppose that time will tell: but my Mother taught me that you can always afford a book and, at this price, I guess she's right. I ordered it after business hours on 14th January and it arrived in the post this morning - excellent.

Thanks Mum!

Sunday, 16 January 2011

Finally!

As always, my intellect has proved to be inadequate for the needs of my ambition!

After weeks (perhaps months) of failing to get my computers to talk to each other using host names (NetBios) and blaming samba, I've finally managed to resolve the problem.

It turns out that samba was working properly all the time and so too was Ubuntu. More importantly, so was my firewall! I could get samba working on my laptop (an old DELL Inspiron 1501 running Karmic) and access everything on the network except my Ubuntu desktop: the reason that samba worked unhindered on the this device and not the desktop is that I hadn't enabled the firewall on the laptop so there was nothing to block the NetBios broadcasts! I use Ubuntu's Uncomplicated Firewall (ufw) on my desktop and enabled it this afternoon, presuming that opening up the necessary ports (137, 138, 139, & 445) would be all that was need to allow host/client communications between nodes.

sudo ufw enable
sudo ufw status


However, enabling ufw on the laptop immediately broke samba leading to the inevitable conclusion that it was a firewall issue and not a samba issue that was causing my difficulties.

It turns out that the "kernel has network connection tracking modules. The module for netbios-ns (UDP port 137) is not loaded by default. You must turn it on for Samba to penetrate the ufw firewall". A simple change to the /etc/default/ufw configuration file (on both laptop and desktop), adding the firewall rules, and restarting samba was all that was required to finally deliver server/client services using host names!

Now for some extra reading to really understand how samba works.

Monday, 3 January 2011

Almost But Not Quite!

Sams Teach Yourself Networking in 24 Hours
Fourth Edition by Uyless Black
ISBN: 978-0-7686-8576-3

Aimed at the entry-level networking professional, Sams Teach Yourself Networking is unlikely to satisfy the needs of readers interested in an introduction to managing home networks. Much of the discussion centres on network operating systems, dedicated servers and keeping system users happy: hardly high priority topics for non-professionals who tend to be more interested in getting (and keeping) a disparate collection of hardware devices working in harmony! However, this observation should not be construed as criticism and Black's treatise is an excellent aid to developing expertise beyond the typical hybrid desktop routers supplied by most ISPs.

Black uses the OSI network model to introduce the concept of layered protocols and it is a theme used throughout the book to describe how data moves through networks. Not only is this model an excellent vehicle for explaining the fundamentals of networking, but it is also useful for understanding how PCs prepare data for transmission and interpret data on receipt: suddenly, those cryptic error messages will start to make sense and troubleshooting errant PCs becomes a little easier.

However, despite imparting some excellent guidance this book does have some flaws. For instance, Black squanders a couple of his “hours” discussing the role and responsibilities of a network administrator: whilst this might be interesting per se, its inclusion suggests that learning about networks requires less than twenty-four hours! Similarly, Black spends the last chapter speculating on the future of computer networks. It is almost as if he has run out of technical advice and resorts to conjecture to fill some space (and the requisite number of hours).

Overall, this book provides a useful insight into professional network management and offers an excellent description of layered protocols. However, the shortcomings diminish the desired effect and, given the relatively high cover price, the result is an offering of questionable value that fails to deliver the promise of the title.

Monday, 29 November 2010

Demise of the DELL

Recently, I wrote about synchronizing Windows mobile PIM data with Thunderbird on my Ubuntu distro. I have a couple of PDAs running Windows mobile: a DELL Axim X50 (running WinMob 2003) and an HP iPAQ hx2790 (running WinMob 5.0). Since publishing my tutorial, I have been happily synchronizing both devices successfully over my home network.

However, my recent attempts to improve my understanding of small networks have persuaded me to improve my wireless access security from WEP to WPA and this simple change of security encryption played havoc with my PDAs: after changing to the more secure WPA protocol, neither could connect to the network. A little research suggested that this is a well-known problem and HP has already issued a fix for my iPAQ: however, installing it still didn't allow my device to connect but, following some chatter on various forums, I suspected that using Odyssey Client (pdf) might provide the solution. Fortunately, although Odyssey isn't installed by default on the iPAQ, HP ships a licenced copy on the companion CD (at least, it did with my hx2790!) and installing it is simple using Activesync or Mobile Device Center (and a Windows machine, obviously!). Once installed, configuring the client was straightforward and my iPAQ rejoined my network as a wireless node.

Sadly, the news for my X50 is not so good. DELL did ship the X50 with a pre-installed version of Odyssey, but even with this utility running, my PDA can't connect to my wireless access point even though it has no trouble detecting the network. Even a hard reset hasn't had the desired effect and I suspect that the DELL will shortly be consigned to the drawer where legacy devices go to die.

Friday, 26 November 2010

Networking For the Rest of Us


Network Know-How: An Essential Guide for the Accidental Admin
John Ross
No Starch Press
ISBN: 978-1-59327-191-6

It is unlikely that those with extensive theoretical and practical experience of designing, building and maintaining small computer networks will find much of interest in John Ross' book. However, if like me you are the archetypal "accidental admin", this may just be the most useful computer book that you ever buy!

In Network Know-how, Ross introduces the novice network manager to the basic concepts of networking and provides important insights into why things work (or sometimes don’t work) in small network environments. He offers practical advice on LAN design as well as equipment and infrastructure installation, giving concise instructions on how to setup and operate a range of servers, clients, and peripherals. All this Ross achieves without resorting to unnecessary jargon or gross over-simplification: in short, it is networking for the rest of us!

Given the extensive range of hardware and software available, the book does tend to be understandably vague regarding hardware and, in places, a little Windows-centric. Nevertheless, Ross has been careful to provide pointers for Mac and Linux users even if it is not as comprehensive as one would have liked and, because he explains the principles of networking so well, these signposts are more than sufficient to cope with all but the most specialised kit. Reading this book has resulted in significantly improved security in my own network and the ability to share files and services across multiple operating platforms (Windows, Windows Mobile, & Linux) and devices.

Overall, this book is a thoroughly recommended tract on networking for non-specialists. As with all books of the genre, this one is over-priced. However, don't let this fool you into believing that it is not value for money: if you want a secure and reliable network over which you can share data and resources, this is an excellent introduction.

Thursday, 25 November 2010

If at First You Don't Succeed...

My ongoing battle with my NAS and netbios names prompted me to wonder whether I could share files between my Ubuntu machine and Windows Vista. In theory, a public share on the network from Linux should be a simple matter but, even sharing a directory as root via Samba, met with no success.

However, one thing that I have learned from my fight with my network is that trial and error only gets you so far: at some point you have to understand how things work in order to get things done. Clearly, my accumulated networking knowledge needed to be put on a more secure noetic footing if I was ever going to get my disparate operating systems and network nodes talking to one another.

In an effort to combine my practical experience with some meaningful intellectual understanding, I turned to John Ross' excellent book, Network Know-how: an essential guide for the accidental admin. It was here that I discovered how subnets are identified which, in turn, triggered my understanding of why Samba wasn't doing what I expected.

The /etc/samba/smb.conf file, specifies which hosts (servers) can connect to your machine in order to share directories and files. These are called the allowed hosts and you have to tell Samba what they are by changing the configuration file.

Open the Smb.conf file:

sudo gedit /etc/samba/smb.conf

Enter your password when prompted and the smb.conf file will open in a plain text editor. Look for the line that identifies the allowed hosts (mine is line 7) and add your LAN subnet address. For instance, if your LAN IP address is 192.168.1.1, then your LAN subnet is 192.168.1 and that's all you need to add.

Save and close the file.

Restart Samba:

sudo /etc/init.d/samba restart


Hey Presto! Suddenly all of my shares appeared in Nautilus and I could see my shared directories in File Explorer from my Windows Vista box!

But that's not the best news...

After amending my Samba configuration, I can now use netbios names rather than IP addresses meaning, in theory at least, that I can return to dynamic IP addresses and no longer worry about moving my network around!

How cool is that?