Recently, I wrote about synchronizing Windows mobile PIM data with Thunderbird on my Ubuntu distro. I have a couple of PDAs running Windows mobile: a DELL Axim X50 (running WinMob 2003) and an HP iPAQ hx2790 (running WinMob 5.0). Since publishing my tutorial, I have been happily synchronizing both devices successfully over my home network.
However, my recent attempts to improve my understanding of small networks have persuaded me to improve my wireless access security from WEP to WPA and this simple change of security encryption played havoc with my PDAs: after changing to the more secure WPA protocol, neither could connect to the network. A little research suggested that this is a well-known problem and HP has already issued a fix for my iPAQ: however, installing it still didn't allow my device to connect but, following some chatter on various forums, I suspected that using Odyssey Client (pdf) might provide the solution. Fortunately, although Odyssey isn't installed by default on the iPAQ, HP ships a licenced copy on the companion CD (at least, it did with my hx2790!) and installing it is simple using Activesync or Mobile Device Center (and a Windows machine, obviously!). Once installed, configuring the client was straightforward and my iPAQ rejoined my network as a wireless node.
Sadly, the news for my X50 is not so good. DELL did ship the X50 with a pre-installed version of Odyssey, but even with this utility running, my PDA can't connect to my wireless access point even though it has no trouble detecting the network. Even a hard reset hasn't had the desired effect and I suspect that the DELL will shortly be consigned to the drawer where legacy devices go to die.
Showing posts with label FinchSync. Show all posts
Showing posts with label FinchSync. Show all posts
Monday, 29 November 2010


Friday, 7 May 2010
Synchronizing WinMob PIM Data with Ubuntu - Post 4
Originally posted at Mobility Site in the X50 / X51 Forums/Tips and Tricks forum as multiple posts under the pseudonym, Jogga. It's the last in my series of setting up FinchSync to synchronize WinMob devices with Ubuntu.
Syncing Multiple PCs
If you want to sync multiple machines and aren't bothered about keeping your data separate (for instance, work and private information), you can simply create an Alias client server on the PDA.


As you can see, the first screen shows the Ubuntu server settings and the second shows my laptop with the Ubuntu server name (ironically enough, Ubuntu) in the Alias drop-down menu. When you Test the server connection settings, you'll see the server name (in this case, Laptop) with the Alias in brackets.

Now, data will happily travel between PCs and your PDA: you can (apparently) set up as many machines as you wish. I am currently sharing (and syncing) data between a desktop (Ubuntu – Karmic), a laptop (Windows XP) and my Axim X50 – all wirelessly!
Uninstall FinchSync from Your PC
I can't imagine why anyone would want to uninstall this remarkable program from their PC, but if you do, simply delete the FinchSync directory (the folder and all its contents that you created in Post #2): that's it!
Uninstall FinchSync from Your PDA
Removing the application from your PDA is a little more complicated. First, you delete your servers from the Server list (this is a manual process).
Additional information:
Avoid Corrupting Your Data
Before synchronizing your PDA close Thunderbird on your desktop and all Outlook programs on your PDA. I can't stress this enough: if you synchronize with Thunderbird open, you will corrupt or delete your data – Don't say that you haven't been warned.
Good practise dictates that you backup your data regularly and your contacts and calendar data is no exception. The good news is that it is relatively easy to write a simple shell script that can automate the process of closing Thunderbird and opening the FinchSync GUI.Open a text editor (not a word processor) such as gedit or (my favourite) Scite and type the following into a new document:
Save your file in your /home/[usrname] directory as, finchsync.sh. Obviously, the spelling and file extension are important: so get it right!
Now you need to make the file executable. Open a terminal and, if you have stored your file your home directory, type:
If you want to test the code, simply type:
And the FinchSync GUI should appear. From now on, you can open the GUI from a terminal simply by typing the command above, saving one whole line of command and several characters from the second line. However, you will still need to open a terminal and type the command in order to access the GUI: wouldn't it be so much better to have a clickable icon on your desktop panel? Fortunately, Ubuntu makes this easy to set up.
Right-click on the panel where you would like your icon and select Add to Panel from the drop-down menu. The Add to Panel dialog box should open:

Select the Custom Application Launcher and click Add. The Application Properties dialog box will appear.

Click the icon and watch the GUI open as if by magic! Ironically, it takes longer to type (and read) these instructions than to actually execute them. I hope that you'll find this a useful mod to your system.
Working with Microsoft Windows
The process for creating and opening the FinchSync GUI is (very) slightly different on Windows. I've only installed it on XP, but having created the directory and copied the Java file to the folder, there is no need to run code at a command prompt: just double click the Java file (called “finchsync Executable Jar File 738KB”) and the GUI will open.
Pretty much everything else is the same as per the Ubuntu instructions although in Windows, the IP address in the status bar of the GUI seems to be the correct one.
Killing the Server using a Web Browser
Simply type http://[ip]:[port]/status into the web browser address bar, type in the user name and password created in Post #2 and click Stop Server.
I find that just exiting the application is sufficient, but there you go!
Syncing Multiple PCs
If you want to sync multiple machines and aren't bothered about keeping your data separate (for instance, work and private information), you can simply create an Alias client server on the PDA.
- Set up the server information on your PC (following the instructions in Post #2)
- Create the Sync Sources on your PC
- Create your Client and allocate the Sync Sources (just follow the instructions in Post #2)
- Set up the server information on your second machine (again, following the instructions in Post #2)
- Add the same Sync Sources on your second PC with exactly the same name(s)
- Create a Client and allocate the Sync Sources
- On your PDA, set up the first server as per the instructions in Post #3
- Add a second server, giving it a separate name but add the name of the first server as an Alias in the Alias dialogue box


As you can see, the first screen shows the Ubuntu server settings and the second shows my laptop with the Ubuntu server name (ironically enough, Ubuntu) in the Alias drop-down menu. When you Test the server connection settings, you'll see the server name (in this case, Laptop) with the Alias in brackets.

Now, data will happily travel between PCs and your PDA: you can (apparently) set up as many machines as you wish. I am currently sharing (and syncing) data between a desktop (Ubuntu – Karmic), a laptop (Windows XP) and my Axim X50 – all wirelessly!
Uninstall FinchSync from Your PC
I can't imagine why anyone would want to uninstall this remarkable program from their PC, but if you do, simply delete the FinchSync directory (the folder and all its contents that you created in Post #2): that's it!
Uninstall FinchSync from Your PDA
Removing the application from your PDA is a little more complicated. First, you delete your servers from the Server list (this is a manual process).
- Open FinchSync on your PDA
- Tap Config
- Tap Server
- Select each entry in turn and tap Remove
- Tap Yes on the dialog box each time it appears
Additional information:
”Two small configuration files may be left by the uninstaller. To remove these files, use the 'File Explorer' to navigate to the folder 'My Device/Program Files' and delete the folder 'FinchSync'.”From the FinchSync Documentation
Avoid Corrupting Your Data
Before synchronizing your PDA close Thunderbird on your desktop and all Outlook programs on your PDA. I can't stress this enough: if you synchronize with Thunderbird open, you will corrupt or delete your data – Don't say that you haven't been warned.
Good practise dictates that you backup your data regularly and your contacts and calendar data is no exception. The good news is that it is relatively easy to write a simple shell script that can automate the process of closing Thunderbird and opening the FinchSync GUI.Open a text editor (not a word processor) such as gedit or (my favourite) Scite and type the following into a new document:
#!/bin/bash
#Run FinchSync from a single command line
killall /opt/thunderbird/thunderbird-bin
# Closes Thunderbird before opening Finchsync as recommended by Markus Rahiff
cd /home/[usrname]/finchsync
# Changes directory
java -jar finchsync.jar
# Executes Java GUI
Save your file in your /home/[usrname] directory as, finchsync.sh. Obviously, the spelling and file extension are important: so get it right!
Now you need to make the file executable. Open a terminal and, if you have stored your file your home directory, type:
chmod +x finchsync.shIf you want to test the code, simply type:
./finchsync.shAnd the FinchSync GUI should appear. From now on, you can open the GUI from a terminal simply by typing the command above, saving one whole line of command and several characters from the second line. However, you will still need to open a terminal and type the command in order to access the GUI: wouldn't it be so much better to have a clickable icon on your desktop panel? Fortunately, Ubuntu makes this easy to set up.
Right-click on the panel where you would like your icon and select Add to Panel from the drop-down menu. The Add to Panel dialog box should open:

Select the Custom Application Launcher and click Add. The Application Properties dialog box will appear.

- The application type is: Application
- The application name is FinchSync
- The command is the directory path and file name. For instance, my path looks like /home/jogga/finchsync.sh – the applet recognizes this as an application because you've made the file executable with the chmod command.
- The comment can be anything that you want. When you hover your mouse over the icon, the system displays the application name and your comment, so make the comment relevant to the operation of the icon
Click the icon and watch the GUI open as if by magic! Ironically, it takes longer to type (and read) these instructions than to actually execute them. I hope that you'll find this a useful mod to your system.
Working with Microsoft Windows
The process for creating and opening the FinchSync GUI is (very) slightly different on Windows. I've only installed it on XP, but having created the directory and copied the Java file to the folder, there is no need to run code at a command prompt: just double click the Java file (called “finchsync Executable Jar File 738KB”) and the GUI will open.
Pretty much everything else is the same as per the Ubuntu instructions although in Windows, the IP address in the status bar of the GUI seems to be the correct one.
Killing the Server using a Web Browser
Simply type http://[ip]:[port]/status into the web browser address bar, type in the user name and password created in Post #2 and click Stop Server.
I find that just exiting the application is sufficient, but there you go!
Thursday, 6 May 2010
Synchronizing WinMob PIM Data with Ubuntu - Post 3
Client Side – Installing & Configuring FinchSync on Axim X50
Originally posted at Mobility Site in the X50 / X51 Forums/Tips and Tricks forum under the pseudonym, Jogga. If you can't wait for the final post, head on over to Mobility Site.
No mystery here, the appropriate download is found on the same page as the PC Server application: make sure that you download the one necessary for your device. For the X50, you need the Pocket PC Client application (Windows Mobile <= 5.0, .NET 1.1) .cab file (or the .zip file).
Download the file to your computer and use Activesync (perhaps for the last time!) to copy it to your pda. Double tapping the file installs FinchSync on your device.
You'll find the program in the Program listing and you open it as you would any other application. Now that it's installed, you have to configure the client to talk to the server.
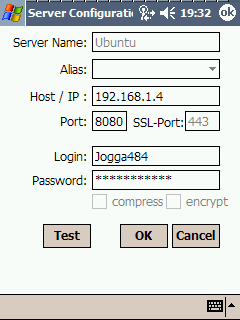
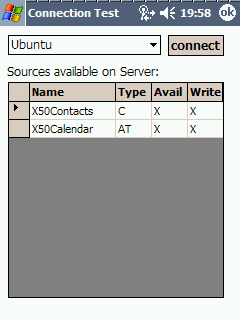
Click the Test button to test the connection to your Server by tapping Connect on the next screen. If all's well, you should see the Sources table appear: if you get an error message, check your settings and/or your firewall.
You're almost ready to sync your data! However, first you should set up your category maps on the client. Category maps help keep data synchronized between discrete machines and discrete categories: for instance, if you sync your PDA between a home and work PC, you may not want your “home” data appearing on your “work” server and visa versa. I used the default settings because I don't really use categories a great deal. If you want to know a little more about how they work, have a look at the Sync Guide Documentation.
To set up your Category Maps, tap Config and then Category Mapping.
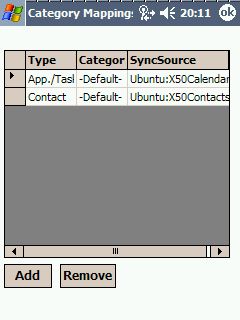
Here's my categories, your initial table will be blank. To add a category, tap Add.
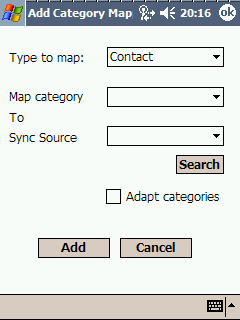
In the above example, I am mapping Contact details on my PDA with my address book on the Sync Sources (X50Contacts): for the Map Category drop down box, I selected the -default- option, but you can map all of your categories back to Thunderbird. Check the Adapt categories option to rename the category field of all existing items according to your mapping.
Make sure that you map all of your Sync Sources to categories and you're ready to synchronise your devices.
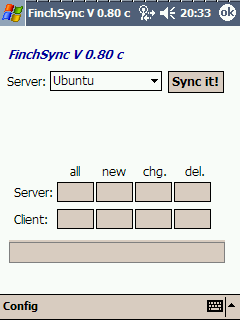
That should be that! I'll post some hints and tips tomorrow but you must make sure that you close Thunderbird before syncing or you may corrupt or loose data!
Good luck and, if you do try this, let me know how it goes. The good news is that FinchSync works on Windows also, so Outlook could be a thing of the past for syncing mobile data!
Originally posted at Mobility Site in the X50 / X51 Forums/Tips and Tricks forum under the pseudonym, Jogga. If you can't wait for the final post, head on over to Mobility Site.
No mystery here, the appropriate download is found on the same page as the PC Server application: make sure that you download the one necessary for your device. For the X50, you need the Pocket PC Client application (Windows Mobile <= 5.0, .NET 1.1) .cab file (or the .zip file).
Download the file to your computer and use Activesync (perhaps for the last time!) to copy it to your pda. Double tapping the file installs FinchSync on your device.
You'll find the program in the Program listing and you open it as you would any other application. Now that it's installed, you have to configure the client to talk to the server.

- Tap Config.
- Tap Server.
- Tap Add.
- Complete the log-in details (established when you set up the client on the Server), making sure that you use the correct IP address and leaving the Alias field blank.

Click the Test button to test the connection to your Server by tapping Connect on the next screen. If all's well, you should see the Sources table appear: if you get an error message, check your settings and/or your firewall.

You're almost ready to sync your data! However, first you should set up your category maps on the client. Category maps help keep data synchronized between discrete machines and discrete categories: for instance, if you sync your PDA between a home and work PC, you may not want your “home” data appearing on your “work” server and visa versa. I used the default settings because I don't really use categories a great deal. If you want to know a little more about how they work, have a look at the Sync Guide Documentation.
To set up your Category Maps, tap Config and then Category Mapping.

Here's my categories, your initial table will be blank. To add a category, tap Add.

In the above example, I am mapping Contact details on my PDA with my address book on the Sync Sources (X50Contacts): for the Map Category drop down box, I selected the -default- option, but you can map all of your categories back to Thunderbird. Check the Adapt categories option to rename the category field of all existing items according to your mapping.
Make sure that you map all of your Sync Sources to categories and you're ready to synchronise your devices.
- Close Thunderbird on Ubuntu (how I wish someone had told me that!)
- Turn on WiFi on your Axim
- Start The FinchSync Server on Ubuntu using a terminal and the java command outlined earlier
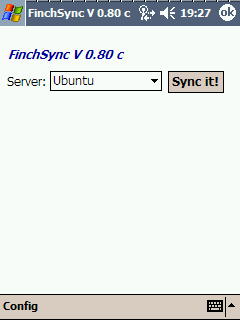
- Start the FinchSync client software on the PDA from the Programs screen
- Select your Server from the drop-down box
- Tap Sync it!

That should be that! I'll post some hints and tips tomorrow but you must make sure that you close Thunderbird before syncing or you may corrupt or loose data!
Good luck and, if you do try this, let me know how it goes. The good news is that FinchSync works on Windows also, so Outlook could be a thing of the past for syncing mobile data!
Wednesday, 5 May 2010
Synchronizing WinMob PIM Data with Ubuntu - Post 2
Server Side – Installing & Configuring FinchSync on Ubuntu
Originally posted at Mobility Site in the X50 / X51 Forums/Tips and Tricks forum under the pseudonym, Jogga. It is the second of four posts: if you can't wait for the next two in the series, head on over to Mobility Site.
Installing FinchSync on Ubuntu is easy:
When the terminal has changed directory, we'll open the FinchSync Gui using:
All being well, you should see the FinchSync GUI.

When the GUI appears, you may receive the error message, 'Address already in use: JVM_Bind': this can be safely ignored for the time being. Next, from the toolbar, select File and Server Configuration and you should see the Server Configuration dialog box.

The http port should be set to a value between 8080 & 8087 (although theoretically it can have any value between 0 and 65535): if the value selected has already been allocated, you'll be prompted to change the setting. Be warned, if you change the setting you must close and restart the server before the changes take effect. Keep cycling through the numbers until you find a vacant port number. If you are using a firewall, you'll have to open this port in order to allow the pda to connect: I use Firestarter and opening the 8080 port is straightforward, so I can help with instructions if needed (anything else and you're on your own!).
If you select the Enable Status Page option, you can kill the server via a web browser using http://[ip]:[port]status. Please note that the IP address is not the one shown on the GUI status bar (at the bottom of the GUI): it is most likely the eth0 IP address followed by the port number you selected. For example, I would type http://192.168.1.4:8080/status into my Firefox browser and the status page appears: to find the appropriate IP address for your set up, open a terminal and type:
When you've completed the user and password fields, click OK (and remember what you've typed!).
Now we can tell FinchSync what we want to synchronize: these are called Sync Sources. Click the Sync Sources tab in the FinchSync GUI.

Obviously, your table will be empty! Click the Add button to start the setup wizard.

Now click the Add button to set up your client.

Enter a name for your device and a password. These are your log-in details when we set up the client side software, so make a note of the details! You can add a description of the device and then select which sources you want to sync by clicking the Add button. A dialog box gives you the options set up in your Sync Sources, just select the ones that you want to sync.
Phew, that's the PC set up: now for the pda!
Originally posted at Mobility Site in the X50 / X51 Forums/Tips and Tricks forum under the pseudonym, Jogga. It is the second of four posts: if you can't wait for the next two in the series, head on over to Mobility Site.
Installing FinchSync on Ubuntu is easy:
- Create a file on your hard drive called finchsync (my path looks like this: /home/jogga/finchsync).
- Download the PC Server application from the FinchSync Downloads Page (you'll have to accept the Terms and Conditions – the file is called FinchSync.jar (738 KB)) and save (or copy) the download to the finchsync folder you created in step 1. You don't need to open the file or do anything clever: simply copy the download to the finchsync directory!
cd /home/[usr]/finchsyncWhen the terminal has changed directory, we'll open the FinchSync Gui using:
java -jar finchsync.jarAll being well, you should see the FinchSync GUI.

When the GUI appears, you may receive the error message, 'Address already in use: JVM_Bind': this can be safely ignored for the time being. Next, from the toolbar, select File and Server Configuration and you should see the Server Configuration dialog box.

The http port should be set to a value between 8080 & 8087 (although theoretically it can have any value between 0 and 65535): if the value selected has already been allocated, you'll be prompted to change the setting. Be warned, if you change the setting you must close and restart the server before the changes take effect. Keep cycling through the numbers until you find a vacant port number. If you are using a firewall, you'll have to open this port in order to allow the pda to connect: I use Firestarter and opening the 8080 port is straightforward, so I can help with instructions if needed (anything else and you're on your own!).
If you select the Enable Status Page option, you can kill the server via a web browser using http://[ip]:[port]status. Please note that the IP address is not the one shown on the GUI status bar (at the bottom of the GUI): it is most likely the eth0 IP address followed by the port number you selected. For example, I would type http://192.168.1.4:8080/status into my Firefox browser and the status page appears: to find the appropriate IP address for your set up, open a terminal and type:
ifconfigWhen you've completed the user and password fields, click OK (and remember what you've typed!).
Now we can tell FinchSync what we want to synchronize: these are called Sync Sources. Click the Sync Sources tab in the FinchSync GUI.

Obviously, your table will be empty! Click the Add button to start the setup wizard.
- Enter a unique name and click Next (as an example, for my contacts source, I used the name X50Contacts which (I hope) is pretty self-explanatory).
- From the Source drop-down menu, select either the Address Book or Calendar option.
- Browse to where your file is stored on your hard drive. You can use the Scan Disk option, but this can take time in Ubuntu and I didn't find it helpful (and it never found the relevant files!). If you are setting up you contacts, you are looking for a file called abook.mab which is in the /home/[usr]/.thunderbird directory in the Default user file. Your calendar is in the directory that you created when you started so it should be easy to find!
- Click Next.
- The next screen gives some additional configuration options. Read Only prevents the client (i.e. your mobile device) from changing source data (not useful if you make changes to your calendar or contacts on the move!).Config opens another dialog box allowing you to block application preventing Thunderbird from opening if a sync is in progress (very useful as you will later see!).
- Click Finish to set up your Sync Source and repeat for additional Calendars or Address Books.

Now click the Add button to set up your client.

Enter a name for your device and a password. These are your log-in details when we set up the client side software, so make a note of the details! You can add a description of the device and then select which sources you want to sync by clicking the Add button. A dialog box gives you the options set up in your Sync Sources, just select the ones that you want to sync.
Phew, that's the PC set up: now for the pda!
Tuesday, 4 May 2010
Synchronizing WinMob PIM Data with Ubuntu - Post 1
Originally posted at Mobility Site in the X50 / X51 Forums/Tips and Tricks forum under the pseudonym, Jogga.
One of the shortcomings of Linux distributions is the difficulty of synchronizing PIM data with Microsoft Windows in general and Windows Mobile in particular, or so I thought! Actually, this perception is more a reflection of Windows than Linux, but as open-source mobile devices are still comparatively rare, syncing Windows devices with Linux distros is still the mobile equivalent of cross-platform nirvana. Notwithstanding the incompatibility issues, I still wanted to find a way of synchronizing all of my PCs and mobile devices and I recently came across a freeware application called, FinchSync by Markus Rahlff that promised to do just that.
Whilst the FinchSync setup is not particularly intuitive for the technically challenged (like me) and the documentation seems a little vague, after some hours of frustration, blind alleys and trawling the FinchSync forum, I have finally managed to synchronize my Axim X50 contacts, calendar and task data with Mozilla Thunderbird over my WLAN.
It's worth mentioning that I haven't managed to get a USB connection to work using Ubuntu (but I think that's mainly because I'm inept) and have only managed to sync over the wireless network. But hey, that's not bad, right?
Anyway, I thought that I'd share the process with you and hopefully help anyone interested in trying this to avoid mistakes. However, this is going to be a marathon post, so I'm going to break it into four sections:
Housekeeping
I recommend that you review (and cleanse) your contact data before attempting this setup and then backing up your address book. That way, if things go wrong (and they might!) you'll be able to restore your data quickly and easily. Use the Export function from the Address Book toolbar (Tools → Export...) and save your address book as a LDIF file on your hard drive (you'll thank me one day).
For some reason, the latest builds of Thunderbird use .sqlite file formats for calendar data and FinchSync can't read this format because there is no native java support! In order to synchronize your calendar, you'll need a .ics calendar file somewhere on your hard drive or network. I set up a folder in /home/[usr]/ (change [usr] to your user name) called mycalendars (so my file path is /home/jogga/mycalendars) and just built a new calendar in Thunderbird for the purpose (of syncing data), but, if you are an old hand with Thunderbird, you'll probably want to import your existing calendar into a new calendar file with the .ics file extension. To create a new calendar:
That's the housekeeping taken care of: it gets a little tricky from here on, but nothing we can't handle!
If you can't wait for the next three posts, feel free to head on over to Mobility Site. While you're there, feel free to sign up and add input where you can.
One of the shortcomings of Linux distributions is the difficulty of synchronizing PIM data with Microsoft Windows in general and Windows Mobile in particular, or so I thought! Actually, this perception is more a reflection of Windows than Linux, but as open-source mobile devices are still comparatively rare, syncing Windows devices with Linux distros is still the mobile equivalent of cross-platform nirvana. Notwithstanding the incompatibility issues, I still wanted to find a way of synchronizing all of my PCs and mobile devices and I recently came across a freeware application called, FinchSync by Markus Rahlff that promised to do just that.
Whilst the FinchSync setup is not particularly intuitive for the technically challenged (like me) and the documentation seems a little vague, after some hours of frustration, blind alleys and trawling the FinchSync forum, I have finally managed to synchronize my Axim X50 contacts, calendar and task data with Mozilla Thunderbird over my WLAN.
It's worth mentioning that I haven't managed to get a USB connection to work using Ubuntu (but I think that's mainly because I'm inept) and have only managed to sync over the wireless network. But hey, that's not bad, right?
Anyway, I thought that I'd share the process with you and hopefully help anyone interested in trying this to avoid mistakes. However, this is going to be a marathon post, so I'm going to break it into four sections:
- This brief introduction
- Server Side installation and configuration
- Client Side Installation and Configuration
- Troubleshooting Hints and Tips
- Axim X50 2003 Second Ed v 4.21.1008
- Ubuntu 9.10 (Karmic)
- Mozilla Thunderbird 3.0.4 with Lightning Calendar 1.0b 1extension
- DELL Inspiron 6400 (XP Pro) running the same Thunderbird setup as above
Housekeeping
I recommend that you review (and cleanse) your contact data before attempting this setup and then backing up your address book. That way, if things go wrong (and they might!) you'll be able to restore your data quickly and easily. Use the Export function from the Address Book toolbar (Tools → Export...) and save your address book as a LDIF file on your hard drive (you'll thank me one day).
For some reason, the latest builds of Thunderbird use .sqlite file formats for calendar data and FinchSync can't read this format because there is no native java support! In order to synchronize your calendar, you'll need a .ics calendar file somewhere on your hard drive or network. I set up a folder in /home/[usr]/ (change [usr] to your user name) called mycalendars (so my file path is /home/jogga/mycalendars) and just built a new calendar in Thunderbird for the purpose (of syncing data), but, if you are an old hand with Thunderbird, you'll probably want to import your existing calendar into a new calendar file with the .ics file extension. To create a new calendar:
- On the main toolbar, click File → New → Calendar...
- Select the, On the network option and click Next
- Select the iCalendar (ICS) option and, in the location dialog box, type: file:///[calendar location]/[Calendar Name].ics (my location path looks like this: file:///home/jogga/mycalendars/Private.ics) and click Next
- Choose the calendar name, colour and email address and click Next
- All being well, you should get a confirmation screen telling you that your calendar has been created (it should also appear on the sidebar): click Finish
That's the housekeeping taken care of: it gets a little tricky from here on, but nothing we can't handle!
If you can't wait for the next three posts, feel free to head on over to Mobility Site. While you're there, feel free to sign up and add input where you can.
Subscribe to:
Posts (Atom)