Showing posts with label Tutorials. Show all posts

Sunday, 19 October 2014

Fixing mp3 Track Duration Errors

I recently converted my music collection to the mp3 format; however, whilst the playback quality is excellent, many of the tracks had erroneous track duration data. This wasn't a particular problem until I copied some of the tracks to my phone which started crashing while playing music and I began to suspect the duration error as the culprit.

Changing duration is not as straightforward as fixing tags (easily achieved using EasyTAG) but there is a great app in the Software Center for doing just that, MP3 Diags.

Track duration errors are caused by missing, incomplete, or corrupt variable bitrate (VBR) headers:

"There are 3 kinds of VBR headers: Xing, LAME, and VBRI. MP3 Diags identifies files having an incorrect or missing VBR header, and allows you to create Xing headers, should you need to." Source: MP3 Diags, MP3 Introduction

Warning, following this advice may corrupt your music files - backup first!

Despite the rather dire warning above, I've experienced no data loss or corruption (at least, none that I've found) and this great app has repaired all of my track duration errors and one or two other issues as well!

If you're using Ubuntu or one of it's derivatives, the best installation option is the Software Center. Open the Software Center and search for mp3diags - don't put a gap between mp3 & diags or you'll only be offered the MP3 Diags documentation. Simply install as usual.

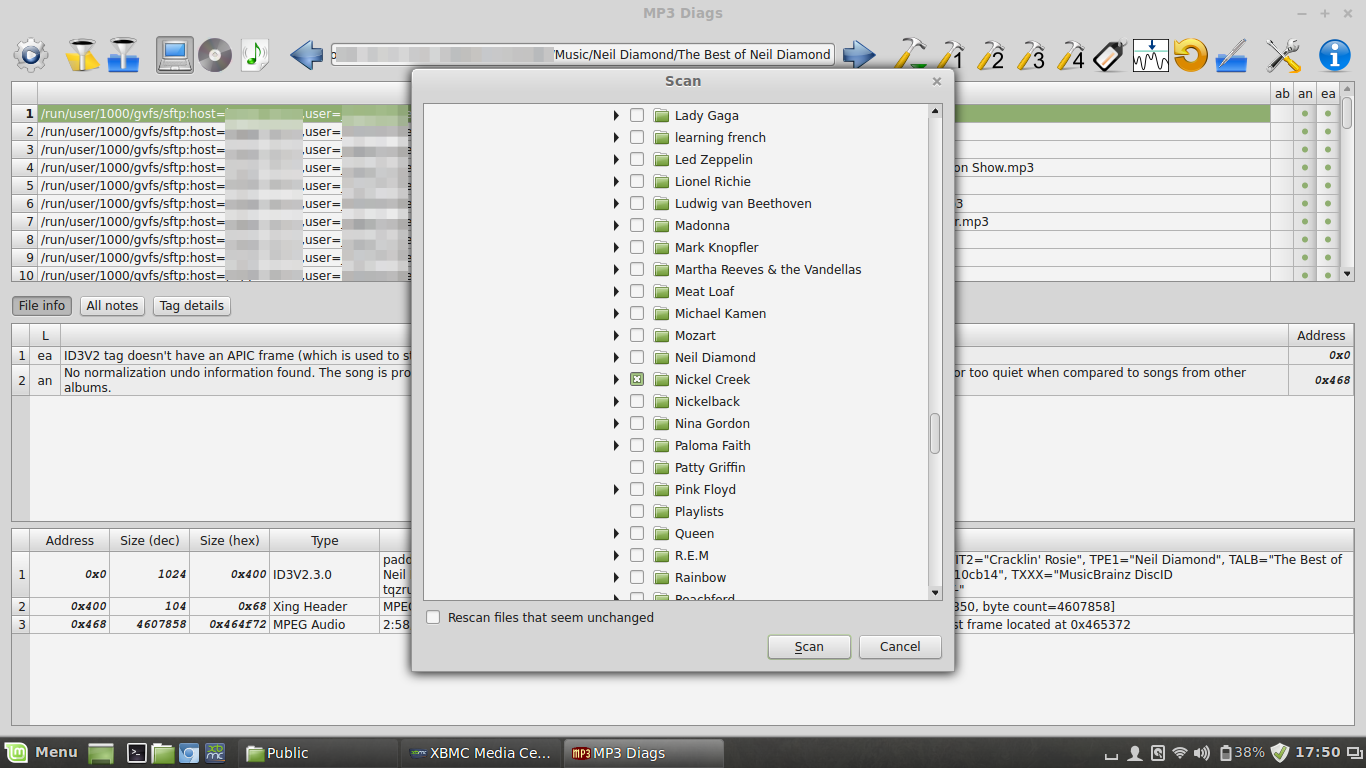
When you open the app you must scan your files for errors. Just click the gear icon (1st on the left of the toolbar) and the browser will open. You can also scan remote files if you have mounted them using SSH: in Mint the route is a little convoluted, try:

run/usr/1000/gvfs/sftp:host=server,user=user/

...and then look for your music directory. Select your directory and then hit the Scan option. This can take several minutes on a single remote directory (album), so patience will be needed if you have a large music library with lots of errors. My repairs took over a week on a modest (3,500 track) library.

If the scan reveals any Xing errors, repair them by clicking the single transformation icon (a hammer with a green arrow) and selecting the Repair VBR data option.

Sources & References:

Sunday, 5 October 2014

Fixing The Internal Microphone - Presario CQ60

It's taken weeks of Googling, but I've finally found a fix for the internal microphone on the Presario CQ60.

I had no luck with the various fixes that I found online until I came across this post which, if I've understood it correctly, suggests that the problem with the internal microphone on the CQ60 is not a software issue but a hardware problem. As I understand the OP's problem, the kernel allocates the wrong pin id at boot: the workaround turns out to be surprisingly simple.

First we need an application developed by David Henningsson at Canonical. It's called HDAJackRetask and it was originally developed to turn unused microphone jacks into additional headphone jacks - brilliant! It's now part of the alsa-tools-gui, so there's no need to add a new repository. Open a terminal and do:

sudo apt-get install alsa-tools-gui

Alternatively, you can download it from the Software Center or Synaptic. When prompted about the additional space (in the terminal method), type y and hit enter.

Open HDAJackRetask from the Main Menu (in Mint Cinnamon it's under Sound & Video). Select your sound card and then, under the Options panel, check the Show unconnected pins option. In the Pin configuration section, look for your Internal Mic, Riser entry, click the Override checkbox, and set the spin button to Not connected.

Next, look for the Pin ID: 0x1d, check the Override checkbox, and the use the spin button to select Internal mic. Now click the Apply now option and test your microphone. If all's gone well, it's time to make this a permanent change: click the Install boot override. You'll see the following message dialog: click OK and reboot.

Sources & References:

Sunday, 3 August 2014

Migrating From XP - Outlook Express to Thunderbird

More on the theme of migrating from Windows XP to Linux. As always, my focus is on Ubuntu and its derivatives, but I suspect that the following process will work for any Linux distro.

One of the concerns that I've encountered when trying to encourage XP users to try Linux is that of migrating data from one OS to another. Usually, this isn't for any utilitarian reason, it's because the user doesn't have a current backup and is (ultimately) terrified of loosing years of work! However, moving (and using) data from Windows to Linux is relatively painless, but what about all that email that's accumulated over the past ten years?

I was recently asked how a user could move all of their email and settings from Outlook Express and use them on Linux. If you're using Thunderbird on your target system, migrating all of your Outlook Express data and settings is fairly easy. Although it's not exactly straightforward or intuitive, it is simple. I've tested the following instructions using a virtual WinXP system and Mint 17 and it takes longer to record what I did than actually do what I did! (if that makes sense!)

The problem is that you can't simply dump all of your Outlook Express data into a file and import it into a new machine: you have to import the data into Thunderbird and then copy your user profile to the target PC. So, the first thing we have to do is download and install Thunderbird on your Windows XP machine. A standard installation is all that's required.

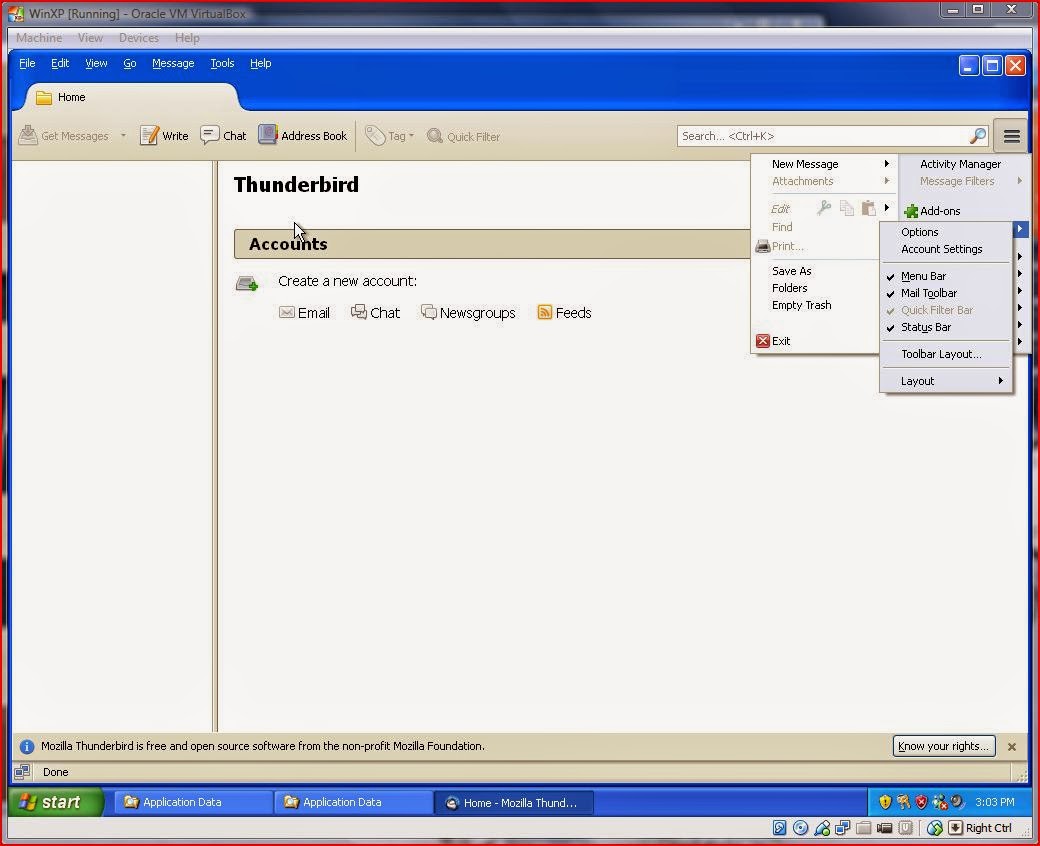
Open Thunderbird and skip the New Email dialog (just click the I think I'll configure my account later" option). If the Menu Bar is hidden, click the menu option (just to the right of the search dialog), hover over Options & then click Main Menu.

From the Main Menu, click Tools & then Import... When the Import dialog appears, ensure that the Import Everything (default) option is selected and click Next.

Select the Outlook Express option is selected and then click next. When the import process is complete, close Thunderbird completely.

Now copy your new Thunderbird profile directory. This can be tricky to locate, but you should find it in:

C:\Documents and Settings\User Name\Application Data\Thunderbird\Profiles.

Your profile will have a random eight digit alpha-numeric string followed by a period (full stop) and the word, default: copy this directory (file) to a USB stick or other portable medium.

If you're changing operating system on the same PC as your Windows XP rig, safely remove your external medium and continue with your installation. If not, just plug your USB stick into the PC to where you want to migrate your data. If your target pc does not have Thunderbird installed, install it from the Software Center (assuming Ubuntu or derivative) or from the Mozilla Downloads page.

Make sure that Thunderbird is closed and that you have selected the Show Hidden Files option in your file browser. Plug in your removable medium (assuming that you haven't already done so) and copy the contents of the WinXP profile to your new Thunderbird profile on the target PC. You'll find the relevant directory under:

/home/user_name/.thunderbird

DO NOT substitute the parent directory from Windows for the parent directory in in .thunderbird: this will cause an application error. Only copy the contents from the old directory to the new directory, overwriting any existing files in the new location. Now open Thunderbird: in the System Integration dialog, select the Set as Default option and you're good to go!

Sources & References:

Friday, 13 June 2014

Getting Started With Tails

Because Tails is designed to be used as a live operating system, in many respects downloading and creating a live disk is the same as most other Linux distros. However, given that security is likely the most important consideration for users, special attention should be paid to validating and verifying the download before using the operating system. The following process is aimed at Ubuntu users, links are provided for other operating systems where appropriate.

You can download Tails from the Tails Download, Verify and Install page.

In order to verify the download, you must also download the Tails signing key which you can get from the same link. But (and this is a big but for the security conscious), how can you be sure that the key that you have downloaded is genuine? It's possible (although, not likely) that the key has been compromised by a man-in-the-middle attack and you may want to ensure that the key that you have downloaded has been signed by members of the Debian Development Team.

"Tails signing key is actually already signed by the keys of several official developers of Debian, the operating system on which Tails is based. Debian makes an extensive use of OpenPGP and you can download the keys of all Debian developers by installing the debian-keyring package. You can then verify the signatures those developers made with their own key on Tails signing key."

First, download the signature from Tails Download page to your Download folder (in this example, home/[user]/Downloads/)1 and check that the key is signed. Open a terminal and then:

gpg --import /home/[user]/Downloads/tails-signing.key

This command imports the key into your gpg keyring. In order to check the signatures, you must first locate the Tails key id: the following code will list all public keys (including the Tails key that you've just imported) in your keyring.

gpg --list-public-keys

The output will include the following entry:

pub 4096R/BE2CD9C1 2010-10-07 [expires: 2015-02-05]

uidTails developers (signing key)

uidT(A)ILS developers (signing key)

The relevant ID is the second part (BE2CD9C1) of the alpha-numeric string on the first line; using this key ID, check the signatures with:

gpg --check-sigs BE2CD9C1

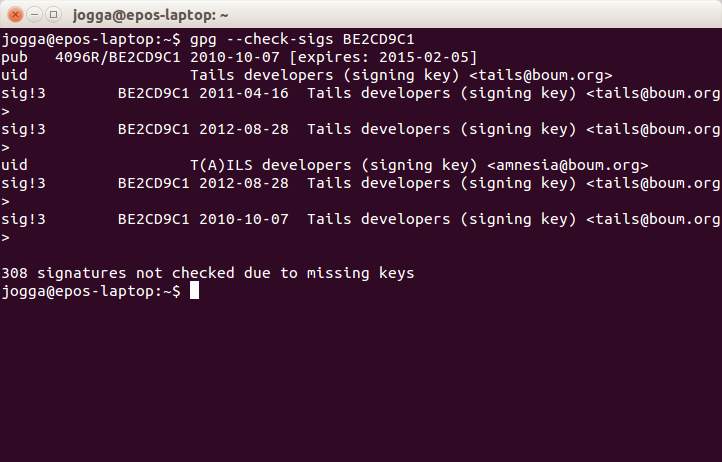
The output will appear as follows:

Note the last line which warns us that: "308 signatures not checked due to missing keys". These missing keys are those of the Debian Developers and others for whom you have no public keys in your keyring. You can download the Debian keys from the Ubuntu Software Center (search for debian-keyring) or with:

sudo apt-get install debian-keyring

Now that you have access to the Debian keys, you can check to see if any of the missing keys are in the Debian keyring:

gpg --keyring=/usr/share/keyrings/debian-keyring.gpg --keyid-format long --check-sigs BE2CD9C1

By using the Debian keyring (rather than your personal keyring) the number of missing keys has been reduced to 300 telling us that eight of the signatories on the Tails key are in the Debian keyring. I think this a more elegant solution that the recommended process: checking random signatures can be both time-consuming and frustrating. Moreover, there is no need to import signatures into your personal keyring that you will be unlikely to use again. Whilst not foolproof, this should give you confidence that the Tails key that you have downloaded is genuine and can be used with confidence to check the Tails .iso file. Fortunately, this is not such a long-winded process as validating the signature!

Change to the Download directory:

cd /home/[user]/Downloads

Next, check the signature of the .iso file matches the signing key:2

gpg --keyid-format long --verify tails-i386-1.0.1.iso.sig tails-i386-1.0.1.iso

If all's gone well, you should see:

gpg: Signature made Sat 30 Apr 2011 10:53:23 AM CEST

gpg: using RSA key 1202821CBE2CD9C1

gpg: Good signature from "Tails developers (signing key) "

Don't worry if you see a warning telling you that "[t]his key is not certified with a trusted signature!", this simply means that you haven't personally signed the Tails key.

Now you're ready to burn the Live Disk. In Ubuntu you simply follow the same procedure as for all Linux Distros: in your file manager, navigate to your download, right-click the .iso file and then select Write to Disc...3. Remember that it is good practise to burn the disk at the lowest possible speed in order to reduce errors.

To use your Live Disk, simply reboot your PC using the optical drive as the first boot device.

That's it! Now you're ready to use the Tails operating system. In the next post, I'll look at the pros & cons of burning a Live USB and consider whether or not to create a persistence file.

Sources & References:

Notes:

    1. Change [user] to suit your circumstances - usually your username
    2. Remember, over time the version numbers will change: make sure that you are referencing the correct file (download) name.
    3. In some other distros (for instance, Mint) this might not be as easy. However, there are appps (such as K3B) that will burn your Live Disk: search the software center or use the link above. Windows users can use Infrarecorder to burn their installation disks.

Thursday, 15 May 2014

Lubuntu 14.04 - Installing Your System

Now that you've checked your installation disk for errors, it's time to install Linux Mint 16.

If it's not already in the drive, insert your installation disc and reboot your pc. Make sure that you have set your pc to boot from the optical drive before booting from the hard drive. As you did when checking the disc, you'll boot to the Lubuntu splash screen

Highlight the Install Lubuntu option & hit Enter.

You'll be prompted for your installation language: if your default language is not already highlighted, use the tab, space, & enter keys to find and select your preferred option.

Do the same to select your location on the following screen.

The next screen provides an opportunity to detect your keyboard layout: if you choose not to auto-detect your keyboard, you can change it in the following screen or after the installation is complete. Just Enter on the No option (highlighted).

Select your keyboard from the Configure Keyboard screen and hit Enter. The next screen will provide additional granularity to your input options.

Now the system will detect your hardware and prepare for the installation proper. Time for a cuppa!

After some time preparing the hardware, the installation will require some user input in order to authenticate the system and the user on any network. The first screen requires a hostname for the network. Most of us can just make something up here or go with the default setting. All that matters is that you can identify this machine on your network - so give it something obvious! Use the Tab button to highlight the Continue option and hit Enter

Next comes the user name and credentials. Full name & username do not have to be the same! You'll also be prompted for a password. Once the user information has been verified, you'll be prompted to decide on whether you want to encrypt your /home directory. For the sake of brevity, I'll select the No option: but you may want to consider this option carefully.

Confirm your time zone - the default should be correct.

Now we get into the more technical aspect of the installation - partitioning. I'm a big fan of partitioned drives and usually have a separate partition for my /home directory. However, as this is a test machine (and this tutorial is aimed at XP users) I'll opt for the Guided - use entire disk option.

There's the obligatory warnings (yes, two chances to say "no") of dire consequences of erasing your disc - be sure that you want to continue before hitting the Enter button. On the second screen, you'll have to select the Yes option before hitting Enter.

Now sit back and relax - your system is being installed!

If you need to establish proxy access to the Internet, the next screen will give you the option to add you details (obviously, I can't help with this!). Most of us can just carry on with the installation.

If you're overwriting an existing operating system or writing to a new drive you should select yes to the warning about the GRUB boot loader and then accept the default for UTC time.

Now you're done - remove the Live CD and reboot!

Sources & References:

  • None

Wednesday, 14 May 2014

Lubuntu 14.04 - Checking Your Installation Disc

The first thing that you should do after you have created your Lubuntu Live CD/installation disc is to check it for defects. Errors can occur on the disc for several reasons, but the most common is through burning the disc at too high a speed.

"If the CD writing fails, try writing at a slower speed. For better results, try the slowest burn speed reasonably possible. Most Gui tools have a "Properties" button to select speed but with Brasero those sorts of options appear after pressing the 1st "burn" button. This is the single most likely cause of problems but is much more widely known than Md5sum/SHA error-checking. Slower speeds ensure greater accuracy."
[source]

Insert your installation disc into your optical drive and reboot your pc. Make sure that you have set your pc to boot from the optical drive before booting from the hard drive. If the disc fails to boot to the Lubuntu splash screen (and your pc boots from the hard drive as normal), you can assume that either the disc is corrupt or that you have not set your boot order correctly.

On reaching the Lubuntu splash screen, select the second option on the navigation menu, Check disc for defects and leave the utility to run.

It takes several minutes to check the disc, but, if all's well, you should see a Integrity test successful message dialog.

Click to return to the splash screen and you're ready to install the operating system.

Sources & References:

Tuesday, 13 May 2014

Lubuntu 14.04 - Creating an Installation Disc

In April, Lubuntu announced that it was releasing the first LTS version of its lightweight flavor of Ubuntu. Its three-year support cycle takes 14.04 Trusty to 2017 & I thought I'd take a look at this latest offering.

In my view, Lubuntu has the potential to become an important operating system, particularly now that Microsoft has deprecated WinXP. Based on Ubuntu & deploying the Lightweight X11 Desktop Environment (LXDE) as its default desktop, it is aimed firmly at "normal users" using "low-spec machines" - filling nicely the potential gap in the market left by XP.

"Lubuntu is targeted at "normal" PC and laptop users running on low-spec hardware. Such users may not know how to use command line tools, and in most cases they just don't have enough resources for all the bells and whistles of the "full-featured" mainstream distributions."
[source]

The obvious machine to test this on is my DELL Dimension 8400: it's ten-years-old and was designed to run XP. However, I'll be testing this on VirtualBox first in order to decide whether I want to roll it out to my stable of operating systems on a permanent basis.

First things first, download the ISO file from the Lubuntu Download page - if you want a previous version, go here - depending on your Internet connection this may take several minutes. Once downloaded, check the integrity of the download by comparing the MD5 hash with the published hash of your particular download. Don't worry too much about what an MD5 hash is, just be content to know that it is unique alphanumeric string for any given file, so if your download is exactly the same as the baseline file provided by Lubuntu (i.e. not corrupted or amended in any way) the two hashes will match.

How To Check Your MD5Sum Hash Using Ubuntu

Open a terminal (Ctrl+Alt+T) and then navigate to your download location:

cd ~/Downloads

Note: your download may be in a different location; amend the code to suit.

Now create the MD5 hash with:

md5sum [name.of.download.iso]

For example, using the 32-bit desktop version, my ISO file is called, lubuntu-14.04-desktop.i386.iso so my code looks like this:

md5sum lubuntu-14.04-desktop-i386.iso

It will take a moment for the system to generate the hash code, but, after a few seconds, you should see a long alphanumeric string followed by the name of your ISO file.

The easiest way to compare the generated & published hashes is to paste one above the other in your favourite text editor.

If you are using Windows, go here to find instructions on how to generate your MD5 Hash. If all's well, you're ready to create your Live Disk.

How To Burn Your Live CD Using Ubuntu

One of the advantages of this lightweight OS is that, whereas Ubuntu must be written to a DVD or USB drive, Lubuntu's ISO file is still small enough to burn to a CD.

Place a blank CD into your CD/DVD writer and close any prompt or automatic burning program (such as Brasero).

Using your file manager, navigate to your ISO file and right-click. Select the Write to disc... option.

In the resultant dialog, select the Properties button and set the Burning Speed to the lowest setting (this should minimize copying & burning errors). Click Close and then Burn to start the burning process. The disc should auto-eject when the process is complete.

Now your disc is ready to check, run a live desktop session, or install Lubuntu to your hard drive.

Sources & Resources:

Saturday, 10 May 2014

ufw - Letting Samba Play

In yesterday's post on security I mentioned that, if you share files on your network using Samba, you'll have to add some special rules to your firewall. Fear not, this is pretty easy!

Open a terminal and type the following commands pressing enter after each one.

sudo ufw allow proto udp from 192.168.1.0/24 to any port 137

sudo ufw allow proto udp from 192.168.1.0/24 to any port 138

sudo ufw allow proto tcp from 192.168.1.0/24 to any port 139

sudo ufw allow proto tcp from 192.168.1.0/24 to any port 445

You may not have the same address as the one used in the example code above - you can check your own ip address in your terminal (in Linux) using:

ifconfig -a

Find your (live) network connection from the list and identify the inet addr data and amend the above rules accordingly. As you add each new rule, the terminal will confirm that it has been added successfully. However, you can check the status of your firewall once all of the rules have been added with:

sudo ufw status

If all's gone well, you should see something like the screen below:

Remember, to access folders and files you'll need a Samba password on the server (you'll be prompted for your username & password when you try to access the files through your file manager). You can add a user and password from the terminal:

sudo smbpasswd -a [username]

Change [username] to suit your circumstances. You'll be prompted for you root password (if you're not already operating at elevated permissions) and then for a SMB password - this is the password that you'll use to access files from a client computer. Confirm your SMB password when prompted.

Reboot and you should be able to access files from a remote client. Remember, you will have to open these ports on any pc with ufw enabled if you want to share folders and files using Samba.

Sources & References:

Friday, 2 May 2014

14.04 Replacing LibreOffice With OpenOffice

Recently I was asked to replace the bundled LibreOffice with OpenOffice on a vanilla install of Ubuntu 14.04. It's kind of tricky because you have to remove everything connected with LibreOffice before OpenOffice will install.

First, uninstall LibreOffice. I tried several methods but, in the end, the following was the only one that worked. Open a terminal (Ctrl+Alt+T) & type:

sudo apt-get remove --purge libreoffice*.*

Download OpenOffice into your Downloads folder and then right-click on your download and click Extract Here. The resultant directory (/home/usr/Downloads/en-GB)* contains a sub-directory called, DEBS - change to this directory using the terminal:

cd /home/usr/Downloads/en-GB/DEBS

Now do:

sudo dpkg -i *.deb

Not quite finished: we need to integrate OpenOffice into the Ubuntu desktop. Change directory to the ./DEBS/desktop-integration folder:

cd ./desktop-integration

Now run the dpkg instruction again:

sudo dpkg -i *.deb

Now, exit the terminal and you should find OpenOffice in the dash.

Sources & References:

Notes:

  1. * Where usr is your user name & en-GB is your installation file after extraction.

Tuesday, 23 April 2013

Seeing Clearly

My refurbished PC is up and running but I wanted to share my screen using a VGA switch. This had a disastrous effect on Ubuntu's appearance as the OS didn't seem to be able to detect the screen's native resolution through the switch although it had no problems when I plugged the cable directly into the video card.

There's a fair few solutions on the web, but I couldn't seem to make any work, so I cobbled together a fix which, although not particularly elegant, does work (for me). Simply put, I automate a command at startup that adds the desired resolution and forces Ubuntu to adopt it as the default.
There are a couple issues with my solution:
  • The script runs at startup not at boot, so I'm stuck with a low-res login screen.
  • The script (initially) runs too early giving me some weird video effects until the resolution had been reset.
  • This will only work for my login
As I'm the only user, I don't have to worry about multiple fixes. Moreover, I've fixed the second issue and resolved to live with the first. Here's how I solved the problem:

First of all, ascertain the monitor's native resolution. I just Googled mine, but if you have the manual, the information is probably in there. My resolution is 1280x1024 with a refresh rate of 60Hz. Now create the resolution in Ubuntu. Open a terminal and type:

sudo cvt 1280 1024 60

Change the values to suit your monitor (horizontal, vertical, and the refresh rate). The output of this command will look similar to that below.

# 1280x1024 59.89 Hz (CVT 1.31M4) hsync: 63.67 kHz; pclk: 109.00 MHz
Modeline "1280x1024_60.00" 109.00 1280 1368 1496 1712 1024 1027 1034 1063 -hsync +vsync


We're interested in the second line (the one starting Modeline): we'll be using this information in our script later.

Next, determine the Output Port Name (aka monitor designation). In your terminal, type:

sudo xrandr -q

The output of this command gives you information about your monitor and how it's connected to the PC. The output will depend on the video driver in use; for my analogue connection, the port name is VGA-0. If you're uncertain which designation is correct, look here (under Output Port Names) to see which is the most likely.
Now prepare the script that will run at startup. Open a text editor such as Gedit with:
sudo gedit /home/username/.resfix
Then:
#!/bin/bash
      # Fix screen resolution at boot via VGA switch
xrandr --newmode "1280x1024_60.00" 109.00 1280 1368 1496 1712 1024 1027 1034 1063 -hsync +vsync
xrandr --addmode VGA-0 1280x1024_60.00
xrandr --output VGA-0 --mode 1280x1024_60.00


Change the values (in red) to suit and then save and close your file. Next, make the file executable. In a terminal:

sudo chmod a+x /home/username/.resfix

Now add the script to the startup routine. The easiest way to do this is via the shutdown button - just select Startup Applications... from the dropdown menu. In the Startup Applications Preferences dialog, click Add. Now complete the Edit Startup Program:
  • Name: anything you want!
  • Command: /home/username/.resfix
  • Comment: something useful!
One last thing to do and that's to delay the script so that it minimizes the weired video. In a terminal:

sudo gedit /home/username/.config/autostart/.resfix.desktop

At the end of the file, add the following:

X-GNOME-Autostart-Delay=15

The number is the time in seconds that you want to delay your script: change yours to suit. Reboot for your changes to take effect.

Sources &References:

Sunday, 8 July 2012

NoMachine - Installation & Configuration

I use NoMachine's NX Client to connect to my FreeNX server: it's fast and accurate and gives the user an almost local desktop experience. As I'm just loading it onto my 1501 (running Kubuntu), I thought it would be useful to record the installation & setup process.

First, head over to NoMachine's Download page and select the NX Client for Linux. You can download this either as a .tar or a .deb package - I'm going with the DEB!

Click on the download icon and you'll be taken to the download page (yes, it is a bit clumsy) and there select the Download Package option. Once the package is downloaded, navigate to the download location and click on the file: the packager installer should open automatically.

Click the Install Package option.

Use your file browser to navigate to /usr/NX/bin and click on the nxclient application: this should start the NX Connection Wizard.

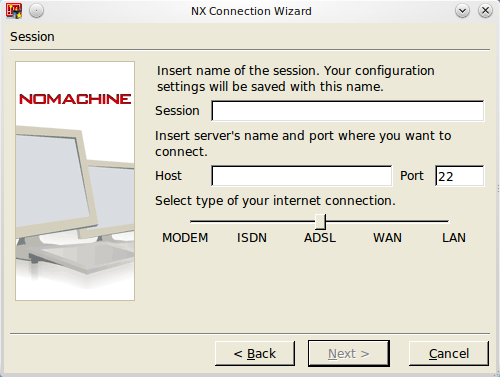
  1. Your Session name can be anything you like. For instance, if you want to set up two sessions, one behind your router (LAN) and one for when you're outside your router (WAN), you could call them Local and Remote respectively.
  2. Your Host name will depend on how you intend to connect to your server:
    • From inside your LAN, you'll probably connect using your LAN IP address - something like 192.168.x.x (where x is a number).
    • If you are outside your LAN and have a static IP address, you can connect using the ISP issued address - you'll find this from your router/modem interface.
    • If you don't have a static IP address and use a DDNS service like No-IP, you'll use the human friendly name that you allocated to your server when you signed up for the service. It'll be something like; host.no-ip.org or whatever subdomain you chose.
  3. NoMachine uses SSH as its connection agent so the default port is 22. You can change this port number by amending the /etc/ssh/sshd_config and (perhaps) the /etc/nxserver/node.conf files: you'll find instructions on how to make these amendments here
  4. Unless you have a specific reason, leave the Internet Connection Type as ADSL.
  5. Click Next
  6. In the Desktop dialog, leave the OS type as Unix but change the desktop type to Custom and then click the Settings... button
  7. Select the Run the following command radio button and enter the following command in the dialog box below:

    gnome-session --session=ubuntu-2d

    Now select the New virtual desktop radio button in the Options dialog and click OK. Don't change the Disable encryption option!
  8. Choose the display sizes as appropriate and click Next.
  9. Now click Finish

Finding the client depends on what version of Ubuntu you're running: in 12.04 just use the dashboard and type nxclient; in 11.04, you'll find it lurking in the Internet menu (as you will with Kubuntu).

When the client starts you'll be prompted to authenticate yourself by providing your username and password. Use the Session drop-down to select the session type and enter your details. Then simply click the Login button.

Sources & References:

Saturday, 7 July 2012

Rhythmbox Extras


Now that Rhythmbox is the default music player in Ubuntu 12.04, it's probably worth getting the best out of it. One notable absentee from the shipped application is an equalizer. You can install this plugin individually or you can install a range of working plugins from a ppa mainatined by fossfreedom.

To install the complete collection of plugins, add fossfreedom's ppa. Open a terminal and type:

sudo add-apt-repository ppa:fossfreedom/rhythmbox-plugins

Then update:

sudo apt-get update

Then install the plugins with:

sudo apt-get install rhythmbox-plugin-complete

Once installed, open Rhythmbox and click Edit and then Plugins: check the Equalizer checkbox and you're done.

Sources & References:

Thursday, 5 July 2012

Static IP with No-IP


One minor problem that I've experienced with my new server set-up is random changes in my IP address. Ordinarily, I would expect my IP address to stay fixed for as long as my router remained up and connected to the WAN, but short interruptions at the exchange have renewed my IP address on several occasions meaning that I couldn't connect to my network using NoMachine. My new ISP doesn't offer static IP addresses to domestic customers (no surprise there), but I have found a way to achieve the same result using a dynamic IP address.

No-IP is a service that uses a client to update and redirect service to map a static (DNS) or dynamic (DDNS) IP address to an easy to remember subdomain. The good news is that, when my exchange renews my IP address, I don't need to worry any more, I just point No-Machine to my server's new subdomain. Even better, the entry level service is free! The bad news is that the installation instructions for Ubuntu 12.04 out there on the Internet are not as accurate as they could be and I found installation a little tricky. So, here's how I did it!

Firstly you have to sign up for your No-IP account and set-up your host in the Account section - you'll need to know your current IP address for this. The process for setting up your host is pretty straightforward, so I won't replicate it here.

Next is to install the client on your server: don't bother with the sudo apt-get install option to download the No-IP client (suggested on the No-IP site), it doesn't work! Go to the downloads page, click on the penguin and save the file to the location of choice (mine was home/jogga/Downloads/). When the client has downloaded, use Nautilus to navigate to the download directory, right-click the noip-duc-linux.tar.gz file, and select the Open With Archive Manager option. Click Extract.

Now open a terminal and change directory to your extracted file:

cd /home/jogga/Downloads/noip-2.1.9-1

Tip: keep an eye on your folder/version number - mine is 2.1.9-1; yours could be different.

Now issue the make command.

sudo make

Now issue the make install command.

sudo make install

You'll be prompted for your login details and password. Leave the update interval to 30 (unless you have a good reason to change it) and check that the correct nic is selected (probably eth0).

To check that the client is running:

/usr/local/bin/noip2 -S

If not:

/usr/local/bin/noip2

That's it!

Sources & References:

Wednesday, 31 August 2011

ttf-mscorefonts-installer Package - Don't be Fooled!

So, you think that by installing the ttf-mscorefonts-installer package via KPackageKit that you now have access to the Microsoft fonts? Well, if you have installed the package via the software manager, it's worth checking that it's been properly installed!

To check, open a terminal and type:

locate Arial

If you return to your command prompt without listing any files or directories, the package hasn't been installed even though KPackageKit lists it as an installed package. This may be the result of a bug in KPackageKit that prevents the user from accessing (or, even seeing) the End User Licence (EUL) Agreement.

There are a couple of ways of fixing this, but I found the easiest was to purge the existing package (using the terminal):

sudo apt-get purge ttf-mscorefonts-installer

And then reinstall the package (again, using the terminal rather than KPackageKit):

sudo apt-get install ttf-mscorefonts-installer

Now the Microsoft EUL Agreement screen should appear:

  • Hit TAB to highlight the < OK > option in the EUL Agreement screen and press Enter.
  • Select < Yes > in the next (Configuring ttf-mscorefonts-installer) screen.

  • When the package has finished installing (you return to your command prompt), force the cache to reload:

    sudo fc-cache -f -v

  • Now check that your fonts are installed:

    locate Arial

Now you should be able to select the fonts for use in the System Settings and application properties dialogs.

Sources & references:

  • None

Monday, 25 July 2011

Plan C

Given my views on the cloud, I've been thinking about alternatives to uploading data backups to third-party servers.

In common with other types of memory, flash memory has seen a significant fall in price over recent years and large usb flash drives of 64GB can be had for under £70 (or as little as $90 if you're lucky enough to live in the USA). Flash drives are also small and portable, making them an ideal format for keeping data backups close at hand and separate from the data source.

However, size can also have its disadvantages: flash drives are easily misplaced or stolen, so keeping data secure, even if it should fall into the wrong hands, is of paramount importance.

The good news is that it's easy to create an encrypted directory on a flash drive using free encryption tools readily available from the Ubuntu Software Centre: just install EncFS & Cryptkeeper and you're good to go!

To create your directory:

  • Insert your usb flash drive & and it should mount under the /media/ directory.
  • Click the Cryptkeeper icon in the systray and select the New encrypted folder option.
  • In the Create a new encrypted directory dialog, select the usb drive from the Places menu and type a name for the new directory in the Name: text box.

  • Click Forward.
  • Enter & confirm a password for the directory and click Forward.
  • The directory should be created and mounted.

To import the encrypted folder on another machine:

  • Insert your usb flash drive & and it should mount under the /media/ directory.
  • Click the Cryptkeeper icon in the systray and select the Import EncFS Folder option.
  • In the Import and Encfs encrypted folder dialog, select the directory with a name ending with _encfs and then type a name for the mount point in the Location: text box.

  • Click the Forward button.

At any other time you can mount the encrypted directory by inserting the flash drive, clicking the Cryptkeeper icon, and selecting the checkbox next to the directory name. You'll be prompted for your password and your file browser will display the directory.

Now you can store data in the directory without the need to encrypt individual files. It is worth pointing out that flash drives have limited life-spans so it may even be prudent to have a Plan D!

Sources & References:

Sunday, 24 July 2011

SciTE(ing) Numbers

Having recently figured out how to change the default language and turn on line-wrapping in SciTE, I've just got around to amending the SciTE properties file on my laptop. Although I don't do any programming, I thought that it might be useful to turn on the line-numbering function at the same time.

Open a terminal and type:

sudo cp /usr/share/scite/SciTEGlobal.properties /usr/share/scite/SciTEGlobal.properties.bak

This command creates a backup of the SciTEGlobal properties file and saves it with a .bak extension in the same directory as the original. Inexplicably, I omitted this step in my previous post - however, it is always a good idea to create backup copies of system or properties files before making changes!

In order to turn on the line numbering function, we have to amend two properties in the Global Properties file. Using the command line, open the file with:

sudo gedit /usr/share/scite/SciTEGlobal.properties

The first property to change is the line.margin.visible variable. Open a search dialog in gedit (Ctrl + C) and type:

line.margin.visible

All that is required is to un-comment this line (remove the # character from the start of the line) in the SciTEGlobal.properties file. Next, we need to specify that the margin should expand as the number size increases. The line under the line.margin.visible property should be the line.margin.width property with a default value of 4. Change this variable to read:

line.margin.width=3+

Save the changes and close the SciTEGlobal.properties file. When you next start SciTE, you should now have line numbering turned on by default.

Sources & References:

Sunday, 10 July 2011

Sharing Mint

Here's an interesting fact; file and folder sharing is not enabled by default in Mint. Fortunately, it's easy to fix this oversight.

To enable sharing from Nautilus, you'll need to install an application called, nautilus-share from the Software Manager:

If you want to share your file or directory on your network and you're using SAMBA, you'll also need to add a username and password to the smbpasswd file just open a terminal and type:

sudo smbpasswd -a [user_name]

Where [user_name] is the name that the remote user will use to login to the shared folder.

Once the username has been accepted, you will be prompted for a password and then prompted to confirm the password. Once you have rebooted your PC, sharing is a simple matter:

You can also add a comment, choose to allow users to create and delete files, and allow guest access from the same dialog box.

Monday, 4 July 2011

Deleting Files Securely.

It's no secret that deleting files from a directory doesn't actually erase the files from a hard-drive: it simply marks the disk space as writeable (or empty) and removes any links to the file from the file-tree. For most purposes this is sufficient, but what about those sensitive bank account records and other files that you'd rather not leave hanging around?

Fortunately, Ubuntu ships with the GNU core utilities package which contains the shred command to overwrite a file and effectively destroy its data1.

Let's say that you have a text file called test.txt in the your /home/USR_Name directory that you want to obliterate. Open a terminal and type:

$ shred -u -z -v -n [N] /home/[USR_NAME]/test.txt

Where:
-uTruncates & removes the file after overwriting.
-zAdds a final overwrite with zeros to obscure the shredding process.
-vShows the progress (verbose output) of the operation in the terminal window.
-nThe number [N] of iterations instead of the default.

So, to shred the test.txt file from my /home/[USR_NAME] directory with 30 iterations:

$ shred -u -z -v -n 30 /home/jogga/test.txt

The command can manage multiple files and wildcards. For instance, if you want to delete all .jpg files in a directory; change to the directory (cd /home/[USR_NAME]/directory) and type:

$ shred -u -z -v -n [N] ./*.jpg

However, you should exercise caution when destroying multiple files (or, in fact, when destroying individual files)!

Sources & References:

Notes:

1 There are limitations to this claim: some file systems negate the efficacy of the shred command and you should read the man page to ensure that this form of data obliteration meets your needs. In Ubuntu, the ext3 file system is particularly problematic.

Tuesday, 28 June 2011

Cryptic - EncFS & Cryptkeeper

Encrypting individual files and emails is all very well, but what if you want to protect a whole directory? Fortunately, it is easy to create and manage encrypted directories in Ubuntu1 using EncFS (encrypted File System) and a small system tray applet called Cryptkeeper.

First you should ensure that you have the package, encfs installed. You can do this from Synaptic or by opening a terminal and typing:

sudo apt-get install encfs

Next, open the Ubuntu Software Centre and search for the Cryptkeeper applet.

Just click the Install button and, when the applet has finished installing, reboot your system.

If all has gone well, you should see the Cryptkeeper applet appear in your Gnome-panel (or your system tray applet in the dock of your choice). Right-clicking the applet presents a pop-up menu - click the New encrypted folder option to create your new directory.

Choose a name and location for your directory and click the Forward button.

Enter and confirm a password and click Forward.

That's all there is to it! The directory is not mounted by default and you must select it from the applet's pop-up menu when you want to access your files. When you select the directory that you want to open, you'll be prompted for your password. It's worth taking a few minutes to browse the linked pages below: this is not a block device encryption method and there are advantages and disadvantages to using this process for protecting your files.

Sources & References:

Notes:

  1. This is only partially true: the following instructions work for releases prior to 11.04 but not in Unity. To use the systray applet as described here, you'll need to revert to Ubuntu Classic if you're using 11.04 or above!
    Alternatively, type man encfs into a terminal and use the commands to manage encryption without the Cryptkeeper applet.

Monday, 13 June 2011

Create and Mount a Partition in Ubuntu

If you didn't allocate all of your hard drive to your Ubuntu installation and find yourself with a few GBs of unallocated storage, you can utilize some (or all) of this extra space as a separate drive and configure it to mount either automatically (at boot up) or manually (by command). There are some advantages to having disparate partitions on your hard disk, for instance, you can use a partition as a backup location or as a file server for your music or photographs: often these data are protected from any catastrophic system failure (short of a mechanical failure) and can be recovered when the OS has been repaired.

However, before outlining the steps to create a mount, it's worth pointing out that playing around with partitions can have disastrous consequences: backup your data to a separate storage device before making changes to your partition table. If you are unfamiliar with the precepts of drive partitioning, familiarise yourself with the information on the Ubuntu help pages.

Perhaps the easiest way to manage partitions is to use a partition manager (also known as a partition editor) - I'll be using GParted for this post and you can download and install the program from the Ubuntu Software Centre. I'm also assuming that you have some unallocated space on your drive and it is not my intention to discuss resizing partitions in this post.

When you open GParted (Main Menu > Administration) you'll see a visual representation of your hard disk - right-click on the unallocated space and select New from the pop-up menu. In the Create new Partition dialog you can set the parameters for your partition, including the size and name (label). I recommend using ext4 for the file system in Ubuntu. Once you've adjusted your settings, click the Add button and then Apply from the main menu.

Now that the partition has been created, you'll need to create a mount point:

"A mount point is a directory (typically an empty one) in the currently accessible filesystem on which an additional filesystem is mounted (i.e., logically attached)."
In other words, the mount point is a gateway to another file system: when the gate is unlocked (the file system is mounted) you have access to the files and directories on that file system; when the gate is locked (the file system is unmounted) you don't have access. Typically, when you plug in an external drive to your system it is automatically mounted under the /media/ directory, so this is where I recommend you create your mount point: however, you don't have to create it here. Open a terminal and type

sudo mkdir /media/partition_name

(Where partition_name is literally the name of the partition as you want it known: for instance, you could call it Jogga's Private Drive or Private Storage.)

Next, Ubuntu needs instructions on how to mount this drive and you'll need to amend the /etc/fstab/ file. To do this properly, you'll need the UUID (Universally Unique Identifier label) of your new drive. This is easily obtained using GParted - right-click your partition and then select Information from the pop-up menu. G Parted allows you to copy text from the Information dialog so avoiding mistakes typing a long UUID number can be avoided!

However, you can also get the same information from the command line:

sudo fdisk -l

With the UUID information, you're ready to make the changes to the fstab file, but first:

sudo cp /etc/fstab /etc/fstab.bak

This command makes a backup copy of the file so that you can restore it if necessary!

Now, open the fstab file with:

sudo gedit /etc/fstab

And, when the file is open, add the following line:

UUID=UUID Number /media/partion_name ext4 defaults 0 0

Change the text to suit your partition UUID and name. This command will automount the partition at boot, but that's not obligatory: by changing the defaults command to noauto you can prevent the drive from auto-mounting. For further instructions on this and other configurations, review the information on the Ubuntu Documentation pages.

Now you can mount the paritition with:

sudo mount -a

All being well, you should see your new partition in the media window of Nautilus and it should mount each time you boot.

Sources & References: