Sunday, 27 February 2011

The British Obsession

Being British, I'm obsessed by the weather!

Forecastfox Weather is a great add-on for Firefox.
"Get international weather forecasts from AccuWeather.com and display them in any toolbar or statusbar with this highly customizable and unobtrusive extension."
Using your cursor to hover over the various icons in Firefox's status bar, activates information pop-ups.


You can set your location, dictate the number of forecast days, and configure the add-on to display information in the units of your choice. Excellent!

It's the Simple Things

Advanced users won't be particularly impressed with the contents of this post, but it's always nice to see how far one's experience has developed.

I'm still undecided about a backup strategy. Using Simple Backup's default settings on my desktop resulted in a full backup file (compressed using gzip) of 25GB. Subsequent incremental backups are still over 1.2GB apiece. Whilst space is not necessarily the strategy determinant, I do have four computers to consider: potentially, that's 120GB of data per week to worry about.

This morning I was thinking about what is important data to me. I'm a home user so my important data are my documents and my configuration files. I know where to find my documents, but my configuration files tend to be dispersed more widely around my file system. Configuration files are important, among other things, they hold variables that tell programs how to behave (for instance, see the smb.conf file for the variables used by Samba).

Finding these files is no problem using a terminal: I opened a terminal and typed:

locate *.conf > /home/jogga/Documents/conf_files.txt

locate is simply a command that tells the system to search: this is a much faster method than using the search option in Nautilus.

* is a wildcard character, used with the .conf file extension, this tells the system to return a list of all files with that extension.

The next command (the > character) is an input/output redirection: it tells the system to send the output of the command somewhere other than the terminal screen. In this case, I've specified a text file (called conf_files.txt) in the /home/usr/Documents directory. Obviously, your user name is unlikely to be jogga!

If the output files specified doesn't exist, it will be created by the system. If it does, this command will overwrite the contents! To append data to an existing file, use >> (see William Shotts' book, The Linux Command Line for more information).

When the search and redirection are complete, the command line returns to a standard CLI prompt, something like:

jogga@jogga-laptop:~$

If you want to make sure that the file has been created, use the list command (ls).

jogga@jogga-laptop:~$ cd ~/Documents
jogga@jogga-laptop:~$
ls


You can also open the file from the command line using your favourite text editor. Gedit is loaded by default in Ubunutu.

gedit /home/jogga/Documents/conf_files.txt

However, I like Scite, which can be installed from the Ubuntu Software Centre.

scite /home/jogga/Documents/conf_files.txt

Redirecting the output of the locate command to a text file means that you can review it at your leisure rather than scrolling through the terminal window. This is particularly useful if the output of a command is likely to be substantial. Overall, using the terminal for this sort of work is far more efficient than using Nautilus.

As for my backup strategy, I now have a list of files that will help me to determine what information must be saved and what can be left to the vagaries of an OS re-install if disaster strikes!

Saturday, 26 February 2011

Blogger Update

Google has added some functionality to its Blogger software.

There's some nice new features if you edit your posts in HTML. For instance, Blogger now has improved image handling, including image positioning:
"When you add an image from the dialog into your post it will be placed at the insertion point instead of at the top of the post."
That saves a lot of cutting and pasting!

Blogger has (at last) also added a decent preview function:


which allows you to view your post as it will appear in your blog and not as a simple text rendering - very nice!

Another nice feature with the preview facility is that you can leave the preview open and just hit F5 or Ctr + F5 to force a page refresh (although it may take a few seconds for the updates to be available to the preview - be patient or save the draft first!).


Other touches include warnings if you haven't closed your tags properly and Blogger also claims to handle lists and tables more effectively than previously (click Post Options at the foot of the post window to select how Blogger manages line breaks).


To take advantage of the new features, you have to enable the advanced option in your Blogger settings. Click on Settings from the tab menu at the top of your Blogger home page and then Basic (if it is not already selected). Scroll down to the Global Settings section and select Updated Editor (Recommended).

Sources & References:
Blogger Help: An Overview of the new post editor

That Damned Windows Key

Getting the DELL Inspiron's keyboard to behave as I wanted turned out to be far easier than anticipated but as usual, I made it far more laborious than was necessary!


To get Ubuntu to scroll through your open Windows, all you need to do is enable Extra in the Visual Effects dialog box! Once enabled, holding the Windows key and toggling the Tab key will scroll through your open applications.

Friday, 25 February 2011

Keyboard Conundrum

My little DELL Inspiron 1501 is proving to be an excellent test machine, but it has also presented a few interesting challenges in its own right.

One minor irritation that has plagued my Christmas acquisition is the behaviour of the Alt Gr key. I've always found it useful to insert special characters from the keyboard while I'm typing rather than searching for the insert special character option (or using copy & paste in applications that don't have a special character set). For instance, to insert the acute accent in a word like exposé or café, I just type: Alt Gr + ; followed by e. However, the Alt Gr key on my 1501 has remained obstinately dumb since the installation of Ubuntu.

The fix is quite simple: open a terminal and type

sudo setkeycodes 91 100

Type your administrator password at the prompt.

That's it! This fix has survived the reboot test and I'm assuming that it is a permanent solution. Now to fix that damned Windows key.

Sources & References:
Launchpad Bug #285908 zanonmark - post 66
Ubuntu Manpage getkeycodes
Ubuntu Manpage setkeycodes

Auntie on Rhythm

Having fixed Rhythmbox yesterday, I've been exploring the program's abilities in a little more detail.

One of life's little pleasures is listening to a Quins game on a Saturday afternoon. Usually, I just log on to the BBC and use the iPlayer and load BBC Radio London. However, I thought that it would be nice to be able to use Rhythmbox; all that's needed is the URL of the radio station's feed. Fortunately, the BBC lists its national stations on the iPlayer FAQs page and local stations on a separate FAQs page.

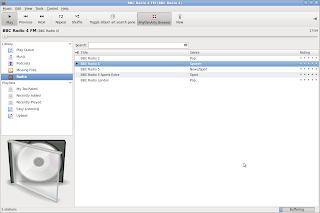
To add the link to a new radio station in Rhythmbox, navigate to the Radio browser in the program.


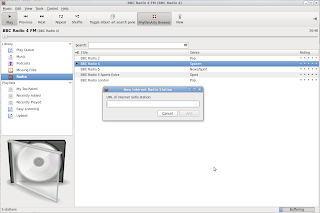
Click the New internet radio station button on the toolbar (or right-click the radio icon in the sidebar.


Copy and paste the URL into the dialog box and click the Add button.

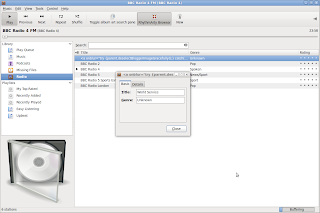
When the radio station has been added to the browser, right-click the new station and select Properties.


Here you can add a human readable title and a genre description. Click Close and you are ready to stream internet radio to your PC via Rhythmbox!

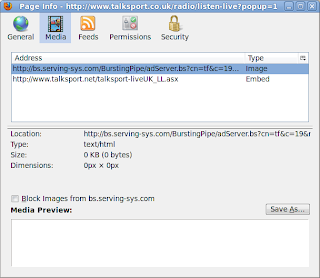
If you're having trouble finding the URL of a station, try opening up the station's web-based Listen Now or Listen Live facility. If you're using Firefox, right-click the player and select the View Page Info option. Then click the Media option on the toolbar.


In the example above, the correct URL is the address titled, "Embed" in the dialog window. Simply copy and paste this address into Rhythmbox's new internet radio station dialog box as before.

Happy listening!

Thursday, 24 February 2011

What a Difference an 'E' Makes

I bumped into my first problem with Lucid yesterday: Rhythmbox crashed (more accurately, closed) when I tried to rip a CD to my collection. Anyone who has followed my various battles with Samba and Rhythmbox will know that this program has given me more headaches than just about all the others put together and I confess that I had that sinking feeling when this happened last night.

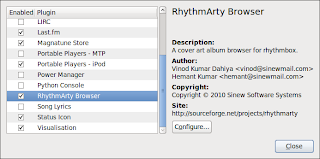
It turns out that it's one of the plugins that's causing the difficulty. I'm not sure which one, I disabled them all and so far I've only re-enabled Cover Art and RhythmArty Browser (both seem to be working with no ill-effects). Ironically, I don't seem to miss the other plugins!

Anyway, while I was fixing Rhythmbox (again), I thought that I'd take the opportunity restore all the album art. Unlike Windows Media Player, Rhythmbox doesn't rip album art to the destination directory: you have to add it after ripping (extracting) the album. This is pretty painless as a rule and, in previous incarnations, a plugin such as Cover Art would do the hard yards for you. However, this plugin doesn't seem to work anymore so I've been adding the artwork manually. Unfortunately, I couldn't get the album cover to load despite renaming the artwork either Folder or AlbumArtSmall, both of which should have worked.

I confess that after a while I got a little frustrated and tried deleting (and rebuilding) the database - all to no effect. It turns out that I had been naming the album art incorrectly in the destination folder: the correct name is Folder.jpg and not Folder.jpeg!

One little 'e' - so much trouble!

Anyway, all fixed and now I can browse my albums by album covers!

The One?

I've been investigating Ubuntu One. The beta version of Ubuntu One was released in 2009 (May 13th 2009, to be precise) and the client software has been part of the Ubuntu OS since Karmic, but I've only just got around to seeing what it can do!

Canonical says of its service that:
"Ubuntu One is your personal cloud. But it's not just about syncing files — whether you need to access your contacts, notes or bookmarks from any computer or the web, enjoy your favorite music from a cloud integrated store or stream your entire collection to iPhone and Android mobile phones — we've raised the bar on personal clouds."
Essentially, it's a web-based storage facility that comes with 2.0GB of free storage (for the basic package) and allows users to buy additional cloud space: each additional 20-pack (20GB) costs $29.99/year.

It all sounds great, doesn't it?

Unfortunately, the hyperbole doesn't quite match the reality. For instance, one of the features of Ubuntu One is that users can synchronise contacts across their registered computers - who wouldn't want to do that? However, in order to synchronise contacts users must be using the Evolution message client (not much help if you're a Thunderbird user) and
Evolution contacts will currently only sync in Ubuntu 10.10 (Maverick) or higher users. Ubuntu 10.04 LTS (Lucid) users should see our status page for updates on getting contacts syncing again in that version of Ubuntu. Source: Ubuntu One Wiki FAQ
Which is no good to someone who runs 10.04 on his desktop and 9.10 on his laptop! Never mind, perhaps I'll have more luck with Bookmarks - at least that caters for Firefox.
"Currently, you need to be running Ubuntu 10.04 or higher and Firefox 3.5+." Source: Ubuntu One Tutorials/Bookmarks
Oh dear, not much luck there, either: it seems that I can sync my desktop bookmarks to my desktop!

I'm similarly disappointed that Windows Mobile (phone) isn't supported. OK, I can understand the iPhone/Android link to Unix, but the argument against including WinMob devices fails now that a Windows version of Ubuntu One has been released to beta testing. After all:
"It is a reality that many Ubuntu One users operate in a mixed environment of operating systems. They may prefer to use Ubuntu at home but are required to use Windows at their office or school. Perhaps they occasionally use Windows for an application that is not available in Ubuntu. Whatever the reason, we want to make it easy for anyone to enjoy our services on any platform." Source as linked above: emphasis mine!
Is it really so difficult to believe that not every Linux user has an Android phone?

One might argue that, once Canonical get the bugs sorted and makes Ubuntu One backwards compatible with its own operating systems, this is going to be a great service. Moreover, the first 2GB are free: what more can anyone ask for? But, not so fast. Today I did a full mirror of my desktop: backup size (compressed) was around 30GB which would require two 20-packs. That's $60/year (give-or-take) and a quick Google suggests that I can get 50GB of storage for nothing!

Tuesday, 22 February 2011

Firefox Add-ons

One of my favourite Firefox Add-ons is Toolbar Buttons.

Michael Buckley (Codefisher.org) has just released Toolbar Buttons 1.0 with a few changes and some new icons. This is always one of the first things that I install (along with All-in-One Sidebar) - if you haven't anything more pressing, give it a go.

Back to Backup

Actually, I hadn't figured out the what after all! My backup scheduled failed once I'd shut the system down and incremental backups never happened.

That's the bad news: the good news is that I've fixed and tested Simple Backup and I've got it working. The new features include:
  • The latest version of sbackup (sbackup 0.11.4)
  • A working (tested!) schedule
  • Password protected destination directory
  • Email confirmation of backup
  • Confirmation notifications during scheduled backups
Here's how I did it:

Preparation and Installation

The easiest way to install the latest version of sbackup is via the Synaptic Package Manager. I find this method much easier than compiling code and building dependencies manually.

First, I had to remove the existing version of sbackup on the system; installed from the Ubuntu Software Centre. From a terminal:

sudo apt-get purge sbackup

The purge option removes both the software and the configuration files (because I wanted to configure the new build of sbackup from scratch). Had I used, sudo apt-get remove I would have left the configuration files on the system and these files are used by subsequent installations.

Once the original installation had been completely removed, I could add the nssbackup-team repository to the software sources:

sudo add-apt-repository ppa:nssbackup-team/ppa

Ubuntu automatically downloads the security key:
"Your system will now fetch the PPA's key. This enables your Ubuntu system to verify that the packages in the PPA have not been interfered with since they were built." Source: nssbackup Repository

Next was to update the packages in the Synaptic Package Manager.

sudo apt-get update

I opened Synaptic Package Manager to find the latest version of sbackup.


Typing sbackup in the search box and marking the sbackup package for installation is all that is required. The package sbackup-gtk was added automatically.


Clicking the Apply button on the main menu installs the latest version of sbackup (v. 0.11.4). Strangely, Simple Backup is no longer listed in the System > Administration Menu: it's now to be found lurking in the Applications > Accessories Menu and the Applications > System Tools Menu. If you want to run non-technical backups without schedules, use the first option: however, to schedule backups you need root privileges, so you must use the second option and type in your password when prompted. I suggest that you edit your menus to hide the version that you don't want to use!

Starting sbackup for the first time generates a warning that no profile has been found (to be expected as I purged the configuration file!): sbackup creates a default profile if one is not available.


I closed the warning dialog in order to begin configuring sbackup:


The first tab allows configuration of the frequency of full backup events and any compression or division of the backup files.

The Include tab allows you to specify what files are backed up. The default setting for the non-administratve mode is /home/usr/ which is likely to be a substantial directory. For the Administrative version, the options are:
  1. /var/
  2. /home/
  3. /urs/local/
  4. /etc/
I've chosen to test this version using a simple directory containing a few simple text files.


In the non-administrative mode, the Exclude tab is blank by default. However, you may wish to exclude temporary and cache files or excessively large files (movies, perhaps). The administrative version, excludes:
  1. /media/
  2. /var/run/
  3. /var/cache/
  4. /var/spool/
  5. /var/tmp/

Which is much more sensible!

The Destination tab allows you to choose where your backup will be stored. The default is the /home/usr/.local/share/sbackup/backups directory: however, you can navigate to a local custom backup location or select the remote site option.


Interestingly, you can't type the location directly into the remote site dialog box: you must click Connect... in order to access the set remote target dialog. Here you can type in your server/host settings and security credentials (login and password) and also test the availability of the remote directory.

Warning: the non-administrative mode does not schedule backups and the Schedule tab is greyed out. However, Administrator mode facilitates both simple schedules or more complex cron jobs and also allows you to specify manual backups only (via the No scheduled backups option).

The Purging tab allows you to specify simple cut-off or logarithmic purging.

The final tab is a nice feature not available on the version from the Ubuntu Software Centre: it allows you to send a report of the backup activity via email. The output (in the form of a simple text document) is embedded in the email rather than being sent as an attachment.

There are also a couple of other nice touches with the most recent version, including notifications. One as a pop-up message at commencement:


The second as an icon on the panel:


One of the problems with the version from the Ubuntu Software Centre is that errors are dropped silently: in other words, if the backup fails you won't know that you have a problem unless you check your backup destination on a regular basis. These notifications (coupled with the email) negate this difficulty.

I've tested the system on my DELL Dimension: now all that I need to do is install and configure the latest version on my laptop and decide what to backup!

Useful Resources:
sbackup stable repository
FAQs for sbackup

Monday, 21 February 2011

Housekeeping

A couple of chores that I hadn't got around to on the laptop install of Karmic.

Install msttcorefonts

sudo apt-get install msttcorefonts

After installing, refresh the cache:

sudo fc-cache -fv

This installs the restricted MS fonts (Times New Roman, Trebuchet MS, Verdana, etc) and makes them available in programs such as Open Office.

Install DVD Codecs

Proprietary DVD won't play on native Ubuntu, you have to add some restricted codecs to make Movie Player work.

sudo apt-get install ubuntu-restricted-extras

Then install libdvdcss2 using:

sudo apt-get install libdvdread4

If you get a message informing you that the latest package is installed, just proceed with:

sudo /usr/share/doc/libdvdread4/install-css.sh

Useful References:

Sunday, 20 February 2011

I've Figured out the How, Now for the What!

I really don't know why it's taken so long. My friends in the various discussion forums that I've contributed to over the years are accustomed to me berating them for not doing it and I know from bitter experience that it's better not to get caught with one's pants down: so I'm embarrassed to admit that recently I haven't been making regular system and file backups!

The reason for my slovenly behaviour? I couldn't figure out how to get Simple Backup to write the backup to a remote network drive!
My early attempts to implement a backup strategy were thwarted by my difficulties with Samba and recently my attention has been monopolized by upgrades and laptops. However, today I set myself the goal of getting my backup strategy back on track. As always, it took an awfully long time to realize that it shouldn't have taken such an awfully long time.
Having fixed Samba (not that it was really broken!), I thought that pointing Simple Backup to my chosen destination directory and telling it how often to backup my files was all that was required. However, every time that I pointed to an existing directory on the network drive, Simple Backup demanded my login and password: that's not ideal if you want to automate a backup process. I tried mounting the drive without success and even looked at alternative solutions; including using rsync via the terminal.

Ultimately, it proved easier to start from scratch and, using Windows Explorer (on a Vista machine), I created a new CIFS share on my network drive called (in my case) UBUNTUBACKUP. In this share, I added two additional directories, one each for my laptop and desktop.

I had to set some pretty liberal read/write permissions, but the vanilla directory did the trick.


It's worth noting that, despite the inference to the contrary on the Simple Backup Help Page you don't have to use a secure shell (ssh) or file transfer protocol (ftp): Samba (smb) works just fine!

Moreover, you don't have to use the ip address of the remote machine: NetBIOS names also work.


After assigning the destination addresses in both Ubuntu machines, I rebooted to test whether the login/password issue would return: it didn't and subsequent test backups showed that I had finally managed to achieve the simplest of tasks! It seems that the point that I'd missed is that writing files to another machine on your network requires the destination directory to be a shared directory with permissions that are liberal enough to allow access for a remote source.

Now that it's working, all I need to do is to figure out what is worth saving and how often!

In the Beginning...

So far, so good: I'm pleased with the upgrade to Lucid.

However, like some other users, I've experienced some start-up problems, particularly the dreaded Gnome-Power-Manager on restart.

A simple workaround if the system hangs on boot with a GPM error message:
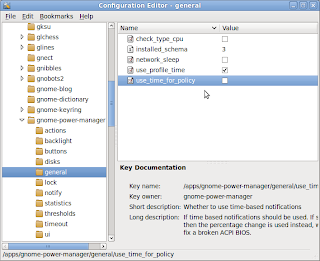
  • Open the Configuration Editor (instructions)
  • Navigate to /apps/gnome-power-manager/general
  • Deselect the use_time_for_policy option
  • Close the Config Editor
No need to reboot for the changes to take effect and it seems to have solved my problem!


Thanks to dh04000 at the Ubuntu Forums for the information.

References:
MSI Wind u100 Ubuntu 10.04 Problems/Workarounds

Monday, 14 February 2011

The Lynx is Loose (Finally)

Today I treated myself to a new graphics card.

You may recall that I was unable to upgrade to Ubuntu 10.04 LTS (Lucid Lynx) because the graphics card in my DELL Dimension 8400 wasn't supported and it simply couldn't cope with Lucid's graphical overhead. Ironically, when I began my Linux experiment, I promised myself that I wouldn't spend any more than the £100 required for a replacement hard-drive, however, over the intervening months, Ubuntu has become my primary operating system (completely replacing Windows) and recently I've been determined to find a way to upgrade to the latest release: hence the new graphics card.

I went with a Gainward GeForce GT220 (512MB) card which cost around £70. Opening the case and removing the existing card was simple enough, but the GT220 comes with a built-in fan and the casing wouldn't clear the sound card to fit into the expansion slot. Fortunately, the 8400 has a spare slot and I managed to rearrange the existing cards so that the motherboard would accommodate my latest acquisition: it took only a few minutes to complete the physical upgrade.

Next came the OS and this took a little longer.

You can force Ubuntu to keep track of major releases in its operating system via the settings option in the Update Manager.


Upgrading via the Update Manager allows you retain your existing files and settings post-installation and there's an additional benefit of not having to burn or check installation disks: something that I learned to my chagrin last time I attempted to upgrade! Nonetheless, this is no quick option and installing the new version of Ubuntu can still take a couple of hours. Clicking on the Upgrade button in the Update Manager starts the process.


You'll receive a warning message asking you to confirm your desire to start the process.


Just click the Start Upgrade button. The process will disable any third-party repositories during the download.


The Update Manager will also warn you of any unsupported applications post-upgrade:


Now all that you have to do is wait:


There are some options to select during the installation process, but these seem to be (mostly) self-explanatory.

Once the installation is complete, reboot the PC. Remember to enable any of the suspended repositories once you have rebooted.

I'm please to report that Lucid is running on my eight year old DELL Dimension and that all the visual effects are working as they should! Samba, video and flash all work without intervention and my files remain in tact! Thus far, my Linux experiment has cost under £200 (excluding the sunk cost of the pc) and I'm running a state-of-the-art system.

Well, almost: I sense another upgrade looming.

Wednesday, 9 February 2011

Snap Happy!

Yesterday, the Guys over at OMG! Ubuntu! blogged on the release of the latest version of Shutter. Shutter is a screenshot tool and, as such, not something that I'd usually get terribly excited about: however, looking at OMG's description of this feature-rich application, I thought that I'd take a closer look (for obvious reasons, this is going to be a post with a lot of pictures!).

You can download from the Ubuntu Software Centre or from the Shutter Project Page.


After installation, you'll find Shutter in the Applications > Accessories Menu:


As you can see, Shutter takes screen-caps of cascading menus! However, this versatile application will also allow you to grab windows or even sections of windows and upload the capture to your online storage account directly from the user interface. One benefit of this versatility is that you can grab web pages without the accoutrements of your browser.


The application also gives you a session summary screen Ă  la Firefox's ShowCase function.


You can force rounded window borders from the preferences menu and grabbing screencaps of panels is simplicity itself!


One of the really nice features is the ability to capture Tool Tips:

Just activate the relevant tip and wait for the capture delay - easy!

Reducing the need to edit screen-caps is great, but not content with their excellent application, the Project Team have included a built-in editor, accessible from the interface. This saves time on routine tasks such as cropping images or adding highlights, particularly if you use screencaps in your day-to-day blogging activities :)

I didn't think that it was possible to get excited about a screen capture tool - clearly, I was wrong!

Monday, 7 February 2011

Rhythmic Eyecandy

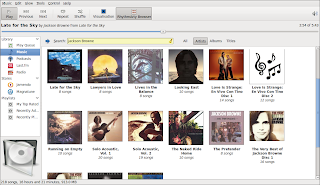
Today, quite by accident, I discovered a plugin for Rhythmbox called RhythmArty: it lets you browse music by album art and it looks really cool!


You can download it from the RhythmArty page at SourceForge. Download it and use your package installer to unzip and install it to Rhythmbox.

Once installed, (in Rhythmbox) go to Edit > Plugins and check the RhythmArty check box.


It may take a while to download the album art, but it's worth the wait. You can toggle the browser window from the new toolbar button.

Enjoy!

Friday, 4 February 2011

Absolute Power

My power problems with Karmic on the DELL Inspiron continue!

Just to recap: when I plug my ac power cord into the laptop when the battery runs low (or I receive a low/critical power warning), I get a critical battery status message and, after a few seconds, my laptop suspends.

Despite spending several hours trying to find a solution, it seems that there are multiple causes of this phenomenon and none seem to fit the the profile of my power issue. During my research, I did come across a cryptic thread in the Ubuntu Forums asking for guidance on how to prevent the power manager from taking any action when the battery level reaches critical. The Power Management editor (System > Preferences > Power Management) doesn't give a nothing option by default in the when battery power is critically low drop-down box, but alesserfate (the OP in the Ubuntu Forums) found a way to encourage Ubuntu to add the option! This prompted me to think that this might offer a workaround, if not a solution, to my problem: I reasoned that, if my laptop takes no action when the power cord is plugged in (regardless of the reported battery state), then I can at least continue what I'm doing uninterrupted.

Using the Configuration Editor (Applications > System Tools), navigate to /apps/gnome-power-manager-actions and click in the critical_battery value dialog.


Simply type nothing as the value and close the editor. If you don't have the Configuration Editor in the Applications menu, you can add it by right-clicking the menu and editing or, open a terminal and type:

sudo gconf-editor

Last night and again this afternoon, I've tested the theory!


When the status indicator dropped below 30%, I plugged in the power cord and received the anticipated warning.


However, the warning disappears after a few seconds and the Power Manager takes no further action. The battery continues to charge as it should.


Of course, there is a (potential) downside to this workaround: you can't leave your laptop unattended if there is a chance that your battery will completely discharge! However, it does demonstrate just how configurable Ubuntu can be.

Tuesday, 1 February 2011

MANhunt

Using the Command Line Interface (CLI) on Ubuntu can be a pretty effective way of getting stuff done, but it does require some commitment to master the multitude of commands and their options. One way of finding out how commands work is to use the man pages that come pre-installed as part of the Ubuntu OS (indeed, man pages are installed in almost all Unix based systems). For instance, if you wanted information on the chmod command, you simply open a terminal and type:

man chmod

The output appears in the terminal window.


You can use the Page Dn, Page Up, or arrow keys to move through the document (to exit the man page, hit the "q" key).

However, whilst it's a very useful feature, I also find reading the man pages in the terminal window a little clumsy so I was surprised and delighted, therefore, to find that the complete set of man pages for every release of Ubuntu are available online. The html format is much easier to read and each web page (or man page) has links that are much easier to follow than scrolling through a document in the terminal. There's also a search bar to speed up access to each man page rather than using the file hierarchy.

One thing that is missing is an apropos type search, but I suppose you can't have everything!