One of my favourite Firefox Add-ons is Toolbar Buttons.
Michael Buckley (Codefisher.org) has just released Toolbar Buttons 1.0 with a few changes and some new icons. This is always one of the first things that I install (along with All-in-One Sidebar) - if you haven't anything more pressing, give it a go.
Tuesday, 22 February 2011


Back to Backup
Actually, I hadn't figured out the what after all! My backup scheduled failed once I'd shut the system down and incremental backups never happened.
That's the bad news: the good news is that I've fixed and tested Simple Backup and I've got it working. The new features include:
Preparation and Installation
The easiest way to install the latest version of sbackup is via the Synaptic Package Manager. I find this method much easier than compiling code and building dependencies manually.
First, I had to remove the existing version of sbackup on the system; installed from the Ubuntu Software Centre. From a terminal:
The purge option removes both the software and the configuration files (because I wanted to configure the new build of sbackup from scratch). Had I used, sudo apt-get remove I would have left the configuration files on the system and these files are used by subsequent installations.
Once the original installation had been completely removed, I could add the nssbackup-team repository to the software sources:
Ubuntu automatically downloads the security key:
Next was to update the packages in the Synaptic Package Manager.
I opened Synaptic Package Manager to find the latest version of sbackup.

Typing sbackup in the search box and marking the sbackup package for installation is all that is required. The package sbackup-gtk was added automatically.

Clicking the Apply button on the main menu installs the latest version of sbackup (v. 0.11.4). Strangely, Simple Backup is no longer listed in the System > Administration Menu: it's now to be found lurking in the Applications > Accessories Menu and the Applications > System Tools Menu. If you want to run non-technical backups without schedules, use the first option: however, to schedule backups you need root privileges, so you must use the second option and type in your password when prompted. I suggest that you edit your menus to hide the version that you don't want to use!
Starting sbackup for the first time generates a warning that no profile has been found (to be expected as I purged the configuration file!): sbackup creates a default profile if one is not available.

I closed the warning dialog in order to begin configuring sbackup:

The first tab allows configuration of the frequency of full backup events and any compression or division of the backup files.
The Include tab allows you to specify what files are backed up. The default setting for the non-administratve mode is /home/usr/ which is likely to be a substantial directory. For the Administrative version, the options are:

In the non-administrative mode, the Exclude tab is blank by default. However, you may wish to exclude temporary and cache files or excessively large files (movies, perhaps). The administrative version, excludes:
Which is much more sensible!
The Destination tab allows you to choose where your backup will be stored. The default is the /home/usr/.local/share/sbackup/backups directory: however, you can navigate to a local custom backup location or select the remote site option.

Interestingly, you can't type the location directly into the remote site dialog box: you must click Connect... in order to access the set remote target dialog. Here you can type in your server/host settings and security credentials (login and password) and also test the availability of the remote directory.
Warning: the non-administrative mode does not schedule backups and the Schedule tab is greyed out. However, Administrator mode facilitates both simple schedules or more complex cron jobs and also allows you to specify manual backups only (via the No scheduled backups option).
The Purging tab allows you to specify simple cut-off or logarithmic purging.
The final tab is a nice feature not available on the version from the Ubuntu Software Centre: it allows you to send a report of the backup activity via email. The output (in the form of a simple text document) is embedded in the email rather than being sent as an attachment.
There are also a couple of other nice touches with the most recent version, including notifications. One as a pop-up message at commencement:

The second as an icon on the panel:

One of the problems with the version from the Ubuntu Software Centre is that errors are dropped silently: in other words, if the backup fails you won't know that you have a problem unless you check your backup destination on a regular basis. These notifications (coupled with the email) negate this difficulty.
I've tested the system on my DELL Dimension: now all that I need to do is install and configure the latest version on my laptop and decide what to backup!
Useful Resources:
sbackup stable repository
FAQs for sbackup
That's the bad news: the good news is that I've fixed and tested Simple Backup and I've got it working. The new features include:
- The latest version of sbackup (sbackup 0.11.4)
- A working (tested!) schedule
- Password protected destination directory
- Email confirmation of backup
- Confirmation notifications during scheduled backups
Preparation and Installation
The easiest way to install the latest version of sbackup is via the Synaptic Package Manager. I find this method much easier than compiling code and building dependencies manually.
First, I had to remove the existing version of sbackup on the system; installed from the Ubuntu Software Centre. From a terminal:
sudo apt-get purge sbackupThe purge option removes both the software and the configuration files (because I wanted to configure the new build of sbackup from scratch). Had I used, sudo apt-get remove I would have left the configuration files on the system and these files are used by subsequent installations.
Once the original installation had been completely removed, I could add the nssbackup-team repository to the software sources:
sudo add-apt-repository ppa:nssbackup-team/ppaUbuntu automatically downloads the security key:
"Your system will now fetch the PPA's key. This enables your Ubuntu system to verify that the packages in the PPA have not been interfered with since they were built." Source: nssbackup Repository
Next was to update the packages in the Synaptic Package Manager.
sudo apt-get updateI opened Synaptic Package Manager to find the latest version of sbackup.

Typing sbackup in the search box and marking the sbackup package for installation is all that is required. The package sbackup-gtk was added automatically.

Clicking the Apply button on the main menu installs the latest version of sbackup (v. 0.11.4). Strangely, Simple Backup is no longer listed in the System > Administration Menu: it's now to be found lurking in the Applications > Accessories Menu and the Applications > System Tools Menu. If you want to run non-technical backups without schedules, use the first option: however, to schedule backups you need root privileges, so you must use the second option and type in your password when prompted. I suggest that you edit your menus to hide the version that you don't want to use!
Starting sbackup for the first time generates a warning that no profile has been found (to be expected as I purged the configuration file!): sbackup creates a default profile if one is not available.

I closed the warning dialog in order to begin configuring sbackup:

The first tab allows configuration of the frequency of full backup events and any compression or division of the backup files.
The Include tab allows you to specify what files are backed up. The default setting for the non-administratve mode is /home/usr/ which is likely to be a substantial directory. For the Administrative version, the options are:
- /var/
- /home/
- /urs/local/
- /etc/

In the non-administrative mode, the Exclude tab is blank by default. However, you may wish to exclude temporary and cache files or excessively large files (movies, perhaps). The administrative version, excludes:
- /media/
- /var/run/
- /var/cache/
- /var/spool/
- /var/tmp/
Which is much more sensible!
The Destination tab allows you to choose where your backup will be stored. The default is the /home/usr/.local/share/sbackup/backups directory: however, you can navigate to a local custom backup location or select the remote site option.

Interestingly, you can't type the location directly into the remote site dialog box: you must click Connect... in order to access the set remote target dialog. Here you can type in your server/host settings and security credentials (login and password) and also test the availability of the remote directory.
Warning: the non-administrative mode does not schedule backups and the Schedule tab is greyed out. However, Administrator mode facilitates both simple schedules or more complex cron jobs and also allows you to specify manual backups only (via the No scheduled backups option).
The Purging tab allows you to specify simple cut-off or logarithmic purging.
The final tab is a nice feature not available on the version from the Ubuntu Software Centre: it allows you to send a report of the backup activity via email. The output (in the form of a simple text document) is embedded in the email rather than being sent as an attachment.
There are also a couple of other nice touches with the most recent version, including notifications. One as a pop-up message at commencement:

The second as an icon on the panel:

One of the problems with the version from the Ubuntu Software Centre is that errors are dropped silently: in other words, if the backup fails you won't know that you have a problem unless you check your backup destination on a regular basis. These notifications (coupled with the email) negate this difficulty.
I've tested the system on my DELL Dimension: now all that I need to do is install and configure the latest version on my laptop and decide what to backup!
Useful Resources:
sbackup stable repository
FAQs for sbackup
Monday, 21 February 2011
Housekeeping
A couple of chores that I hadn't got around to on the laptop install of Karmic.
Install msttcorefonts
After installing, refresh the cache:
This installs the restricted MS fonts (Times New Roman, Trebuchet MS, Verdana, etc) and makes them available in programs such as Open Office.
Install DVD Codecs
Proprietary DVD won't play on native Ubuntu, you have to add some restricted codecs to make Movie Player work.
Then install libdvdcss2 using:
If you get a message informing you that the latest package is installed, just proceed with:
Useful References:
Install msttcorefonts
sudo apt-get install msttcorefontsAfter installing, refresh the cache:
sudo fc-cache -fvThis installs the restricted MS fonts (Times New Roman, Trebuchet MS, Verdana, etc) and makes them available in programs such as Open Office.
Install DVD Codecs
Proprietary DVD won't play on native Ubuntu, you have to add some restricted codecs to make Movie Player work.
sudo apt-get install ubuntu-restricted-extrasThen install libdvdcss2 using:
sudo apt-get install libdvdread4If you get a message informing you that the latest package is installed, just proceed with:
sudo /usr/share/doc/libdvdread4/install-css.shUseful References:
- Ubuntu Forums Microsoft Fonts for Open Office
- Ubuntu Guide (wiki) Restricted Extras
- Ubuntu Guide (wiki) DVD Playback Capability
Sunday, 20 February 2011
I've Figured out the How, Now for the What!
I really don't know why it's taken so long. My friends in the various discussion forums that I've contributed to over the years are accustomed to me berating them for not doing it and I know from bitter experience that it's better not to get caught with one's pants down: so I'm embarrassed to admit that recently I haven't been making regular system and file backups!
The reason for my slovenly behaviour? I couldn't figure out how to get Simple Backup to write the backup to a remote network drive!
My early attempts to implement a backup strategy were thwarted by my difficulties with Samba and recently my attention has been monopolized by upgrades and laptops. However, today I set myself the goal of getting my backup strategy back on track. As always, it took an awfully long time to realize that it shouldn't have taken such an awfully long time.
Having fixed Samba (not that it was really broken!), I thought that pointing Simple Backup to my chosen destination directory and telling it how often to backup my files was all that was required. However, every time that I pointed to an existing directory on the network drive, Simple Backup demanded my login and password: that's not ideal if you want to automate a backup process. I tried mounting the drive without success and even looked at alternative solutions; including using rsync via the terminal.
Ultimately, it proved easier to start from scratch and, using Windows Explorer (on a Vista machine), I created a new CIFS share on my network drive called (in my case) UBUNTUBACKUP. In this share, I added two additional directories, one each for my laptop and desktop.
I had to set some pretty liberal read/write permissions, but the vanilla directory did the trick.

It's worth noting that, despite the inference to the contrary on the Simple Backup Help Page you don't have to use a secure shell (ssh) or file transfer protocol (ftp): Samba (smb) works just fine!
Moreover, you don't have to use the ip address of the remote machine: NetBIOS names also work.

After assigning the destination addresses in both Ubuntu machines, I rebooted to test whether the login/password issue would return: it didn't and subsequent test backups showed that I had finally managed to achieve the simplest of tasks! It seems that the point that I'd missed is that writing files to another machine on your network requires the destination directory to be a shared directory with permissions that are liberal enough to allow access for a remote source.
Now that it's working, all I need to do is to figure out what is worth saving and how often!
The reason for my slovenly behaviour? I couldn't figure out how to get Simple Backup to write the backup to a remote network drive!
My early attempts to implement a backup strategy were thwarted by my difficulties with Samba and recently my attention has been monopolized by upgrades and laptops. However, today I set myself the goal of getting my backup strategy back on track. As always, it took an awfully long time to realize that it shouldn't have taken such an awfully long time.
Having fixed Samba (not that it was really broken!), I thought that pointing Simple Backup to my chosen destination directory and telling it how often to backup my files was all that was required. However, every time that I pointed to an existing directory on the network drive, Simple Backup demanded my login and password: that's not ideal if you want to automate a backup process. I tried mounting the drive without success and even looked at alternative solutions; including using rsync via the terminal.
Ultimately, it proved easier to start from scratch and, using Windows Explorer (on a Vista machine), I created a new CIFS share on my network drive called (in my case) UBUNTUBACKUP. In this share, I added two additional directories, one each for my laptop and desktop.
I had to set some pretty liberal read/write permissions, but the vanilla directory did the trick.

It's worth noting that, despite the inference to the contrary on the Simple Backup Help Page you don't have to use a secure shell (ssh) or file transfer protocol (ftp): Samba (smb) works just fine!
Moreover, you don't have to use the ip address of the remote machine: NetBIOS names also work.

After assigning the destination addresses in both Ubuntu machines, I rebooted to test whether the login/password issue would return: it didn't and subsequent test backups showed that I had finally managed to achieve the simplest of tasks! It seems that the point that I'd missed is that writing files to another machine on your network requires the destination directory to be a shared directory with permissions that are liberal enough to allow access for a remote source.
Now that it's working, all I need to do is to figure out what is worth saving and how often!
In the Beginning...
So far, so good: I'm pleased with the upgrade to Lucid.
However, like some other users, I've experienced some start-up problems, particularly the dreaded Gnome-Power-Manager on restart.
A simple workaround if the system hangs on boot with a GPM error message:
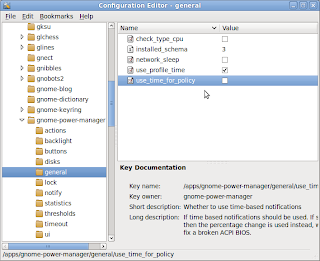
Thanks to dh04000 at the Ubuntu Forums for the information.
References:
MSI Wind u100 Ubuntu 10.04 Problems/Workarounds
However, like some other users, I've experienced some start-up problems, particularly the dreaded Gnome-Power-Manager on restart.
A simple workaround if the system hangs on boot with a GPM error message:
- Open the Configuration Editor (instructions)
- Navigate to /apps/gnome-power-manager/general
- Deselect the use_time_for_policy option
- Close the Config Editor

Thanks to dh04000 at the Ubuntu Forums for the information.
References:
MSI Wind u100 Ubuntu 10.04 Problems/Workarounds
Monday, 14 February 2011
The Lynx is Loose (Finally)
Today I treated myself to a new graphics card.
You may recall that I was unable to upgrade to Ubuntu 10.04 LTS (Lucid Lynx) because the graphics card in my DELL Dimension 8400 wasn't supported and it simply couldn't cope with Lucid's graphical overhead. Ironically, when I began my Linux experiment, I promised myself that I wouldn't spend any more than the £100 required for a replacement hard-drive, however, over the intervening months, Ubuntu has become my primary operating system (completely replacing Windows) and recently I've been determined to find a way to upgrade to the latest release: hence the new graphics card.
I went with a Gainward GeForce GT220 (512MB) card which cost around £70. Opening the case and removing the existing card was simple enough, but the GT220 comes with a built-in fan and the casing wouldn't clear the sound card to fit into the expansion slot. Fortunately, the 8400 has a spare slot and I managed to rearrange the existing cards so that the motherboard would accommodate my latest acquisition: it took only a few minutes to complete the physical upgrade.
Next came the OS and this took a little longer.
You can force Ubuntu to keep track of major releases in its operating system via the settings option in the Update Manager.

Upgrading via the Update Manager allows you retain your existing files and settings post-installation and there's an additional benefit of not having to burn or check installation disks: something that I learned to my chagrin last time I attempted to upgrade! Nonetheless, this is no quick option and installing the new version of Ubuntu can still take a couple of hours. Clicking on the Upgrade button in the Update Manager starts the process.

You'll receive a warning message asking you to confirm your desire to start the process.

Just click the Start Upgrade button. The process will disable any third-party repositories during the download.

The Update Manager will also warn you of any unsupported applications post-upgrade:

Now all that you have to do is wait:

There are some options to select during the installation process, but these seem to be (mostly) self-explanatory.
Once the installation is complete, reboot the PC. Remember to enable any of the suspended repositories once you have rebooted.
I'm please to report that Lucid is running on my eight year old DELL Dimension and that all the visual effects are working as they should! Samba, video and flash all work without intervention and my files remain in tact! Thus far, my Linux experiment has cost under £200 (excluding the sunk cost of the pc) and I'm running a state-of-the-art system.
Well, almost: I sense another upgrade looming.
You may recall that I was unable to upgrade to Ubuntu 10.04 LTS (Lucid Lynx) because the graphics card in my DELL Dimension 8400 wasn't supported and it simply couldn't cope with Lucid's graphical overhead. Ironically, when I began my Linux experiment, I promised myself that I wouldn't spend any more than the £100 required for a replacement hard-drive, however, over the intervening months, Ubuntu has become my primary operating system (completely replacing Windows) and recently I've been determined to find a way to upgrade to the latest release: hence the new graphics card.
I went with a Gainward GeForce GT220 (512MB) card which cost around £70. Opening the case and removing the existing card was simple enough, but the GT220 comes with a built-in fan and the casing wouldn't clear the sound card to fit into the expansion slot. Fortunately, the 8400 has a spare slot and I managed to rearrange the existing cards so that the motherboard would accommodate my latest acquisition: it took only a few minutes to complete the physical upgrade.
Next came the OS and this took a little longer.
You can force Ubuntu to keep track of major releases in its operating system via the settings option in the Update Manager.

Upgrading via the Update Manager allows you retain your existing files and settings post-installation and there's an additional benefit of not having to burn or check installation disks: something that I learned to my chagrin last time I attempted to upgrade! Nonetheless, this is no quick option and installing the new version of Ubuntu can still take a couple of hours. Clicking on the Upgrade button in the Update Manager starts the process.

You'll receive a warning message asking you to confirm your desire to start the process.

Just click the Start Upgrade button. The process will disable any third-party repositories during the download.

The Update Manager will also warn you of any unsupported applications post-upgrade:

Now all that you have to do is wait:

There are some options to select during the installation process, but these seem to be (mostly) self-explanatory.
Once the installation is complete, reboot the PC. Remember to enable any of the suspended repositories once you have rebooted.
I'm please to report that Lucid is running on my eight year old DELL Dimension and that all the visual effects are working as they should! Samba, video and flash all work without intervention and my files remain in tact! Thus far, my Linux experiment has cost under £200 (excluding the sunk cost of the pc) and I'm running a state-of-the-art system.
Well, almost: I sense another upgrade looming.
Wednesday, 9 February 2011
Snap Happy!
Yesterday, the Guys over at OMG! Ubuntu! blogged on the release of the latest version of Shutter. Shutter is a screenshot tool and, as such, not something that I'd usually get terribly excited about: however, looking at OMG's description of this feature-rich application, I thought that I'd take a closer look (for obvious reasons, this is going to be a post with a lot of pictures!).
You can download from the Ubuntu Software Centre or from the Shutter Project Page.

After installation, you'll find Shutter in the Applications > Accessories Menu:

As you can see, Shutter takes screen-caps of cascading menus! However, this versatile application will also allow you to grab windows or even sections of windows and upload the capture to your online storage account directly from the user interface. One benefit of this versatility is that you can grab web pages without the accoutrements of your browser.

The application also gives you a session summary screen à la Firefox's ShowCase function.

You can force rounded window borders from the preferences menu and grabbing screencaps of panels is simplicity itself!

One of the really nice features is the ability to capture Tool Tips:
 Just activate the relevant tip and wait for the capture delay - easy!
Reducing the need to edit screen-caps is great, but not content with their excellent application, the Project Team have included a built-in editor, accessible from the interface. This saves time on routine tasks such as cropping images or adding highlights, particularly if you use screencaps in your day-to-day blogging activities :)
I didn't think that it was possible to get excited about a screen capture tool - clearly, I was wrong!
You can download from the Ubuntu Software Centre or from the Shutter Project Page.

After installation, you'll find Shutter in the Applications > Accessories Menu:

As you can see, Shutter takes screen-caps of cascading menus! However, this versatile application will also allow you to grab windows or even sections of windows and upload the capture to your online storage account directly from the user interface. One benefit of this versatility is that you can grab web pages without the accoutrements of your browser.

The application also gives you a session summary screen à la Firefox's ShowCase function.

You can force rounded window borders from the preferences menu and grabbing screencaps of panels is simplicity itself!

One of the really nice features is the ability to capture Tool Tips:
 Just activate the relevant tip and wait for the capture delay - easy!
Reducing the need to edit screen-caps is great, but not content with their excellent application, the Project Team have included a built-in editor, accessible from the interface. This saves time on routine tasks such as cropping images or adding highlights, particularly if you use screencaps in your day-to-day blogging activities :)
I didn't think that it was possible to get excited about a screen capture tool - clearly, I was wrong!
Subscribe to:
Posts (Atom)