Tuesday 28 June 2011

Cryptic - EncFS & Cryptkeeper

Encrypting individual files and emails is all very well, but what if you want to protect a whole directory? Fortunately, it is easy to create and manage encrypted directories in Ubuntu1 using EncFS (encrypted File System) and a small system tray applet called Cryptkeeper.

First you should ensure that you have the package, encfs installed. You can do this from Synaptic or by opening a terminal and typing:

sudo apt-get install encfs

Next, open the Ubuntu Software Centre and search for the Cryptkeeper applet.

Just click the Install button and, when the applet has finished installing, reboot your system.

If all has gone well, you should see the Cryptkeeper applet appear in your Gnome-panel (or your system tray applet in the dock of your choice). Right-clicking the applet presents a pop-up menu - click the New encrypted folder option to create your new directory.

Choose a name and location for your directory and click the Forward button.

Enter and confirm a password and click Forward.

That's all there is to it! The directory is not mounted by default and you must select it from the applet's pop-up menu when you want to access your files. When you select the directory that you want to open, you'll be prompted for your password. It's worth taking a few minutes to browse the linked pages below: this is not a block device encryption method and there are advantages and disadvantages to using this process for protecting your files.

Sources & References:

Notes:

  1. This is only partially true: the following instructions work for releases prior to 11.04 but not in Unity. To use the systray applet as described here, you'll need to revert to Ubuntu Classic if you're using 11.04 or above!
    Alternatively, type man encfs into a terminal and use the commands to manage encryption without the Cryptkeeper applet.

Friday 24 June 2011

Snap goes Synaptic

It seems that Canonical has decided to remove the Synaptic Package Manager from Oneiric Ocelot.

Some commentators aren't surprised by this move, but I must confess that I'm not too sure that I'm comfortable with the direction that the Ubuntu OS is heading. De-skilling is often confused with innovation and this move strikes me as little more than a blatant attempt to dumb-down the OS in order to attract Windows users. Of course, building a loyal following is not a bad thing, but one of the most appealing aspects of Linux distros is their tweakability - the recent introduction of Unity and the proposed removal of Synaptic restrict the ability to configure the user interface.

By all accounts, you will still be able to install Synaptic using the Ubuntu Software Centre or the command line (after all, Synaptic is only really a GUI for apt) so perhaps we haven't seen the swansong of Synaptic just yet.

Sources & References:

Desktop's Desktop - Update

You know by now that I love to change my desktop backgrounds regularly - well, here's the latest on the Dimension 8400

Photo credit - Max Wilbert via Nat Geo Photo of the Day - Cape Alava, Washington.

This is a stunning picture, but it's the tranquillity of the scene that appeals to me. Enjoy!

Thursday 23 June 2011

The Dangers of Untrusted Sources...

Further to my recent post on Linux security, I stumbled upon a stark reminder of the importance of staying vigilant when installing any package from an untrusted source.

It seems that a few weeks ago, a member of the Ubuntu Forums fell foul of one of those unscrupulous scumbags that would do harm to others for no reason other than his (or her) self-gratification. Fortunately the victim of this pernicious act was public-spirited enough to recount the experience in order to spare others from the pain and inconvenience of trashing their hard-drives.

Three weeks ago, Rasa1111 downloaded a .deb file from the Gnome-look website believing it to be an innocent theme package. Unfortunately, the author had included the dreaded rm -rf / command in the postinst script - this command (run as root) will delete any writable directory mounted at the time it is executed. You definitely don't want to run this command - ever!

So, be careful and vigilant and you will stay safe; but never let your guard down.

Sources & References:

Tuesday 21 June 2011

Staying Safe

Something that has been bothering me for a while is my unquestioning belief that 'nix is inherently safe - is it true to say that Linux is safer than (say) Windows or even Mac? It seems that I'm not the only person that is vexed by this question and AIB (a registered user at askubuntu.com) has posed the same question to the Ubuntu community.

As usual, the answer is not quite as clear cut as I would have liked but it does seem that there is a consensus that Linux is vulnerable to attacks from malicious code-writers, criminals, and other ne'er-do-wells - it's (perhaps) just less likely to happen than in the more popular operating systems. The usual reason offered for this enhanced security is that Linux sessions are generally run as a non-root user meaning that it is harder to install rogue apps maliciously. However, this doesn't protect users from themselves and if you choose to install an application, you do so at your own risk.

So, the real question is; how do you know which applications are safe and which are not? The answer is that you don't!

An accompanying problem is that of poorly written (but otherwise, benign) code - bug fixes and enhancements can find their way into the repositories without any real audit and potentially have serious implications for system stability.

The good news is that, with appropriate precautions, Linux users are generally quite safe. Windows dominates the OS market and remains a more attractive target for virus and malware writers. Nonetheless, it is good practise to refrain from installing applications from untrusted sources and to stick with the tried and tested applications in the Ubuntu Software Centre. However, if you really must install the latest version from an untrusted ppa, do your research first: check the Ubuntu Forums to see if other users have experience (good or bad) of your chosen application and stick with trusted project maintainers.

Sources & References:

Thursday 16 June 2011

Bye-bye Karmic

I'm embarrassed to acknowledge that this announcement passed without any comment from me - Karmic 9.10 is no longer supported as of 01 May 2011.

"Ubuntu 9.10 (Karmic Koala) end-of-life reached on April 30, 2011.

The support period for Ubuntu 9.10 (Karmic Koala) formally ended on May 1, 2011. Ubuntu Security Notices no longer include information or updated packages for Ubuntu 9.10.

More information can be found at: https://lists.ubuntu.com/archives/ubuntu-announce/2011-May/000148.html"

Source: Ubuntu Weekly Newsletter Issue 220

Although I left Karmic behind a while back, it was this release that really got me hooked on the Ubuntu operating system so it's with a little sadness that I note its passing.

Sources & References:

Wednesday 15 June 2011

Cryptic - Book Review

Cryptography: A Very Short Introduction
Fred Piper & Sean Murphy
ISBN-13: 978-0192803153

This excellent series of books has always been a great way to "plug knowledge gaps" and the Cryptography title is no exception: however, notwithstanding the slender format and its purpose as an introductory text, this should not imply either an absence of gravitas or effort-free knowledge.

Indeed, given that the information density in this volume is as high as its sister titles and the fact that cryptography is meant to be hard to decipher, this book is quite challenging in places and newcomers to the subject will almost certainly benefit from taking plenty of time to absorb the content and reflect on its lessons. Nonetheless, despite its complexity, Murphy and Piper have produced an excellent introduction to the topic and those exploring the potential of encryption for for the first time will find it an invaluable resource that provides the much needed context that is largely absent in the usual “how to” manuals.

Obviously, 130 pages or so isn't really sufficient space for a wholly comprehensive treatise on encryption but the authors manage to provide both historical and modern perspectives as well as discussing the practical application of encryption without loosing sight of its security implications or vulnerabilities. This is an astonishing feat given such a compact form and Murphy and Piper are to be congratulated on their achievement.

Sources:

Monday 13 June 2011

U(buntu)Tube

New blogs are always difficult to get going - finding new material or drafting howtos takes time. Imagine then, the difficulty of starting and maintaining a YouTube channel dedicated to Ubuntu!

Well, just such a channel popped up on YouTube a couple of weeks ago. There's only four videos to date, but the production quality is excellent even though the videos are (so far) little more than advertising vignettes.

The seven minute video on the Ubuntu Font Family is the certainly worth a watch and it'll be interesting to see how this channel develops.

Here's a taster to whet your appetite...

Sources & References:

Create and Mount a Partition in Ubuntu

If you didn't allocate all of your hard drive to your Ubuntu installation and find yourself with a few GBs of unallocated storage, you can utilize some (or all) of this extra space as a separate drive and configure it to mount either automatically (at boot up) or manually (by command). There are some advantages to having disparate partitions on your hard disk, for instance, you can use a partition as a backup location or as a file server for your music or photographs: often these data are protected from any catastrophic system failure (short of a mechanical failure) and can be recovered when the OS has been repaired.

However, before outlining the steps to create a mount, it's worth pointing out that playing around with partitions can have disastrous consequences: backup your data to a separate storage device before making changes to your partition table. If you are unfamiliar with the precepts of drive partitioning, familiarise yourself with the information on the Ubuntu help pages.

Perhaps the easiest way to manage partitions is to use a partition manager (also known as a partition editor) - I'll be using GParted for this post and you can download and install the program from the Ubuntu Software Centre. I'm also assuming that you have some unallocated space on your drive and it is not my intention to discuss resizing partitions in this post.

When you open GParted (Main Menu > Administration) you'll see a visual representation of your hard disk - right-click on the unallocated space and select New from the pop-up menu. In the Create new Partition dialog you can set the parameters for your partition, including the size and name (label). I recommend using ext4 for the file system in Ubuntu. Once you've adjusted your settings, click the Add button and then Apply from the main menu.

Now that the partition has been created, you'll need to create a mount point:

"A mount point is a directory (typically an empty one) in the currently accessible filesystem on which an additional filesystem is mounted (i.e., logically attached)."
In other words, the mount point is a gateway to another file system: when the gate is unlocked (the file system is mounted) you have access to the files and directories on that file system; when the gate is locked (the file system is unmounted) you don't have access. Typically, when you plug in an external drive to your system it is automatically mounted under the /media/ directory, so this is where I recommend you create your mount point: however, you don't have to create it here. Open a terminal and type

sudo mkdir /media/partition_name

(Where partition_name is literally the name of the partition as you want it known: for instance, you could call it Jogga's Private Drive or Private Storage.)

Next, Ubuntu needs instructions on how to mount this drive and you'll need to amend the /etc/fstab/ file. To do this properly, you'll need the UUID (Universally Unique Identifier label) of your new drive. This is easily obtained using GParted - right-click your partition and then select Information from the pop-up menu. G Parted allows you to copy text from the Information dialog so avoiding mistakes typing a long UUID number can be avoided!

However, you can also get the same information from the command line:

sudo fdisk -l

With the UUID information, you're ready to make the changes to the fstab file, but first:

sudo cp /etc/fstab /etc/fstab.bak

This command makes a backup copy of the file so that you can restore it if necessary!

Now, open the fstab file with:

sudo gedit /etc/fstab

And, when the file is open, add the following line:

UUID=UUID Number /media/partion_name ext4 defaults 0 0

Change the text to suit your partition UUID and name. This command will automount the partition at boot, but that's not obligatory: by changing the defaults command to noauto you can prevent the drive from auto-mounting. For further instructions on this and other configurations, review the information on the Ubuntu Documentation pages.

Now you can mount the paritition with:

sudo mount -a

All being well, you should see your new partition in the media window of Nautilus and it should mount each time you boot.

Sources & References:

Friday 10 June 2011

Cryptic - To Encrypt or Not to Encrypt...

As part of the decryption process, GnuPG both authenticates the sender and checks the integrity of the encrypted data. This means that the recipient can be confident that:

  1. The message or data actually comes from the person who purports to have sent it.

    AND

  2. The message or data has not been tampered with after encryption.

Obviously, validating the source and integrity of data is an essential component of the security provided by encryption; but sometimes this sort of validation is desirable without the necessity of encryption (so called, plaintext information). For instance, imagine that you and your friends are working on some code - a bug fix, perhaps - it's easy to understand why recipients would be keen to ensure that the data has not been corrupted or compromised during transimission.

Fortunately, GnuPG makes it is possible to realize these benefits using a technique called digital signing. The signing process creates a new file (the signature) in the same directory as the original. It is essentially an encrypted version of the original data's message digest also known as a hash and this digest is, for all intents and purposes, unique to the data that was encrypted.

When the originator sends the plaintext file to the recipient, she will also send the signature. When the recipient decrypts the signature the hash is compared to the plaintext hash to ensure that the data has not changed. In Ubuntu, creating a digital signature is simple once the Decrypt File package has been installed:

  1. In Nautilus, right-click the file that you want to sign and choose the Sign option from the pop-up menu.
  2. In the Choose Signer dialog box, select the key (certificate) that you want to use to sign the file
  3. Enter your passphrase in the Pinentry dialog box. An electronic signature (a file with a .sig file extension) is saved in the same directory as the original file.
  4. Double-click the .sig file to view the signature validation notification
  5. Send both the original file (encrypted or not) and the signature file to the intended recipient

Sources & References:

Monday 6 June 2011

Blogilo - Update - Update

I finally abandoned my Blogilo experiment. The truth is that it's just as easy to use Scite (or any other text editor that handles html) and preview your text in the browser of your choice. This is not so much a reflection on Blogilo, it's more in recognition that blogger doesn't accomodate all the app's nice features and the only thing that changes my tag attributes is me.

It's a simple work around if you don't want to use the web-based dashboard for drafting posts (especially if they're long posts!) but you do have to copy and paste the text into blogger's New Post dialog when you're ready to upload your text. Of course, Scite won't upload picture files but that's no disadvantage compared to Blogilo.

  1. Install Scite from the Ubuntu Software Centre.
  2. You can open Scite from the Programming menu or, if you prefer, move the shortcut to the location of your choice using the menu editor (Preferences > Main Menu).
  3. When you're drafting your text, make sure that your Language is set to HypertextF12.
  4. Save your draft (at any time) in the location of your choice with a .html file extension.
  5. To preview your draft, simply right-click your file in Nautilus and, from the Open With option, select your browser of choice.
  6. To update your preview, save the file in Scite and reload the tab in your browser.

Perhaps the preview isn't as pretty as it is in Blogilo, but it's certainly good enough for debugging text and working on your prose!

Cryptic - The Postman Always Rings Twice

Sharing enctypted files with other Ubuntu users is straightforward enough, but real-world situations are rarely so simple. For one thing, it seems a little pointless encrypting files if you attach them to email messages that pretty much anyone can read and, for another, most people don't use Ubuntu (hard to believe, I know!).

So, the question is, can you exchange encrypted files and email with Windows users? The answer is most assuredly, yes!

The embedded email client in Ubuntu is Evolution and it supports "signing and encrypting mail via GPG (GNU Privacy Guard) and S/MIME" out of the box. However if, like me, you have migrated to Thunderbird, you can extend the security capabilities of the client by adding the Enigmail plugin. Using both of these applications is a simple affair: draft your email and, before you click Send, click on the Security toolbar button or menu option in the message window. The plugin will prompt you for the relevant key and handles the encryption for you.

For Windows users looking for PGP support, there is Gpg4win. I've tested this on my Vista machine with Microsoft® Outlook 2003 and it works - eventually. The Windows OS being what it is, I found that multiple reboots were required to get the plugin working and that importing my key proved to be problematic: however, when I did get it to work, it performs excellently and there is a superb manual that goes a long way to helping novices get the installation right.

Let's not get paranoid - it's unlikely that anyone is terribly interested in the bulk of email messages and attachments that we send off into the ether: however, it is nice to know that you can share confidential information with your colleagues, friends, and family without letting the whole world take a peak!

Sources & References:

Natty Desktop

My DELL Inspiron 1501 hasn't had a mention for a while. As an intermediate release I'm impressed with the system stability if not by the lack of customization options.

As it's been put to good use today I thought that I'd show off its latest desktop background;

OMG! Ubuntu! showcased this fine artwork by insospettato in early May and it's been on my laptop ever since.

Cryptic - Sharing

Encrypting files on your hard drive for safekeeping is all very well, but how can you share protected information with your family, friends, and colleagues without compromising data security? In this post I'll outline how to encrypt, transmit, and decrypt protected files safely using the Gnu Privacy Guard (GnuPG) program on Ubuntu.

GnuPG is installed as an integral part of Ubuntu during the installation process1 and it uses the embedded Passwords and Encryption Keys application as a GUI (also known as a front end) by default. The obvious and most frequent use for this program is to store and access system passwords but, when coupled with the Seahorse Decrypt File plugin, it also facilitates data encryption using twin encryption keys known as a keypair.

The first of these keys is the private key which the key owner uses for decrypting files encoded using his keypair. This key should never be revealed as anyone with access to it also has unfettered ability to read files encrypted with that keypair (assuming that an infiltrator has also acheived access to the files).

The second key of the pair is the public key which is used to encrypt data destined for the key owner. This public key may be distributed freely2 to anyone who might wish to send confidential information to the key owner.

As a simple illustration of the process, imagine two friends, Laura and John. John wants to send Laura a confidential file; both are using Ubuntu and have installed the Decrypt File plugin from the Ubuntu Software Centre:

  1. Laura creates a (or selects an existing) keypair.
  2. Laura Exports her public key to a text file3 and forwards it to John.
  3. John Imports Laura's public key and uses it to encrypt his file. He sends the encrypted copy of the file to Laura.
  4. Laura uses her private key and passphrase to decrypt the file.

Probably the easiest way to manage this process is to use the Passwords & Encryption Keys interface, but it can be managed equally well from the command line.

You can use these instructions to create your keypair or, if you have already created the keys, you can use an existing key. To Export a public key from the Passwords & Encryption Keys interface:

  1. Open the application (either from the Accessories menu or by typing seahorse at a command prompt).
  2. Select the My Personal Keys tab and select the key that you want to export.
  3. Click File and then Export...
  4. The Export public key dialog appears - choose a name for the key and a location to store the text file. The default name is the Key Owner's name (including spaces and with the .asc file extension) and the default directory is the usr/home directory; however, you can amend these parameters (however, avoid changing the file extension) to suit your needs.
  5. Click Save

Exporting a public key from the command line is just as simple; open a terminal and, at the command prompt, type:

gpg --export -a -o "User Name.asc" [UID]
(See Note4)

The Key Owner can distribute the public key any number of ways, but to forward the key to a specific recipient, the text file can be attached to an email. Recipients of the key can simply double-click the file to import it to their Other Keys tab of the Passwords & Encryption Keys application5.

Importing a public key from the command line is also simple; from the command prompt, type:

gpg --import [Filename]

The File Owner can now encrypt the data by right-clicking the file in Nautilus and selecting Encrypt... from the pop-up menu. When the Choose Recipients dialog appears, the File Owner selects the appropriate key from the list and clicks OK. The encrypted file will be saved in the same directory as the original (with a .pgp file extension) and can be forwarded to the Key Owner.

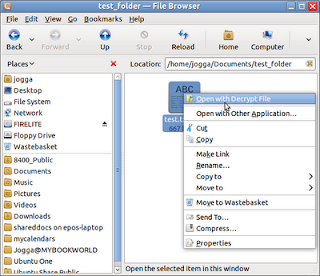
On reciept of the encrypted file, the Key Owner simply righ-clicks the file and selects the Open with Decrypt File option. The Key Owner will then be prompted for his or her passphrase (chosen when the keypair was created) and the file is decrypted.

Notes:

1 Ubuntu Documentation: Gnu Privacy Guard How To
2 So freely in fact, that many key owners publish their public keys on the internet in order to facilitate confidential exchanges.
3 Actually, the output from the Export process can also be in binary format (as it is by default from the command line) but for simplicity, I have stuck with ASCII formats.
4 Where:

gpg refers to the Gnu Privacy Program
--export is the command to export the public key
-a is the command to export the key in text format
-o prepares the command for the destination directory and file name
"User Name.asc" is the file name. The default is usually the key owner's name and quotation marks are required if you wish to include spaces in the file name. The default directory is usr/home/ but you can specify a full path in the command line (e.g. /usr/home/Documents/Keys/" ser Name.asc")
[UID] is the key identifier. To list the available keys from the command line, type
gpg --list-keys
or view the list of keys from the My Personal Keys tab of the Passwords & Encryption Keys application.

5 You can also save the file to disk and use the Import... option in the Passwords & Encryption Keys application: however, double-clicking the text file is easier! Before running any application or invoking code, make sure that you trust the source!

Sources & References:

Sunday 5 June 2011

Blogilo - Update

Hmmm....

There's some good news and some bad news with regard to my Blogilo experiment. I did (eventually) manage to get Blogilo to upload and publish a draft post to blogger; however, blogger doesn't support media uploads (so, no image uploads from the program) and the program also has a strange (and irritating) habit of altering html tag contents; particularly span attributes.

The problem with uploading seems to be caused by broken html code and fixing tags seems to resolve the problem. However, Blogio doesn't seem to have a debugging mode, so fixing problems can be frustrating. That said, this is more a reflection of my ability rather than the program's and I suspect that practise would help!

Of course, I can always draft my posts in Blogilo and copy & paste the content to my blogger post editor (giving me the option to save a local copy) but, equally, I can use Scite and save the draft in as an html file (for previewing), so I'm not entirely convinced - yet!

=-=-=-=-=
Powered by Blogilo

Blogilo

Somehow I managed to loose a whole draft post from blogger the other day - all of it!

I wouldn't have minded but it had taken several hours to compose (it wasn't even finished when disaster struck!) and, to make matters worse, I had no backup. In part I suspect that the problem was caused by my own incompetence and, in part, by the auto-save function in blogger but, whatever the cause, hours of work had been squandered by my own stupidity at not having a failsafe backup policy.

At the risk of appearing sanctimonious , I do try to learn from such experiences and I thought that it might not be a bad idea to find a better way of drafting long posts locally rather than tipping my thoughts straight into blogger - enter Blogilo.

"Blogilo is a Free/Open Source Blogging client, focused on simplicity and usability. Blogilo means “Blog Tool” in Esperanto."1

Blogilo can be installed from the Ubuntu Software Centre: just type Blogilo into the search box and click install.

The layout is intuitive with a Visual Editor window2, an html editor, a (a really nice touch) preview window.

So, in a sense, this post is an experiment to see if Blogilo can completely replace blogger's web-based dashboard (hence, the gratuitous use of superscript!). If it does, then perhaps some more posts on the utility of this program will be in order. Here goes!

Notes:
1 Source: Blogilo home page.
2 A WYSIWYG window.

Sources & References:
Wednesday 1 June 2011

Cryptic - An Open and Shut Case

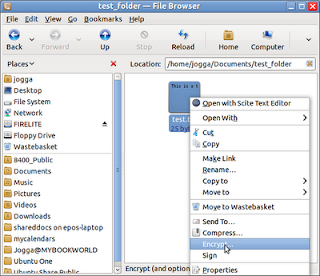
In this second post on encryption, I'm going to demonstrate how easy it is to encrypt and decrypt individual files using Nautilus.

Select the File that you Want to Encrypt
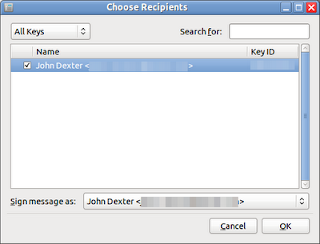
  • In the Choose Recipients dialog, check the PGP Key that you want to use to encrypt your data and click the OK button.
Select a PGP Key
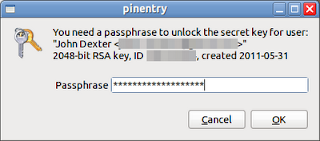
  • In the Pinentry dialog, enter the passphrase allocated to the key when it was created.
Enter your Passphrase to Begin Encryption
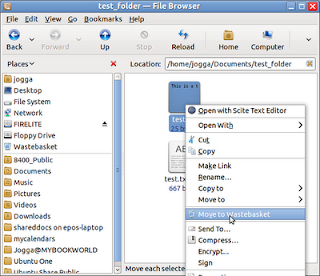
  • An encrypted copy of the file (with a .pgp file extension) is placed in the same directory as the original: you can safely delete the original file (or, to test that everything is working ok, move it to the waste basket or other secure holding directory while you test the plugin).
You Can Safely Delete the Original File (if you are brave enough!)
  • To decrypt your file, right-click the encrypted version and select Open with Decrypt File
Right-click and Select Open with Decrypt File
  • You'll be prompted for your passphrase and, if all goes well, you will receive a notification that your signature has been verified and an un-encrypted version of your file will appear in the directory.
A Good Sign!
  • Now you can open your file using the application of your choice - easy!
Notes:
  • PGP is an acronym for Pretty Good Privacy
  • GUI is an acronym for Graphical User Interface
  • CLI is an acronym for Command Line Interface
Sources & References:
    Cryptic - Be Prepared

    During the installation process, Ubuntu provides a facility to encrypt your /home directory. Whilst I consider all of my files to be private, I know that most of them aren't particularly sensitive and the prospect of waiting for my /home directory to be decrypted every time I boot my pc isn't particularly appealing.

    Fortunately, there is a way to encrypt individual files in Ubuntu and, in this first of two posts, I'll outline how to prepare Ubuntu and create an encryption key:

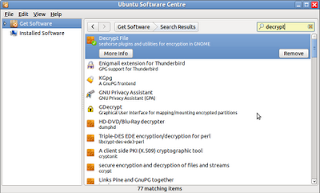
    • Open the Ubuntu Software Centre and type decrypt into the search dialog. Select the Decrypt File plugin and install the package.

      Ubuntu Software Centre
      Install the Decrypt File Plugin from the Ubuntu Software Centre
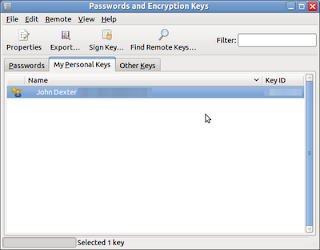
    • When the plugin has been installed, open the Passwords and Encryption Keys application from the Accessories Menu and click on the My Personal Keys tab.

    • Open the Passwords and Encryption Keys Application
      Open the Passwords and Encryption Keys Application
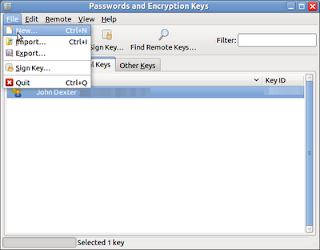
    • Click File and then select New...
    Create a New PGP Key
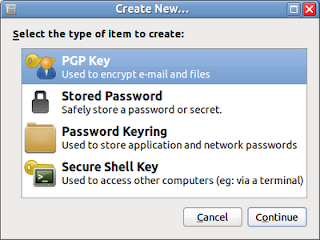
    • In the Create New... dialog, select the PGP Key option and click Continue.
    Select the PGP Key option and Click Continue
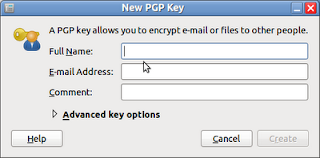
    • Complete the New Key dialog box and click Create and you will be prompted for a passphrase.
    Complete the fields in the New PGP Key dialog

    • Once you have entered and confirmed your passphrase, you are ready to encrypt data using Natilus.

    In the next post, I'll outline how to encrypt and decrypt files using the GUI rather than the CLI.

    Notes:

    • PGP is an acronym for Pretty Good Privacy
    • GUI is an acronym for Graphical User Interface
    • CLI is an acronym for Command Line Interface
    Sources & References: