Every now and then one encounters a problem that seems to defy explanation; a sort of computing ghost in the machine. Yesterday's struggle with Samba is a case-in-point. At some point during the day, my WiFi was no longer activated as part of the boot sequence and I had to enable it manually when the start routine had finished (Fn + F2 on the DELL Inspiron 1501).
This was not a huge problem, after all, WiFi still worked, but it niggled me that I didn't understand what had caused this change in behaviour. After getting Samba up and running, I turned my attention to fixing the problem and tried Google and the Ubuntu Forums for a solution. Unusually, I found no answer in either of these invaluable resources and eventually decided to reinstall the B43 wireless driver. After invoking the driver search (Administration > Hardware Drivers), I elected to try one more reboot before reinstalling the existing Broadcom driver and...
It worked!
I've no idea how the problem happened or why invoking a driver search should fix it but everything is now behaving as it should and I've put it down to one of those things.
Monday, 28 March 2011
Sunday, 27 March 2011
Lessons Learned
I've learned a couple of valuable lessons this weekend and it's only Saturday!
Actually, there's a much easier way to achieve the same result: the GParted Live CD.
Using the GParted Live CD facilitates the resizing (reduction) of the root partition in order to make space for either additional primary partitions (up to three additional partitions (four in total)) or an extended partition, which can house new logical partition(s) and the existing swap file. Then, using these instructions, it's a simple matter to migrate the /home directory to the new partition where its contents can reside safely. This simpler method has subsequently been applied (successfully) to my desktop without the drama of a complete rebuild!
Re-installing Lucid on the laptop also had some unintended consequences for Samba and I couldn't access my Ubuntu or Windows desktop shares from my laptop even though I could see them in the browser. My smb.conf file had been successfully restored to the laptop and a thorough check revealed no errors. My instinct told me that my Ubuntu desktop was the culprit but I'd already learned that it's better to be sure than to act on instinct! After several hours of trying to find the error I realized that:
Sources & References
Ubuntu Documentation Partitioning Home Moving
Gnome Partitioning Editor Sourceforge GParted Page
Dedoimedo GParted Full Tutorial
- Always do you research properly and preferably before you make any system changes.
- The last thing that you changed is the most likely source of any new problems.
- Type carefully!
"Setting up /home on a separate partition is beneficial because your settings, files, and desktop will be maintained if you upgrade, (re)install Ubuntu or another distro. This works because /home has a sub-folder for each user's settings and files which contain all the data & settings of that user." Source: Ubuntu DocumentationDoing some research (and applying a little logic), I realized that I couldn't re-size my existing partition without unmounting it first and, given that my partition was my whole drive, I couldn't unmount it anyway! Rather that keep searching for an answer, I convinced myself that the only way to partition the drive was a vanilla install of Lucid.
Actually, there's a much easier way to achieve the same result: the GParted Live CD.
Using the GParted Live CD facilitates the resizing (reduction) of the root partition in order to make space for either additional primary partitions (up to three additional partitions (four in total)) or an extended partition, which can house new logical partition(s) and the existing swap file. Then, using these instructions, it's a simple matter to migrate the /home directory to the new partition where its contents can reside safely. This simpler method has subsequently been applied (successfully) to my desktop without the drama of a complete rebuild!
Re-installing Lucid on the laptop also had some unintended consequences for Samba and I couldn't access my Ubuntu or Windows desktop shares from my laptop even though I could see them in the browser. My smb.conf file had been successfully restored to the laptop and a thorough check revealed no errors. My instinct told me that my Ubuntu desktop was the culprit but I'd already learned that it's better to be sure than to act on instinct! After several hours of trying to find the error I realized that:
- I had failed to restore my smbpasswd file on the laptop.
- I had mistyped the port number in my ufw rules (I'd typed 149 instead of 139).
Sources & References
Ubuntu Documentation Partitioning Home Moving
Gnome Partitioning Editor Sourceforge GParted Page
Dedoimedo GParted Full Tutorial
Tuesday, 22 March 2011
Making the Most of Ubuntu
Recently I wrote about Virtual Box and its usefulness as both a testing platform and for grabbing video caps.
Unfortunately I had to turn to my Windows machine to do the grunt work because it has plenty of spare RAM to share with the software. This prompted me to review the hardware requirements of my Ubuntu desktop: it was undoubtedly capable of running Ubuntu 10.04LTS with a paltry 1GB of RAM already installed but it was going to be a struggle capturing video once that memory had been distributed between operating systems. Time for an upgrade!
I bought two Kingston 1GB memory modules (tripling my RAM) from Amazon for around £35 including delivery and VAT. Installation was pretty easy and it took longer to reconnect the cables than to insert the modules.
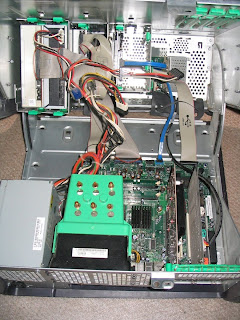
Under the Hood: DELL Dimension 8400 You can see the new video card in the picture above and the old memory modules tower above the new slimline versions - twice as big with half the memory! Despite this upgrade, the cost of my adventure with Ubuntu is still under £200 (excluding the sunk cost of the DELL Dimension) and I'm running a state-of-the-art system.
Virtual Box has been installed from the Ubuntu Software Centre and now it's time to have a peek at Maverick!
Sources & References:
Oracle Virtual Box
Ubuntu Desktop
Unfortunately I had to turn to my Windows machine to do the grunt work because it has plenty of spare RAM to share with the software. This prompted me to review the hardware requirements of my Ubuntu desktop: it was undoubtedly capable of running Ubuntu 10.04LTS with a paltry 1GB of RAM already installed but it was going to be a struggle capturing video once that memory had been distributed between operating systems. Time for an upgrade!
I bought two Kingston 1GB memory modules (tripling my RAM) from Amazon for around £35 including delivery and VAT. Installation was pretty easy and it took longer to reconnect the cables than to insert the modules.

Virtual Box has been installed from the Ubuntu Software Centre and now it's time to have a peek at Maverick!
Sources & References:
Oracle Virtual Box
Ubuntu Desktop
Drastic Action
I've been fighting with sbackup again!
I spent a large part of yesterday trying to get sbackup to work on my laptop and failed! However, there are a couple of good things to come out of my struggle:
However, if I'm honest, my discovery was more desperation than investigation. I had tried manfully to get sbackup to connect to my network drive and even tried mounting the drive permanently but the application simply wouldn't connect for incremental backups using Karmic. So, I hit the update button.
I fully expected to be restoring Karmic this morning, but the DELL has demonstrated once again that I have underestimated its capabilities and, more importantly, overestimated the demands of Ubuntu. Now, not only is the machine running Compiz, AWN and visual effects, it is also backing up to my network drive and emailing me a report on completion: all with free software that is freely available!
Sources & References:
Ubuntu.com About Ubuntu
I spent a large part of yesterday trying to get sbackup to work on my laptop and failed! However, there are a couple of good things to come out of my struggle:
- It seems that my test machine is more important to me than I'd realized and is now worthy of being backed up.
- Finally, I have been forced to evaluate my backup policy for all of my machines.
- My DELL Inspiron 1501 runs Ubuntu 10.04 LTS!
However, if I'm honest, my discovery was more desperation than investigation. I had tried manfully to get sbackup to connect to my network drive and even tried mounting the drive permanently but the application simply wouldn't connect for incremental backups using Karmic. So, I hit the update button.
I fully expected to be restoring Karmic this morning, but the DELL has demonstrated once again that I have underestimated its capabilities and, more importantly, overestimated the demands of Ubuntu. Now, not only is the machine running Compiz, AWN and visual effects, it is also backing up to my network drive and emailing me a report on completion: all with free software that is freely available!
"Ubuntu still is and always will be free to use, share and develop. We hope it will bring a touch of light to your computing – and we hope that you'll join us in helping to build the next version too."Sometimes I have to remind myself that Canonical provides Ubuntu to the world for free and that this operating system is not just comparable to the commercial alternatives but is, in many ways, superior!
Source: Ubuntu.com About Ubuntu
Sources & References:
Ubuntu.com About Ubuntu
Monday, 21 March 2011
Ubuntu Font Family
I only became aware of the development of the Ubuntu Font Family when Canonical announced a new exhibition at London’s Design Museum dedicated to the output of the project. Unfortunately, the exhibition closed at the end of February (2011), but the good news is that you can still see the font and, even better, use it on your desktop!
Go to the Ubuntu Font Family web page and click on the
Select the
That's it! To use the font on your desktop and in your applications, go to the Appearances editor (Preferences > Appearances) and select the Fonts tab. To use the font in Open Office, just scroll through the font options as usual.
Sources and References:
Ubuntu Ubuntu Font
Ubuntu Font Family Download
Go to the Ubuntu Font Family web page and click on the

apt-get install ttf-ubuntu-font-family hyperlink. This will open a Launch Application dialog.Select the

apturl option (if it isn't already highlighted) and click OK.That's it! To use the font on your desktop and in your applications, go to the Appearances editor (Preferences > Appearances) and select the Fonts tab. To use the font in Open Office, just scroll through the font options as usual.
Sources and References:
Ubuntu Ubuntu Font
Ubuntu Font Family Download
Monday, 14 March 2011
Blogger Update - Correction
In an earlier post I suggested that you had to manually update Blogger's new preview feature. This is inaccurate, just hit the PREVIEW button every time you want to view your changes and Blogger will update the browser window automatically.
Splash and Plymouth in 10.04
I've finally decided that I've had enough of Lucid Lynx's splash screen at boot. To be fair, it is certainly an improvement on Karmic's dingy brown spotlight, but it's not terribly dramatic!
However, ever since the Hardy Heron release, changing the boot sequence has become increasingly difficult and I wonder whether new users will start to be put-off by the level of expertise required to make technical system changes to their eye candy. Fortunately, there are several excellent guides that provide instructions for changing Plymouth and the boot splash screen.
First of all, what is Plymouth? The official definition is:
You can view Plymouth during an X-session. First, ensure that you have the plymouth-x11 package installed. You can install it from Synaptic:
or from a terminal:
However, it is a relatively straightforward operation to change the Plymouth theme using existing packages in the Synaptic Package Manager. Find the theme that you want and mark it for installation - then hit the Apply button. Once installed, from a terminal, type:
Changing the boot splash screen is also reasonably straightforward. First, identify the background image that you want to use for the boot sequence and copy it to the /usr/share/backgrounds directory. You'll need to be root to add images to the backgrounds folder:
Next, you'll need to invoke the Gnome Desktop Manager during the boot sequence. In a terminal:
To disable the Appearances Preferences dialog on startup, open a terminal and type:
In a future post, I'll look at adding button icons and a banner message to the login dialog.
Sources & References:
idyllictux (blog): High resolution Plymouth & Virtual Terminal for ATI/NVIDIA cards with proprietary/restricted driver
Scott James Remnant (blog): All about Kernel Mode Setting (or why your $500 nVidia card only displays in 16-colors)
Ubuntugeek (blog): How do you change login and plymouth image in ubuntu 10.04 (Lucid Lynx)
However, ever since the Hardy Heron release, changing the boot sequence has become increasingly difficult and I wonder whether new users will start to be put-off by the level of expertise required to make technical system changes to their eye candy. Fortunately, there are several excellent guides that provide instructions for changing Plymouth and the boot splash screen.
First of all, what is Plymouth? The official definition is:
"Plymouth is an application that runs very early in the boot process (even before the root filesystem is mounted!) that provides a graphical boot animation while the boot process happens in the background"In other words, Plymouth replaces the xsplash package in Karmic (called usplash in earlier incarnations of Ubuntu) and provides the so-called throbber that appears when you hit the power button.
You can view Plymouth during an X-session. First, ensure that you have the plymouth-x11 package installed. You can install it from Synaptic:

or from a terminal:

sudo apt-get install plymouth-x11sudo plymouthdsudo plymouth --show-splashsudo plymouth quitHowever, it is a relatively straightforward operation to change the Plymouth theme using existing packages in the Synaptic Package Manager. Find the theme that you want and mark it for installation - then hit the Apply button. Once installed, from a terminal, type:
sudo update-alternatives --config default.plymouth
sudo update-initramfs -uplymouthd) you'll see your new throbber.Changing the boot splash screen is also reasonably straightforward. First, identify the background image that you want to use for the boot sequence and copy it to the /usr/share/backgrounds directory. You'll need to be root to add images to the backgrounds folder:
sudo cp /location_of_image/name_of_image /usr/share/backgrounds/name_of_imageNext, you'll need to invoke the Gnome Desktop Manager during the boot sequence. In a terminal:
sudo cp /usr/share/applications/gnome-appearance-properties.desktop /usr/share/gdm/autostart/LoginWindowTo disable the Appearances Preferences dialog on startup, open a terminal and type:
sudo unlink /usr/share/gdm/autostart/LoginWindow/gnome-appearance-properties.desktopIn a future post, I'll look at adding button icons and a banner message to the login dialog.
Sources & References:
idyllictux (blog): High resolution Plymouth & Virtual Terminal for ATI/NVIDIA cards with proprietary/restricted driver
Scott James Remnant (blog): All about Kernel Mode Setting (or why your $500 nVidia card only displays in 16-colors)
Ubuntugeek (blog): How do you change login and plymouth image in ubuntu 10.04 (Lucid Lynx)
Ding!
Adding an audible message alert to your Thunderbird mail client is easy if you can find a sound that you can live with! In Thunderbird, just go to Edit > Preferences and then click the General tab.

I prefer simple and unobtrusive notifications (if such notifications don't defeat their own purpose!) and found just what I was looking for in the Ubuntu sound files (have a look in: /usr/share/sound/ubuntu/stereo). The problem was that the file was an .ogg format and Thunderbird prefers its noise in .wav files. Fortunately it's easy to fix audio file formats using FFmpeg.
If you don't have FFmpeg on your system, open a terminal and type:
Then, type:
For instance, I wanted to change the message-new-instant.ogg sound file to a .wav format, change the file name to "mail", and save the converted file somewhere convenient. My code looked like this:
Note that my destination directory had been created prior to executing the command.
Now that the file has been converted, use the preferences browse button in Thunderbird to select your new .wav file and you should be notified whenever you get mail.
Sources & References:
FFmpeg Home Page

I prefer simple and unobtrusive notifications (if such notifications don't defeat their own purpose!) and found just what I was looking for in the Ubuntu sound files (have a look in: /usr/share/sound/ubuntu/stereo). The problem was that the file was an .ogg format and Thunderbird prefers its noise in .wav files. Fortunately it's easy to fix audio file formats using FFmpeg.
If you don't have FFmpeg on your system, open a terminal and type:
sudo apt-get install ffmpegThen, type:
ffmpeg -i /input_file.ext /outputfile.extFor instance, I wanted to change the message-new-instant.ogg sound file to a .wav format, change the file name to "mail", and save the converted file somewhere convenient. My code looked like this:
ffmpeg -i /usr/share/sound/ubuntu/stereo/message-new-instant.ogg /home/jogga/Documents/Sound/mail.wavNote that my destination directory had been created prior to executing the command.
Now that the file has been converted, use the preferences browse button in Thunderbird to select your new .wav file and you should be notified whenever you get mail.
Sources & References:
FFmpeg Home Page
Thursday, 10 March 2011
Natty Changes in Karmic
In this post I mentioned that I'd been tweaking my boot and login screens. Here's the output of my labour:


These first three screen-grabs are actually from a virtualization (using VirtualBox) on Windows Vista but the customizations are the same as my laptop's.
This next screen-grab is actually from the laptop itself, running the following code in a terminal:

Using VirtualBox (something that is almost ridiculously easy!) to run Karmic allows not only screenshots but also desktop videocaps!
I used Windows because the Vista machine has plenty of memory and storage: the laptop would have struggled!
Sources & Resources
Artwork - Ubuntu Tribal Pack by Grovin Thewer
Virtual Box is available from Oracle (or the repositories)
Towheed Mohammed's customization instructions are available from here (.pdf) or from the Ubuntu Forums


These first three screen-grabs are actually from a virtualization (using VirtualBox) on Windows Vista but the customizations are the same as my laptop's.
This next screen-grab is actually from the laptop itself, running the following code in a terminal:
sudo xsplash
Using VirtualBox (something that is almost ridiculously easy!) to run Karmic allows not only screenshots but also desktop videocaps!
I used Windows because the Vista machine has plenty of memory and storage: the laptop would have struggled!
Sources & Resources
Artwork - Ubuntu Tribal Pack by Grovin Thewer
Virtual Box is available from Oracle (or the repositories)
Towheed Mohammed's customization instructions are available from here (.pdf) or from the Ubuntu Forums
Simply Ubuntu
OMG! Ubuntu is reporting on Canonincal's decision to abandon a separate netbook edition of Ubuntu.
Sources & References:
OMG! Ubuntu The end of Ubuntu Netbook edition
Canonical Blog Ubuntu Netbook Edition folded into Ubuntu for next release
"One of the benefits of the direction that’s been taken with the next release of Ubuntu is that there is no longer a need for a separate netbook edition. The introduction of the new shell for Ubuntu means that we have a user interface that works equally well whatever the form factor of the PC. And the underlying technology works on a range of architectures including those common in netbook, notebooks, desktops or whatever you choose to run it on. Hence the need for a separate version for netbooks is removed."Given my own experience I'm ambivalent to the passing of Ubuntu Netbook Remix, but nonetheless, I couldn't let it pass without comment.
Sources & References:
OMG! Ubuntu The end of Ubuntu Netbook edition
Canonical Blog Ubuntu Netbook Edition folded into Ubuntu for next release
Tweak Ubuntu or Ubuntu Tweak?
Recently I've been intrigued by comments in one or two threads at the Ubuntu Forums concerning Ubuntu Tweak. Today, a couple of contributors to this thread suggested that Ubuntu Tweak can control changes to the login screen. If true, using this method would certainly be easier than the one that I recommended last May!
Notwithstanding my recent tweaking binge, I've neglected to change the dreary boot-splash and login window on my Karmic machine and the thread prompted me to give this power toy a trial run. Sadly however, the software failed to match my expectations; you can indeed change the login background and computer icon on the greeter, but (in Karmic anyway), your bespoke background is sandwiched between that same turgid Karmic background during the boot sequence.
So, I went back to the drawing board and followed my earlier instructions for changing the boot sequence background. Nonetheless, this is only a partial customization and the dull-looking simple-greeter (aka login window) still spoils the party; I was determined to find a way to brighten the login dialog. That's when I came across another excellent thread at the Ubuntu Forums outlining detailed instructions for customizing the entire boot sequence in Ubuntu 9.10. Authored by Towheed Mohammed, a .pdf version (58 pages) can also be downloaded from here.
The instructions are concise and accurate and Towheed's guide has enabled me to make some pretty natty changes to my login!
Thanks Towheed!
Monday, 7 March 2011
Maximizing Rhythmbox
It seems that I'm always tweaking Rhythmbox and today is no exception!
Since replacing my Gnome-Panels with Avant Window Manager, I've gone without a notification applet (because AWN's is as dreary as Gnome's!) and that's a potential problem with Rhythmbox.
Fortunately the fix is simple:
Source & References:
Ubuntu Documentation Rhythmbox
Ubuntu Documentation GConfig Editor
Since replacing my Gnome-Panels with Avant Window Manager, I've gone without a notification applet (because AWN's is as dreary as Gnome's!) and that's a potential problem with Rhythmbox.
"From Ubuntu Lucid Lynx (10.04) on, when launched Rhythmbox appears as an icon minimized in the notification area." SourceThat's all very well, but if you don't have a notification area it's difficult to activate the Rhythmbox window!
Fortunately the fix is simple:
- Open gconfig
- Navigate to apps > rhythmbox > plugins > status-icon and check the window-visible option.
Source & References:
Ubuntu Documentation Rhythmbox
Ubuntu Documentation GConfig Editor
Sunday, 6 March 2011
Seeking Closure
Recently, I suggested that, if you intend to use Avant Window Navigator (AWN) in place of Gnome-Panels, before deleting your panels, you should ensure that you have a method of rebooting and closing your system.
AWN does provide a Quit-Log out applet in the default install, but don't be lulled into believing that activating this applet is all that you need to do in order to shutdown or reboot from the AWN dockbar: this applet only exits or logs out of the session!
However, you can configure this applet to display the shutdown dialog.
 If you want to reboot or shutdown before you have configured the button, just open a terminal and type:
to shut your system down, or:
to reboot.
By the way, you can change the applet's icon simply by dragging your chosen icon picture file onto the existing icon on the dockbar. This will trigger the Change icon? dialog box. Make the appropriate choice from the three radio buttons and then click OK.
AWN does provide a Quit-Log out applet in the default install, but don't be lulled into believing that activating this applet is all that you need to do in order to shutdown or reboot from the AWN dockbar: this applet only exits or logs out of the session!
However, you can configure this applet to display the shutdown dialog.
- Activate the applet by starting the AWN Manager and selecting Applets from the left-hand menu. Scroll down to the Quit-Log out applet and click the Activate button.

- When the applet appears on the AWN dockbar, right-click the icon and select preferences.

- Change the command in the pop-up box to:
gnome-session-save --shutdown-dialog

- Click the Close button.


sudo shutdown nowto shut your system down, or:
sudo shutdown -r nowto reboot.
By the way, you can change the applet's icon simply by dragging your chosen icon picture file onto the existing icon on the dockbar. This will trigger the Change icon? dialog box.

Saturday, 5 March 2011
Using Screenlets
One slight niggle that I have with Avant Window Manager (AWN) on my Karmic machine is the absence of a decent WiFi status indicator. The Notification Area applet looks pretty dreary frankly and, despite searching, I haven't found an AWN applet suitable as a substitute.
A workaround is to abandon the idea of an applet all together and go for a screenlet. Highlight the Screenlets application; click the arrow on the right-hand-side and then click Install. That's simple enough! Once installed, you can launch the Screenlets Manager from the Applications > Accessories menu. However, in the standard package, you won't find the wireless app that you want; for that you'll need to download an additional application from the User Screenlets section of the Screenlets website.
I'm using the WirelessScreenlet2 application for my WiFi needs.

Right-click the Screenlet to set your preferences including the theme and behaviour as well as the network and card.
Sources & References
Screenlets Org Home Page
User Screenlets Home Page
A workaround is to abandon the idea of an applet all together and go for a screenlet.
"Screenlets are small owner-drawn applications (written in Python) that can be described as "the virtual representation of things lying/standing around on your desk". Sticknotes, clocks, rulers, ... the possibilities are endless.You can install Screenlets from the Ubuntu Software Centre: simply type Screenlets in the search box.
The goal of the Screenlets base-classes is to simplify the creation of fully themeable mini-apps that each solve basic desktop-work-related needs and generally improve the usability and eye-candy of the modern composited Linux-desktop. Source

- Find the Screenlet that you want from the list on the User Screenlets web page.
- Follow the instructions from the link and save the .tar file to your Downloads folder (or anywhere of your choice.)
- Open the Screenlets Manager (Applications > Accessories)
- Click on Install and select Install Screenlet from the drop-down dialog.

- Navigate to your download and click Open.

I'm using the WirelessScreenlet2 application for my WiFi needs.

Right-click the Screenlet to set your preferences including the theme and behaviour as well as the network and card.
Sources & References
Screenlets Org Home Page
User Screenlets Home Page
Thursday, 3 March 2011
fAWNing over Avant Window Navigator
Perhaps the most notable feature of Linux is its versatility. Distros such as Ubuntu are endlessly configurable and there seems to be an inexhaustible supply of creative people developing applications to customize the user environment.
Of course, tweaking your system with the latest eye-candy is a less risky proposition if you can do your experimenting (and make your mistakes!) on a spare machine first. Doubtless, my recent acquisition has inspired me to explore Ubuntu's potential in greater depth and I can do so without making speculative and potentially disastrous changes to the stable configuration on my desktop.
Recently I added Compiz to both my Ubuntu machines. Whilst the graphics and visual effects are superb, I really wanted to differentiate multiple workspaces in order to improve their utility (in plain language, I was looking for a way to have a different wallpaper on each workspace!). Compiz handles this effortlessly and I was (reasonably) pleased with the results. However, the problem with different wallpapers is that you often need to adjust the window decorations like the dreary Gnome Panels to suit the theme and these panels just don't lend themselves to the task. So, obviously the best thing to do is to get rid of the panels all together and replace them with a dockbar.
Avant Window Navigator
Although I tried a couple of dockbars (including docky and Simbar), I finally settled on Avant Window Navigator (AWN). This application is available from the Ubuntu Software Centre (in both Karmic and Lucid), so there's no requirement to compile the source code. Moreover, it is an intuitive application, that provides for a wide range of customizations.

To install AWN, you'll need to have a compositing manager installed and running (there are several available, including the one that I recommend, Compiz). Also, there are some technical specifications to meet, particularly if you're running an older pc with ageing graphics support (Karmic Desktop Effects, Lucid Desktop Effects).
If your system meets the installation criteria, the easiest way to install AWN is from the Ubuntu Software Centre (type “Avant” in the search box and select Avant Window Manager). I also recommend installing the following packages if they are not installed by default: Once you have installed AWN and configured your launchers (for instance, make sure that AWN is displaying a log-out applet or another method of shutting down the system (a terminal applet perhaps): more of that in another post) and applets, it's time to say goodbye to those dreary Gnome Panels.
If you have more than one panel running on your system, you can right-click all but one and select the delete pane option. You'll get the usual dire warning about your settings disappearing, but just click OK. To get rid of the last panel, open the Gnome Config Editor either via the Applications > System Tools menu or open a terminal and type:
Navigate to desktop > gnome > session > required_components and delete the value in the panel option. Close the gconf-editor and you are good to go.

I'm currently running everything on AWN that I was on my two Gnome Panels including my bespoke FinchSync launcher.
On first sight, AWN appears a little MAC-centric for my tastes, but configuring it is easy and it is rapidly becoming indispensable – particularly the slick switcher application.

Now, that's really nice!
Sources & References:
Avant Window Navigator Wiki – Home Page
AWN Project Installation Guide
AWN Project Ubuntu Specific Installation Guide
Of course, tweaking your system with the latest eye-candy is a less risky proposition if you can do your experimenting (and make your mistakes!) on a spare machine first. Doubtless, my recent acquisition has inspired me to explore Ubuntu's potential in greater depth and I can do so without making speculative and potentially disastrous changes to the stable configuration on my desktop.
Recently I added Compiz to both my Ubuntu machines. Whilst the graphics and visual effects are superb, I really wanted to differentiate multiple workspaces in order to improve their utility (in plain language, I was looking for a way to have a different wallpaper on each workspace!). Compiz handles this effortlessly and I was (reasonably) pleased with the results. However, the problem with different wallpapers is that you often need to adjust the window decorations like the dreary Gnome Panels to suit the theme and these panels just don't lend themselves to the task. So, obviously the best thing to do is to get rid of the panels all together and replace them with a dockbar.
Avant Window Navigator
Although I tried a couple of dockbars (including docky and Simbar), I finally settled on Avant Window Navigator (AWN). This application is available from the Ubuntu Software Centre (in both Karmic and Lucid), so there's no requirement to compile the source code. Moreover, it is an intuitive application, that provides for a wide range of customizations.
To install AWN, you'll need to have a compositing manager installed and running (there are several available, including the one that I recommend, Compiz). Also, there are some technical specifications to meet, particularly if you're running an older pc with ageing graphics support (Karmic Desktop Effects, Lucid Desktop Effects).
If your system meets the installation criteria, the easiest way to install AWN is from the Ubuntu Software Centre (type “Avant” in the search box and select Avant Window Manager). I also recommend installing the following packages if they are not installed by default:
- Awn Settings
- python-awn-extras
- awn-applets-c-extras
- awn-applets-python-extras

If you have more than one panel running on your system, you can right-click all but one and select the delete pane option. You'll get the usual dire warning about your settings disappearing, but just click OK. To get rid of the last panel, open the Gnome Config Editor either via the Applications > System Tools menu or open a terminal and type:
gconf-editorNavigate to desktop > gnome > session > required_components and delete the value in the panel option. Close the gconf-editor and you are good to go.

I'm currently running everything on AWN that I was on my two Gnome Panels including my bespoke FinchSync launcher.
On first sight, AWN appears a little MAC-centric for my tastes, but configuring it is easy and it is rapidly becoming indispensable – particularly the slick switcher application.

Now, that's really nice!
Sources & References:
Avant Window Navigator Wiki – Home Page
AWN Project Installation Guide
AWN Project Ubuntu Specific Installation Guide
Tuesday, 1 March 2011
Compiz - Multi-dimensional Eye Candy
Ubuntu provides multiple workspaces as part of its standard installation, but I've always felt that the default behaviour (identical appearance across all workspaces) is an impediment to its adoption. Of course, that's because I didn't know any better!
It is possible to have a different desktop background on each workspaces using a compositing manager called Compiz Fusion. However, to describe this software as a background manager is to do it a great disservice!

The screen-cap (above) is lifted directly from my laptop. The cube can be rotated in any direction using a USB mouse and any workspace selected. It is no exaggeration to say that that this laptop could barely load Windows Vista a month or so ago, but it is now running graphics that would put most Windows desktops to shame.
The configurations possible from the CompizConfig Settings Manager are bewildering and it has taken me several hours to get to grips with just the basic settings. However, the result is a multi-workspace environment, each with its own background and all accessible using either mouse or keyboard.
To install Compiz on Ubuntu, open a terminal and type:
You may also want the Simple CompizConfig Settings Manager!
Then, makes sure that the Enhanced features are enabled in the Appearance dialog (System > Preferences > Appearance > Visual Effects). Once done, you'll find the Config Settings Manager under the System > Preferences menu.
Whilst the interface is not particularly intuitive, it is worth persevering. Setting wallpaper and animating the cube will test your patience, but there is help on the Compiz Wiki pages.
Sources & References:
Compiz Home
Compiz Fusion Ubuntu Documentation
It is possible to have a different desktop background on each workspaces using a compositing manager called Compiz Fusion. However, to describe this software as a background manager is to do it a great disservice!
"Compiz is an OpenGL compositing manager that use GLX_EXT_texture_from_pixmap for binding redirected top-level windows to texture objects. It has a flexible plug-in system and it is designed to run well on most graphics hardware."This is no idle boast: Compiz is not only running on my DELL Inspiron 1501, but it is also delivering the graphical enhancements promised on the Compiz Home Page.
"In a nutshell, Compiz is a compositing manager, which means that it enhances the overall user interaction by adding fancy effects to your windows, from drop shadows to awesome desktop effects like the Desktop Cube or the Expo view.""Awesome" is not overstating the case!

The screen-cap (above) is lifted directly from my laptop. The cube can be rotated in any direction using a USB mouse and any workspace selected. It is no exaggeration to say that that this laptop could barely load Windows Vista a month or so ago, but it is now running graphics that would put most Windows desktops to shame.
The configurations possible from the CompizConfig Settings Manager are bewildering and it has taken me several hours to get to grips with just the basic settings. However, the result is a multi-workspace environment, each with its own background and all accessible using either mouse or keyboard.
To install Compiz on Ubuntu, open a terminal and type:
sudo apt-get install compiz compizconfig-settings-manager compiz-fusion-plugins-extra compiz-fusion-plugins-main compiz-pluginsYou may also want the Simple CompizConfig Settings Manager!
sudo apt-get install simple-ccsmThen, makes sure that the Enhanced features are enabled in the Appearance dialog (System > Preferences > Appearance > Visual Effects). Once done, you'll find the Config Settings Manager under the System > Preferences menu.
Whilst the interface is not particularly intuitive, it is worth persevering. Setting wallpaper and animating the cube will test your patience, but there is help on the Compiz Wiki pages.
Sources & References:
Compiz Home
Compiz Fusion Ubuntu Documentation
Subscribe to:
Posts (Atom)